OAD Ultrafidelity CP1 Owner'S Manual Download Page 4

2

Identification of Connections & Controls   


      REAR PANEL

1 AC MAINS INPUT

• 

The CP1 comes supplied with a detachable mains power cord. Connect corresponding end of the 

mains power cord to the AC mains input of CP1 and the plug connected to a mains power source.

•  Always disconnect the mains power plug from the mains power source first, before disconnecting the 

cable from the CP1’s AC Mains input socket.
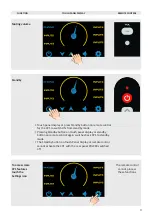
2 POWER SWITCH

• 

Supplies the AC mains power to the CP1.

•  When the POWER switch is set to ON (1) position, the CP1 will run through its boot up procedure and 

within 30 sec will be ready to play.

•  If you do not intend to use the CP1 for long periods of time (such as when on holidays), switch off (0) 

the POWER switch. With POWER switched off, neither the front touch panel display (Standby) button 

nor the remote control’s power button can activate the CP1.

3 FUSE HOLDER

•  Your CP1 is fitted with a fuse. If it needs to be replaced you must use the same type and rating. Installing 

an incorrect fuse may cause damage and this will void the warranty of your CP1.

4 AUDIO OUT

•  The main outputs that connects the CP1 to the corresponding audio inputs of external power amplifiers.

5 AUDIO IN

•  Use single-ended analog audio input for sources (CD Player, tuner, DAC or other applicable devices).

•  If your CP1 has the optional PHONO card installed then connect the twin RCA lead from your turntable 

to  INPUT 1.

6 PHONO GROUND CONNECTOR

• 

Turntables normally include a single wire earth lead. Use the CP1 phono ground connector to connect    

this lead. Unscrew the terminal to connect the earth lead. Tighten the terminal to secure the lead.

7 & 8 PHONO DIP SWITCHES

•  Adjust switches to suit your type of MM cartridge, gain level and parallel capacitance. See pages 8 & 9.

WARNING


SHOCK HAZARD 

DO NOT OPEN

!

SERIAL No.

Open Audio Designs

M E L B O U R N E   A U S T R A L I A

O P E N A U D I O D E S I G N S . C O M

PLEASE READ THE MANUAL BEFORE USE

AC IN

  INPUTS     

  OUTPUTS      

L

R

1

2

3

4

5

6

MAIN

PHONO

PHONO

4 3 2 1

8 7 6 5 4 3 2 1

MM | 330pF | 220pF | 100pF

G | MM | 330pF | 220pF | 100pF

GAIN | MM | CAPACITIVE LOADING SETTINGS

TO PREVENT FIRE AND SHOCK HAZARD

DO NOT EXPOSE THIS DEVICE TO RAIN 

OR MOISTURE.

DO NOT OPERATE WITH COVER REMOVED.

CAUTION

FOR PROTECTION AGAINST FIRE 

HAZARD REPLACE FUSE WITH SAME 

TYPE AND RATING ONLY

WARNING

THIS UNIT MUST BE EARTHED

2

3

4

7

8

6

1

5

Summary of Contents for CP1

Page 1: ...Owner s Manual OAD Ultrafidelity CP1 Stereo Control Preamplifier ...

Page 2: ...ctions Controls 2 3 Navigating the CP1 features and making changes 3 4 5 6 7 Line Stage Specifications 7 Warranty 7 CP1 with Phono Card installed 8 Phono Specifications 8 Adjustment of Switches 8 Gain Setting G 8 Moving Coil Settings 9 Moving Magnet Settings 9 Moving Magnet Parallel Capacitance Settings 9 Contents ...

Page 3: ...does not disconnect all power from this unit This unit is in standby mode when not on For continued protection against fire hazard replace the fuse only with the same type and rating see page 8 for fuse information Your hi fi system including the CP1 can be damaged by lightning and should be turned off and disconnected from the mains when there is risk of lightning strike We recommend that all con...

Page 4: ...AUDIO OUT ThemainoutputsthatconnectstheCP1tothecorrespondingaudioinputsofexternalpoweramplifiers 5 AUDIO IN Use single ended analog audio input for sources CD Player tuner DAC or other applicable devices If your CP1 has the optional PHONO card installed then connect the twin RCA lead from your turntable to INPUT 1 6 PHONO GROUND CONNECTOR Turntables normally include a single wire earth lead Use th...

Page 5: ... source name on the display The selected source will change colour to blue MAIN HOME SCREEN Increasing or decreasing Volume Use the CP1 remote control or touch panel display icons to select sources and to navigate through the CP1 features and access to other functions Note Images show CP1 with optional phono card installed Navigating the CP1 features and making changes Touch Panel Display Infrared...

Page 6: ... standby mode Pressing Standby button on touch panel display or standby button on remote control again switches back CP1 to standby mode The Standby button on Touch Panel Display or remote control cannot activate the CP1 with the rear panel POWER switched off To access more CP1 features touch the Settings icon The remote control cannot process these functions ...

Page 7: ...d selection to be changed and then pressing the button on the remote control Successful learning will result in a green button to the right of the selection The CP1 will not allow 2 identical codes to be learned and will result in a red button next to the selection Image at right shows a successful learning for Volume Up button Touch on the green back arrow to return to the main home screen Displa...

Page 8: ...tness or for less brightness Once set just touch on the green back arrow to return to the Settings menu Volume Balance Control To access the balance settings touch on the balance button as shown Balance Control The Left Channel Right Channel balance can be adjusted over a 12dB range in 0 5dB steps To adjust balance touch the R to increase right channel volume relative to left channel and L to incr...

Page 9: ...m 9 25 x 22 44 x 19 68 Mains Supply 110 120V or 220 240V 50 60Hz Warranty OAD Ultrafidelity products are covered by a 3 Year Limited Warranty This Limited Warranty initiates from the date of purchase and is limited to the original purchaser Outside Australia the authorized importing retailer or distributor has accepted the responsibility for warranty of OAD Ultrafidelity products sold by them The ...

Page 10: ...tation of how the two pairs of switches can be adjusted Switches 6 7 8 of DIP switch on the right have no effect and should be ignored The phono card ships from the factory with a default setting of moving coil at 100 ohms with a gain of 71 dB In order to set the switches for your particular cartridge you will need to have some knowledge of its specifications If you do not have that cartridge info...

Page 11: ...ed value of 100pF You may select any switch or number of switches the values are additive The range of values available is 100pF 750pF The correct value is that which gives the best overall tonal balance Typically if the cartridge sounds too bright then more capacitive loading is required Set switches 1 2 3 of both left and right DIP switches to the same positions when setting the parallel capacit...

Page 12: ...OAD ultrafidelity www openaudiodesigns com ...

Reviews: