OAD Ultrafidelity CP1 Owner'S Manual Download Page 11

9

Depending on the output voltage of your MC cartridge, you may need to adjust DIP switch 5 (G). Up will 

set the phono card to 71dB and down will set the gain to 61dB. For most MC cartridges, the higher gain 

setting will be necessary to achieve normal listening levels.

Moving Magnet setup.

For MM cartridges, switch 4 of both DIP switches are set to down for ‘on’.

It will be impossible to give suggestions for correct capacitance with any given cartridge, due to the huge 

variation in capacitance of turntable cables. The optimal value is selected by listening.

There are three capacitive loading switches with values of 100pF, 220pF and 330pF. These are in addition 

to a fixed value of 100pF. You may select any switch or number of switches; the values are additive. The 

range of values available is 100pF – 750pF. The correct value is that which gives the best overall tonal 

balance. Typically, if the cartridge sounds too bright, then more capacitive loading is required. Set switches 

1,2 & 3 of both left and right DIP switches to the same positions when setting the parallel capacitance. For 

most MM cartridges, the lower gain of 35dB will be the preferred setting. 

Resistive loading for moving magnet is fixed at 47kOhm. If you require something other than 47kOhm, 

please contact the OAD factory.

Do not set the preamp so that it enhances one recording only. Listen to a variety of material and adjust 

accordingly.

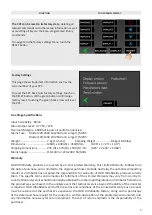
Moving Magnet Parallel Capacitance Settings.

100pF

200pF

320pF

430pF

530pF

420pF

650pF

750pF

MM  330pF 220pF 100pF

G  MM   330pF 220pF 100pF

Summary of Contents for CP1

Page 1: ...Owner s Manual OAD Ultrafidelity CP1 Stereo Control Preamplifier ...

Page 2: ...ctions Controls 2 3 Navigating the CP1 features and making changes 3 4 5 6 7 Line Stage Specifications 7 Warranty 7 CP1 with Phono Card installed 8 Phono Specifications 8 Adjustment of Switches 8 Gain Setting G 8 Moving Coil Settings 9 Moving Magnet Settings 9 Moving Magnet Parallel Capacitance Settings 9 Contents ...

Page 3: ...does not disconnect all power from this unit This unit is in standby mode when not on For continued protection against fire hazard replace the fuse only with the same type and rating see page 8 for fuse information Your hi fi system including the CP1 can be damaged by lightning and should be turned off and disconnected from the mains when there is risk of lightning strike We recommend that all con...

Page 4: ...AUDIO OUT ThemainoutputsthatconnectstheCP1tothecorrespondingaudioinputsofexternalpoweramplifiers 5 AUDIO IN Use single ended analog audio input for sources CD Player tuner DAC or other applicable devices If your CP1 has the optional PHONO card installed then connect the twin RCA lead from your turntable to INPUT 1 6 PHONO GROUND CONNECTOR Turntables normally include a single wire earth lead Use th...

Page 5: ... source name on the display The selected source will change colour to blue MAIN HOME SCREEN Increasing or decreasing Volume Use the CP1 remote control or touch panel display icons to select sources and to navigate through the CP1 features and access to other functions Note Images show CP1 with optional phono card installed Navigating the CP1 features and making changes Touch Panel Display Infrared...

Page 6: ... standby mode Pressing Standby button on touch panel display or standby button on remote control again switches back CP1 to standby mode The Standby button on Touch Panel Display or remote control cannot activate the CP1 with the rear panel POWER switched off To access more CP1 features touch the Settings icon The remote control cannot process these functions ...

Page 7: ...d selection to be changed and then pressing the button on the remote control Successful learning will result in a green button to the right of the selection The CP1 will not allow 2 identical codes to be learned and will result in a red button next to the selection Image at right shows a successful learning for Volume Up button Touch on the green back arrow to return to the main home screen Displa...

Page 8: ...tness or for less brightness Once set just touch on the green back arrow to return to the Settings menu Volume Balance Control To access the balance settings touch on the balance button as shown Balance Control The Left Channel Right Channel balance can be adjusted over a 12dB range in 0 5dB steps To adjust balance touch the R to increase right channel volume relative to left channel and L to incr...

Page 9: ...m 9 25 x 22 44 x 19 68 Mains Supply 110 120V or 220 240V 50 60Hz Warranty OAD Ultrafidelity products are covered by a 3 Year Limited Warranty This Limited Warranty initiates from the date of purchase and is limited to the original purchaser Outside Australia the authorized importing retailer or distributor has accepted the responsibility for warranty of OAD Ultrafidelity products sold by them The ...

Page 10: ...tation of how the two pairs of switches can be adjusted Switches 6 7 8 of DIP switch on the right have no effect and should be ignored The phono card ships from the factory with a default setting of moving coil at 100 ohms with a gain of 71 dB In order to set the switches for your particular cartridge you will need to have some knowledge of its specifications If you do not have that cartridge info...

Page 11: ...ed value of 100pF You may select any switch or number of switches the values are additive The range of values available is 100pF 750pF The correct value is that which gives the best overall tonal balance Typically if the cartridge sounds too bright then more capacitive loading is required Set switches 1 2 3 of both left and right DIP switches to the same positions when setting the parallel capacit...

Page 12: ...OAD ultrafidelity www openaudiodesigns com ...

Reviews: