Nytech ND-4000 Manual Download Page 37

- 37 -

Bulb Photography

This mode is used for taking subjects that require several seconds to photograph such as firework displays at night.

When using this mode, be sure to use a tripod to keep the camera stable and prevent distortion of images.

Set the mode dial to the 

 mode.

Press the 

ENTER 

button.

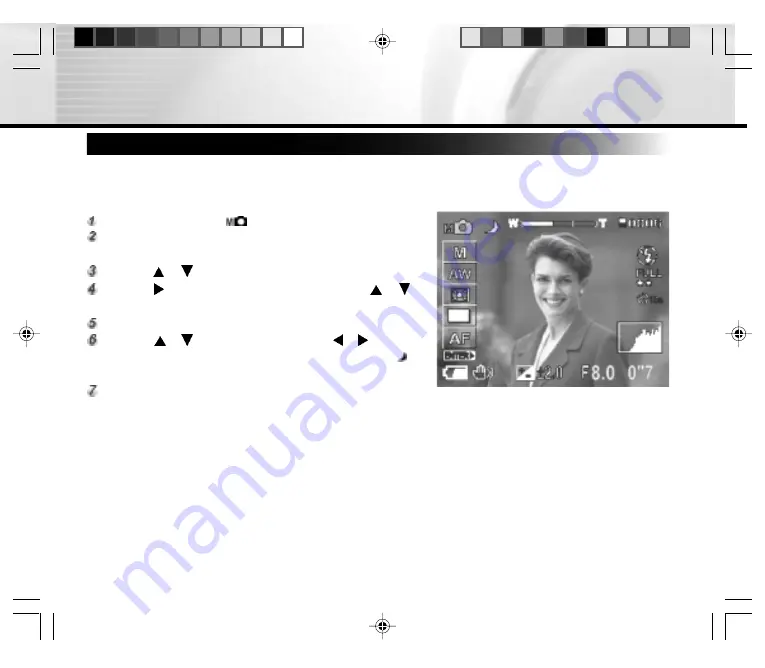
The manual setting items are displayed.

Press the 

 or 

 button to select 

EXP.

.

Press the   button to display option menu, press the 

 or 

button to select 

or 

Tv 

and press the 

ENTER 

button.

Press the 

ENTER 

button.

Press the 

 or 

 button (in 

Tv 

mode) or the   or   button (in 

M

mode) to adjust the shutter speed to 0.7 second or longer,   icon

is displayed on the LCD monitor.

Compose the picture and press the shutter button.

The camera takes the picture at the set exposure time.

During the exposure, the viewfinder lamp turns orange. It takes about twice the set time to complete taking the

photograph due to processing of the captured image.

Note

:

* Flash photography and burst photography are not possible.

* The image taken in the bulb photography mode may be blurred.

Summary of Contents for ND-4000

Page 1: ...1 ENGLISH ENGLISH ENGLISH ENGLISH ENGLISH Nytech ND 4000...

Page 2: ...ered trademarks of Microsoft Corporation l Pentium is a registered trademark of Intel Corporation l Macintosh is a trademark of Apple Computer Inc l SD is a trademark l Other names and products may be...

Page 3: ...lightly different product inclusions and accessories to suit their market requirements customer demographics and geographical preferences Products very often vary between retailers especially with acc...

Page 4: ...n electrical shock Do not touch the power plug during a thunderstorm if you are using the AC power adapter This may cause an electrical shock Do not use the camera if any foreign objects have entered...

Page 5: ...rom the power source if you are using an AC power adapter Unplug the adapter from the AC power outlet after you have disconnected the camera Failure to do so may result in an electrical shock Do not u...

Page 6: ...6...

Page 7: ...sing the Flash 27 Taking Photographs in a Variety of Modes SCENE Mode 28 Changing the Focus 29 Taking Pictures Manually 30 Manual Settings 31 Photography in the Program Mode 33 Photography in the Aper...

Page 8: ...D Monitor Display 55 In Photography Mode 55 In Playback Mode 55 Menu Options Recording Menu 56 Playback Menu 59 Setup Menu 60 Transferring Recorded Images Video Clips to Your Computer Step 1 Installin...

Page 9: ...power is turned off the images saved on the memory card are not erased In addition to still images you can record short videos using the movie function This camera can also serve as a PC camera which...

Page 10: ...you have the following items Common Product Components Digital Camera USB cable Video cable Software CD ROM User s Manual Camera Strap Common Optional Accessories Memory card Camera pouch AC power ad...

Page 11: ...11 Getting to Know the Camera Front View POWER Power switch Shutter button Mode dial Lens cover switch Self timer LED Flash Viewfinder Lens Lens cover...

Page 12: ...lock Tripod socket Zoom key LCD button Menu controller Rear View MENU Menu button Viewfinder LED Optical viewfinder LCD monitor Erase button Self timer button Flash button MENU controller ENTER button...

Page 13: ...r images to a computer Playback mode Use this mode to view your images video clips Slide show or thumbnail display for recorded images is also available in this mode Record mode Use this mode to take...

Page 14: ...tic exposure setting Mode dial setting Manual record mode Bulb photography Zoom state Possible number of shots Flash state Size Quality Self timer Auto focus area Histogram Shutter speed Aperture Expo...

Page 15: ...vie mode Mode dial setting Zoom state Possible photographic time Size Quality Self timer Date Time Focus mode Battery condition Playback mode Mode dial setting Photography number Date Battery conditio...

Page 16: ...the battery cover lock in the direction of the Lock arrow 2 Getting Started You can use either 4 AA size batteries Alkaline Ni MH or an AC power adapter optional accessory to power the camera Battery...

Page 17: ...ng batteries in extremely cold environments as low temperatures can shorten the battery life and reduce camera performance Using an AC Power Adapter optional accessory Make sure the camera is turned o...

Page 18: ...can go with the memory card electrodes metal contacts facing the front of the camera If the card cannot be inserted check the orientation Close the battery cover and move the battery cover lock in the...

Page 19: ...p through the strap eyelet on the camera Pull the large loop through the small loop until the strap is firmly secured Attaching the Hand Strap To prevent accidental dropping of the camera always use t...

Page 20: ...ia e mail or the Internet To change image resolution size and quality as follows In the or mode Press the MENU button Press the button until the QUALITY is highlighted and press the button LCD monitor...

Page 21: ...tton The size item is highlighted Press the or button to select the size setting users desired to set and press the ENTER button The quality item is highlighted Press the or button to select the quali...

Page 22: ...52 978 1957 Quality Mode Compression Ratio Image Size Frame Size Photography Time secs 1 10 FULL 16 KB 30 FINE 1 7 HALF 6 KB 90 1 14 FULL 11 KB 45 NORMAL 1 10 HALF 4 5 KB 120 1 19 FULL 8 KB 60 Movie I...

Page 23: ...ery consumption Using the Viewfinder Make sure that the SD memory card is correctly loaded Slide the lens cover switch to position Turn the camera on by sliding the POWER switch Set the mode dial to t...

Page 24: ...ease battery longevity turn the LCD monitor off and use the viewfinder instead Using the Optical Zoom The lens moves during the zoom photography Zoom photography allows you to take telephoto and wide...

Page 25: ...s the ENTER button d Press the MENU button e To activate the digital zoom press the zoom key on the T button completely and hold it until the image on the LCD monitor expands Press the shutter button...

Page 26: ...button the following are displayed in order on the LCD monitor No display setting OFF 10 seconds 2 seconds Compose the scene Press the shutter button The self timer function is activated The photograp...

Page 27: ...is mode for general photography Red eye Forced Flash The flash emits a precursor flash before the main flash fires This causes the pupil in the human eye to constrict reducing the red eye phenomenon S...

Page 28: ...utton to display option menu press the or button to select the desired option and press the ENTER button Pressing the ENTER button selects the setting To cancel press the button Automatically adjusts...

Page 29: ...intervals 7 5 frames second The 16 photographed images are saved as on image FULL size 2400 x 1600 pixels This mode is effective for continuously photographing moving subjects Changing the Focus Set t...

Page 30: ...d Press the or button to select the setting item Press the button to display option menu press the or button to select the desired setting and press the ENTER button Pressing the ENTER button selects...

Page 31: ...hite Balance W B The camera determines the white balance by averaging the various kinds of lights that actually enters the lens A user can set in advance the white balance when taking photographs unde...

Page 32: ...vironment Single Continuous or AEB Photography Mode S C 1 shot mode Burst mode In this mode photographs are taken continuously at a maximum speed of 0 8 second intervals The maximum number of photogra...

Page 33: ...to change the white balance and the metering system in program mode Set the mode dial to the mode Press the ENTER button The manual setting items are displayed Press the or button to select EXP Press...

Page 34: ...l to the mode Press the ENTER button The manual setting items are displayed Press the or button to select EXP Press the button to display option menu press the or button to select Av and press the ENT...

Page 35: ...ress the or button to select EXP Press the button to display option menu press the or button to select Tv and press the ENTER button Press the ENTER button Press the or button to adjust the shutter va...

Page 36: ...s the or button to set the shutter speed value separately are also possible Compose the picture and press the shutter button Note When pressing the or button in the full manual mode the shutter speed...

Page 37: ...he or button to select M or Tv and press the ENTER button Press the ENTER button Press the or button in Tv mode or the or button in M mode to adjust the shutter speed to 0 7 second or longer icon is d...

Page 38: ...e mode dial to the mode Press the ENTER button The manual setting items are displayed Press the or button to select S C Press the button to display option menu press the or button to select AEB and pr...

Page 39: ...the ENTER button The camera is ready to take photographs Compose the picture and press the shutter button The maximum number of photography that can be taken continuously is three If you release the...

Page 40: ...em cannot be selected if there is not enough space on the SD memory card This setting is for erasing all images Press the ENTER button Press the button to select and press the ENTER button The image i...

Page 41: ...the picture Press the shutter button to start recording a video clip To stop recording press the shutter button again Note Flash photography is not possible The image size is displayed on the LCD mon...

Page 42: ...r button to move forward and reverse The button to advance to next frame and the button to go back one frame Press the ENTER button nine images are displayed simultaneously Note Images can be rotated...

Page 43: ...ach press of the button feeds the image in reverse by one frame 1 frame feed is continued for the duration the button is held down Pause Canceling pause Playback Stop The display returns to start of t...

Page 44: ...same time which can quickly search for the image that you want Set the mode dial to the mode Press the ENTER button Nine images are displayed simultaneously Press the or button to select the image to...

Page 45: ...or The white frame indicates the entire image while the green frame shows the location of the currently enlarged area Press the or button to select the area to enlarge To return to regular display pre...

Page 46: ...o the mode Press the MENU button The playback menu is displayed Press the or button to select SLIDE SHOW and press the button The slideshow starts and the icon is displayed on the LCD monitor You can...

Page 47: ...rase one image at a time Set the mode dial to the or mode When the mode is selected press the or button to select the image to be erased When the or mode is selected only the last recorded image can b...

Page 48: ...eing played back In or mode Folder of images currently being photographed Set the mode dial to the or mode Set the mode dial to the type of folder you want to erase Press the button for two seconds Pr...

Page 49: ...ard cannot be formatted if it write protected Set the mode dial to the or mode Press the button for two seconds Press the or button to select and press the ENTER button To cancel formatting select and...

Page 50: ...rotected Set the mode dial to the mode Press the MENU button Press the or button to select RESIZE and press the button The RESIZE menu is displayed Press the or button to select the image and press th...

Page 51: ...e resized when the SD memory card is write protected Set the mode dial to the mode Press the MENU button Press the or button to select QUALITY and press the button The QUALITY menu is displayed Press...

Page 52: ...read the embedded information on the memory card and print the specified images Set the mode dial to the mode Press the MENU button Press the or button to select DPOF and press the button Press the or...

Page 53: ...POF file select CANCEL and press the ENTER button To end the setting press the or button to select END and press the ENTER button To cancel confirmation proceed to Step 9 Select the desired operation...

Page 54: ...utton This fixes the image to be protected and icon is displayed under the image To cancel the selection press the ENTER button Press the or button to select EXECUTE and press the ENTER button Select...

Page 55: ...LCD monitor off Note In the movie mode and the macro photography mode the LCD monitor cannot be turned off In Playback Mode Press the or button to select image Each press of the DISP button switches...

Page 56: ...porarily view the image on the LCD monitor as soon as you take a picture OFF Do not display preview ON Display preview Choose the desired selection by using the or button and press the ENTER button No...

Page 57: ...ailable in the mode SHARPNESS Set the level of the image sharpness NORMAL Leave the image detail as captured SOFT Soften the edge of the image detail for the special effects HARD Sharpen the edge of t...

Page 58: ...utton and press the ENTER button LCD Adjust the brightness of the LCD monitor 5 5 Choose the desired selection by using the or button and press the ENTER button QUALITY Set the size number of pixels a...

Page 59: ...OW Refer to section in this manual titled Slideshow Display for further detail RESIZE Refer to section in this manual titled Reducing the Image Size Resize for further detail QUALITY Refer to section...

Page 60: ...e Auto Power Off has been executed slide the POWER switch to turn on the camera s power 1 MINUTE If no operation is carried out for 1 minute Auto Power Off is activated 2 MINUTES If no operation is ca...

Page 61: ...tion by using the or button and press the ENTER button TIME DATE Set the date and time Press the or button to select the item to set and press the or button to set the value for each item Press the EN...

Page 62: ...etail FRAME NUMBER Set whether or not to reset the image number when you take photographs EXECUTE Reset the image number CANCEL Does not reset the image number Press the or button to select EXECUTE an...

Page 63: ...Connecting the camera to your computer Step 3 Downloading images video clips System Requirements Windows Pentium 166 MHz or higher Windows 98 98SE Me 2000 XP 32MB 64MB RAM recommended 128 MB hard disk...

Page 64: ...r Step 2 Connecting the Camera to Your Computer Set the mode dial to the mode Connect one end of the USB cable to an available USB port on your computer Connect the other end of the USB cable to the U...

Page 65: ...by double clicking on it Double click on the folder Your images are inside the folder s Select the images that you want then choose Copy from the Edit menu Open the destination location and choose Pa...

Page 66: ...lay Shutter speed 1 2 to 1 1000 sec mechanical shutter Recording medium SD memory card Compression system JPEG compliant Image file format EXIF ver 2 1 AVI Effective Flash Range 0 5m to 2 9m WIDE ISO...

Reviews: