


www.nxp.com
SETTING UP THE SYSTEM
CONTINUED
3
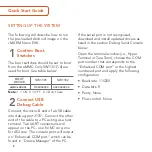
Connect HDMI
Display
The MIPI-DSI to HDMI accessory card and
mini SAS cable are needed for evaluating
HDMI.
Connect the mini-SAS cable to J801
on the EVK (MIPI DSI Connector) and
connect the other end to J5 on the MIPI
to HDMI accessory card. Connect an
HDMI cable to J2 (HDMI port) on the MIPI
to HDMI accessory card and connect the
other end to a HDMI display panel.
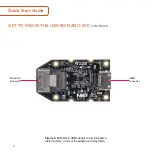
Figure 4: Mini-SAS cable connected to the mini-
SAS connector (J5) on the MIPI-DSI to HDMI
accessory board.
Note:
Color may differ
4
Connect
Mouse
Connect the mouse to J301 (USB Type-C
Port1) through the USB Type-C to A
adapter.
5
Connect Power
Supply
Connect the USB Type-C plug of the
Power Supply to J302 (USB Type-C Port2),
then power up the board using switch
SW101.
Use only J302 for power delivery to the
board.
6
Board Boot
Up
As the board boots up, you will see 4
penguins appear in the upper left-hand
corner of the monitor, and then you will
see the Android logo, then the Android
desktop. Congratulations, you are up and
running.
9