MENU
BAND
OK
A/B
DISP
NV-T2DAB
Dual AM/FM Tuner
STANDBY
RADIO DATA SYSTEM
AM 550
FM 103.5
Ticket To Ride
P103
P104
ST
1
4
5
6
7
8
9
10
12
13 14
2
3
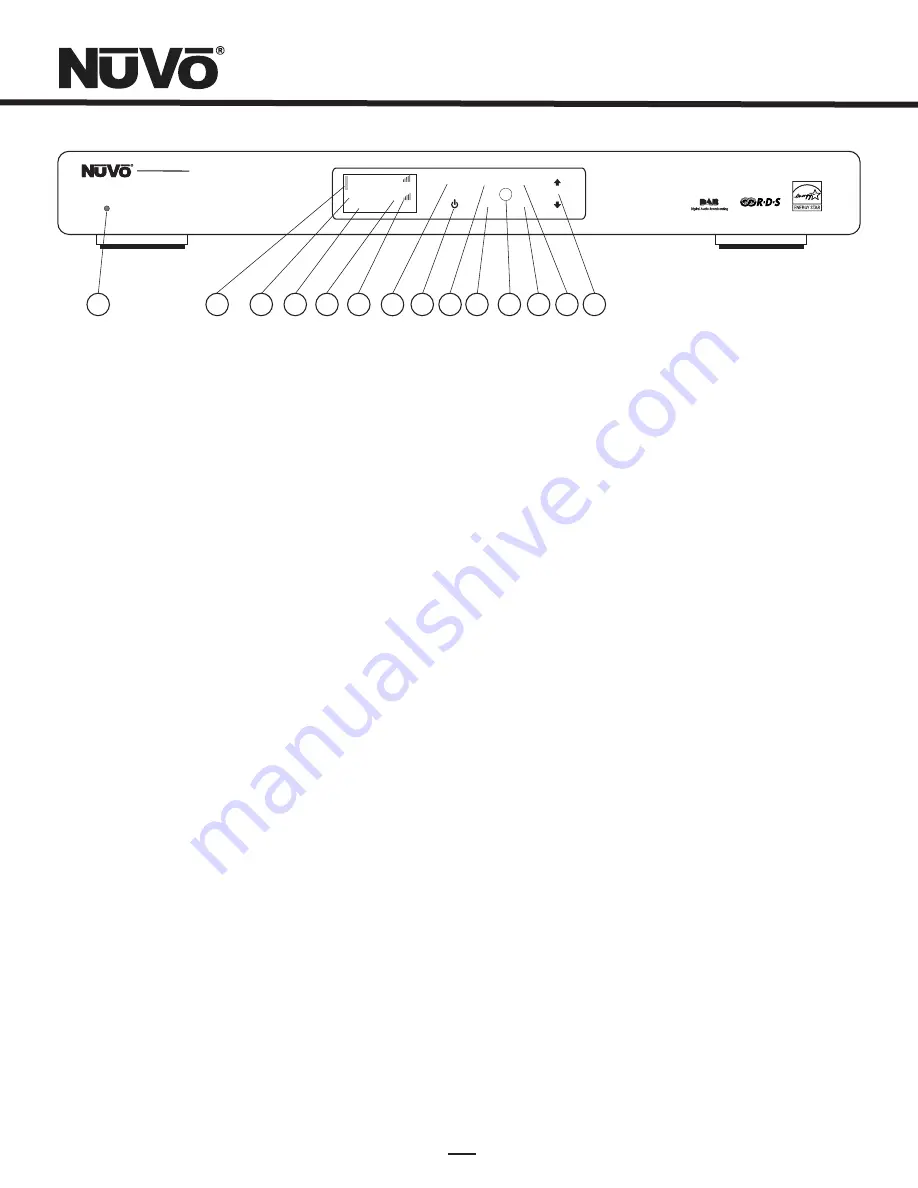
Front Panel Features
1. Standby:
This blue LED will light when the T2DAB is plugged into an AC power outlet.
2. Tuner Highlight:
This highlight bar shifts between the tuner A and B display to indicate which tuner is being controlled.
3. Broadcast Band Display:
This line of the front panel display shows the selected broadcast band and frequency. The bands
available are FM and DAB.
4. Metadata Display:
This line of the display scrolls RDS, Radio Data Service, information for FM broadcast and metadata
associated with DAB ensembles and channels.
5. Preset Number:
The T2DAB features up to 5 banks of 20 presets each. This indicates the number of the preset bank of the
selected preset.
6. Antenna Signal:
The level of signal level is indicated with up to five bars, five being the best. When listening to FM, full stereo
reception is indicated with an abbreviated ST.
7. Menu:
This capacitive touch panel allows front access to the T2DAB's controls as well as preset listening selections and
tuning parameters.
8. Power:
This button turns the power for the front panel off when tapped, and causes a soft reboot of the operating system when
it is held for 3 seconds.
9. A/B:
By tapping the A/B button, the highlighted tuner output control toggles between A
and B.
10. Band:
The Band button toggles between AM and FM listening.
11. IR Window:
The T2DAB can be controlled via IR through its front panel IR receiver.
12. OK:
Ok initiates a highlighted Menu choice.
13. Disp:
This button is only active for SIRIUS Satellite radio. It does not function on the T2DAB Tuner.
14. Up and Down Arrows:
These arrow buttons provide multiple functions depending on the mode of the tuner. In normal operation
they initiate tuning up and down through the selected band. When in menu mode they scroll up and
down through the menu choices.
4
11
Summary of Contents for NV-T2DAB
Page 1: ...NV T2DAB Dual AM FM Tuner Installation Guide...
Page 2: ......


