SMART POT EKO
User guide.
Please make sure to read this User Guide prior to using your unit.
Page 1: ...SMART POT EKO User guide Please make sure to read this User Guide prior to using your unit...
Page 2: ...tall and remove float valve 24 Install and remove anti block shield 25 Install condensation collector 26 Remove and clean inner pot 27 Venting methods 29 Control panel details 31 Smart features 34 LED...
Page 3: ...yle than with this mighty appliance We are constantly working to create recipes that are EASY DELICIOUS NUTRITIOUS You can find these recipes online at nutricookworld com We can t wait to see how you...
Page 4: ...ilure to do so may result in property damage and or personal injury Follow Care maintenance instructions in this User guide to clean the cooker before cooking Do not remove safety warning stickers or...
Page 5: ...reduced physical sensory or mental capabilities or lack of experience and knowledge unless they have been given supervision or instruction concerning use of the appliance by a person responsible for...
Page 6: ...e the inner pot on a stable and heat resistant surface after removing from the cooker base DO NOT operate the cooker without the inner pot inserted into the cooker base NEVER pour food or liquid into...
Page 7: ...counter or touch hot surfaces The cord can get tangled or cause the appliance to fall Bring it to a qualified technician for examination repair or electrical and mechanical adjustment DO NOT operate...
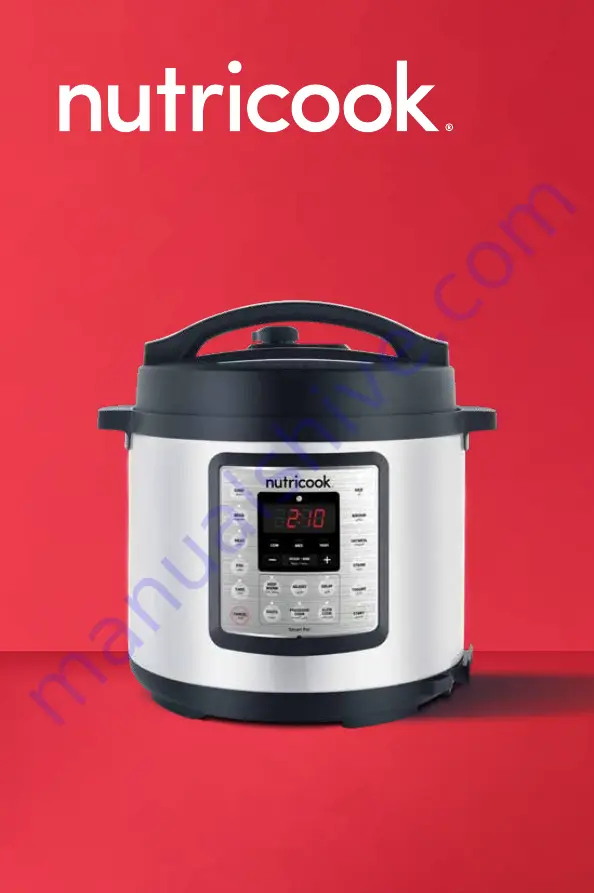
Page 8: ...IMENSION SMART POT EKO SP104 6 L 1000 W 220 240 V 50 60 Hz 5 4 kg 32 5x32 3x37 36 cm Product Specification 15 14 What s included 1000 WATT COOKER BASE STAINLESS STEEL COOKING POT STEAM RACK SOUP SPOON...
Page 9: ...fer to actual product Seali ng Venting Cooker parts overview top of lid bottom of lid float valve lid handle lid marker sealing ring rack sealing ring float valve silicone cap anti block shield lockin...
Page 10: ...Find delicious recipes online at nutricookworld com nutricookworld Getting started 19 18...
Page 11: ...luminated when the lid is not properly locked Install and remove sealing ring Install Place the sealing ring inside the sealing ring rack and press into place Ensure entire sealing is snug behind seal...
Page 12: ...urn lid over On the bottom of lid attach the silicone cap to the float valve Note The float valve and silicone cap must be installed in the lid before operating your cooker Warning Never touch the flo...
Page 13: ...way from cooker base Do not pull down to avoid any damage Install and remove anti block shield The anti block shield safely prevents food from entering the pressure release hole to avoid blockage and...
Page 14: ...he pressure release valve when it is letting out steam Do not cover the pressure release valve with a rag or cloth while steam is being released Venting Sealing Venting Sealing hot surface sealing ven...
Page 15: ...down This may take 10 to 15 minutes or even longer depending on the amount of food inside your cooker After cooking is finished cooker will be in Auto Keep Warm mode if Auto Keep Warm function is on S...
Page 16: ...me adjustments can be made Smart features Time Controls Indicator light Adjust button Start button Delay button Unlock icon Use to increase cooking time Use to decrease cooking time Use Hour Min to se...
Page 17: ...Screen displays 06 00 as the default Delay time Note After pressing Delay you cannot go back to adjust the settings of the selected cooking program To make adjustments on the cooking program press CAN...
Page 18: ...press and hold the button of the Smart Cooking Program you wish to restore when the cooker is on standby mode until cooker beeps The default settings of the cooking program will go back to the origina...
Page 19: ...is highly recommended for first time users to do a test run This optional but recommended test run will complete in about 15 minutes 1 Open and remove lid 2 Remove the inner pot from the cooker base 3...
Page 20: ...he cooker base 3 Plug in cooker to a power outlet 4 Press Saut button 5 Press Saut button repeatedly to cycle through Low Med High modes for temperature options Alternatively use Adjust button to cycl...
Page 21: ...oup before serving Always use Natural Release method to release pressure when cooking soup with a high starch content Med Soup with meat High Rich bone broth Bean Low Firmer texture Natural release Ch...
Page 22: ...or safe use 1 Open and remove lid 2 Remove the inner pot from the cooker base 3 Add food including the liquid ingredients in the inner pot Note For pressure cooking programs do not fill the inner pot...
Page 23: ...es while venting pressure to avoid serious physical injury and property damage The Slow Cook program does not use pressure during the cooking process This program cooks similar to common slow cookers...
Page 24: ...Yogurt It involves two steps Pasteurizing Milk and Culturing Yogurt Yogurt Cooking Program Cooking Modes Suggested Use Notes Yogurt Low Lower temperature fermentation Milk must reach a minimum of 72 C...
Page 25: ...Dry all parts thoroughly after cleaning before using or before storing your cooker Make sure that no water enters your cooker s housing or the control panel Make sure that all parts and surfaces are c...
Page 26: ...up position Gently press the float valve downward using a long utensil Difficulty opening lid There is still pressure inside the cooker Release pressure by turning the pressure release valve in Ventin...
Page 27: ...mited warranty EXCLUSIONS AND LIMITATIONS This Nutricook Two Year Limited Warranty applies only to Nutricook products distributed by or for Nutricook that can be identified by the Nutricook trademark...
Page 28: ...emoved or defaced and or e if the product has been used with an adapter converter THIS LIMITED WARRANTY AND THE REMEDIES SET FORTH ABOVE ARE EXCLUSIVE AND IN LIEU OF ALL OTHER WARRANTIES REMEDIES AND...
Page 29: ...m All rights reserved Illustrations may differ from the actual product We are constantly striving to improve our products therefore the specifications contained herein are subject to change without no...