4
2
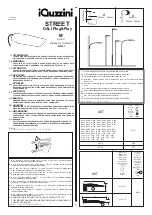
LUMINAIRE HOLE CUTTING TEMPLATE:
Two people are required to use the metal
template. A rotary tool with a 1/8” bit is
required to cut the luminaire hole.
3
4” WIDE HOUSING
4” WIDE HOUSING
2” WIDE HOUSING
2” WIDE HOUSING
6” WIDE HOUSING
6” WIDE HOUSING
5-3/4”
2-3/4”
3-3/4”
3/4”
3/4”
3/4”
3/4”
3/4”
3/4”
1-3/8”
1-3/8”
1-3/8”
1-5/16”
1-5/16”
1-5/16”
1-5/16”
1-5/16”
1-5/16”
ACCESS PLATE WITH
TWO 7/8” KNOCK-OUTS
OPTIONAL END KNOCK-OUT
(CONSULT FACTORY FOR ACCESS PLATE)
PLAN VIEW OF HOUSING BACK
ROW INSTALLATION - INDIVIDUAL INSTALLATION FOLLOW STEPS 1 THROUGH 7.
5
6
3
24”
2”
1
Snap a center line on the ceiling. Place the fi rst
drywall screw 2” in from the start of the row. Space
the screws 24” appart for the entire row length.
Make the fi rst cut at the start of row line. The cut
hole length will be 5/8” longer than the row.
Loosen the yoke screws, nearly fl ush with the
captive nut in yoke.
Make sure yoke legs
snap over ceiling.
Insert luminaire into
ceiling hole. Push
up on the yoke
bolts.
ROW LENGTH LINE
STAR
T LINE
STAR
T LINE
DO NOT DRIVE
THE SCREWS IN
COMPLETELY
MARKS THE END OF A ROW.
DO NOT CUT THROUGH
TEMPLATE.
START OF ROW
MOUNTING YOKE