MAIN MENU
22
5.2.2 TOOLS
SYSTEM
ACCOUNT
LANGUAGE
ENGLISH
TOOLS
UPGRADE
SUBMIT
SYSTEM INFO
NETWORK UPGRADE
SUBMIT
BACKUP DATA
BACKUP CONFIG
SUBMIT
BACKUP LOG
RESTORE CONFIG
SUBMIT
EXIT
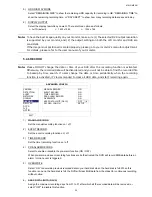
1) LANGUAGE
Select the language of the OSD.
2) UPGRADE
Save the upgrade files obtained from your installer or distributor in a compatible USB flash drive, and insert it
into the USB port at the front panel. Then, click “SUBMIT” to start upgrading.
Note:
Before using the USB flash drive, please use your PC to format the USB flash drive to FAT32 format
first. For the list of compatible USB flash drives, please refer to “APPENDIX 6 COMPATIBLE USB
FLASH DRIVE LIST” at page 72.
Note:
After upgrading firmware, it’s recommended to clear all HDD data for the system to work more
stably. Before clearing all HDD data, please remember to make video backup.
3) NETWORK
UPGRADE
Click “SUBMIT” for perform system upgrade via Internet.
Note:
This function requires Internet access. Please make sure your DVR is connected to Internet before
using this function.
4) BACKUP CONFIG / RESTORE CONFIG
To keep the current configurations after DVR upgrade, insert a compatible USB flash drive into the USB port,
and select “SUBMIT” in “BACKUP CONFIG” to copy the current DVR configurations to a file “System.bin”
and save to your USB flash drive.
To restore the DVR configurations, insert the USB flash drive including “System.bin” to the USB port, and
select “SUBMIT” in “RESTORE CONFIG”.

