background image


Page 3 of 4 


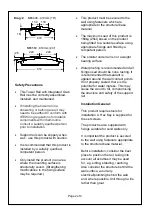
Tighten 
Set 
Screws 

DIAG: 5 


Wall 
Plug 

Set 
Screws 

Rail 
Socket 

Fixing 
Screw 

DIAG: 4 

DIAG: 3 

Wall 
Stem 

11 - IMPORTANT NOTE: Perform a final tighten 
and inspection of all fasteners.  

12 - Test the installation by vigorously pulling on 
the support rail. The rail should be rigid and 
stable. 

Care &Maintenance 

Inspect on a regular basis the stability and 
rigidity of the product, check all screws are 
tightened and in good condition 

Cleaning 

·

  Clean regularly, wiping down with a soft 

cloth and a mild detergent/disinfectant 
solution 

·

  Do not use abrasive cleaners 


7 - Place the rail back onto the wall 
stems. See diag. 4 

8 - Secure rail by tightening the set 
screws. See Diag 5 

9 - The rail will pull into the stems as the 
set screws are tightened. 

10 - The rail will fit best if placed as 
straight as possible over the wall stems. 
If the rail sockets do not easily fit onto 
the wall stems there is some movement 
possible with the oversized hole in the 
wall stems, the stems can be adjusted to 
accommodate the rail sockets. 

Installation Instructions: 

1 - Position the rail in the proposed area 
and mark accurately it's position, 
ensuring it is level. 

2 - Peel off the backing on the self 
adhesive washers attached to the wall 
stems (3 places)  

3 - Push the rail firmly against the wall.  

4 - Using the supplied hex-key, loosen 
all set screws in the rail sockets so the 
rail can be removed, leaving the threes 
wall stems attached to the wall 

5 - Mark the positions through the 
centre of the wall stems, remove the 
stems and drill three holes to the correct 
size. 

6 - Fit the wall plugs and fix the wall 
stems to the wall using appropriate 
fasteners and seal with suitable water 
proofing 


Summary of Contents for M66406

Page 1: ...s stylish Towel Rail with discreet Integrated Grab rail has been designed to compliment fittings in a contemporary bathroom and provide a sturdy grab rail to support and provide extra safety for the user it can be used on its own or part of a group of products which combine and compliment each other to provide a safer environment for the user Details of the other products in the range are shown on...

Page 2: ...s 160kg 25st based on the product being fitted to a suitable surface using appropriate fixings and fitted by a competent person The smaller under rail is not a weight bearing surface Waterproofing is recommended and all fixings used should be none rusting It is recommended that sealant is applied around the wall contact points If not properly sealed there is the potential for water ingress This ma...

Page 3: ...tightened 10 The rail will fit best if placed as straight as possible over the wall stems If the rail sockets do not easily fit onto the wall stems there is some movement possible with the oversized hole in the wall stems the stems can be adjusted to accommodate the rail sockets Installation Instructions 1 Position the rail in the proposed area and mark accurately it s position ensuring it is leve...

Page 4: ...ucts in our range of bathroom grab rails useful 2 In 1 Soap Dish with Integrated Grab Rail Code M66388 2 In1 Toilet Roll Holder with Integrated Grab Rail Code M66399 2 In 1 Corner Shelf with Integrated Grab Rail Code M66376 IMPORTANT For information on how to obtain the User Instructions in other languages and formats for use by people with visual reading or cognitive impairments please contact in...

Reviews: