background image

TagTemp- NFC 


NOVUS AUTOMATION 

8/9


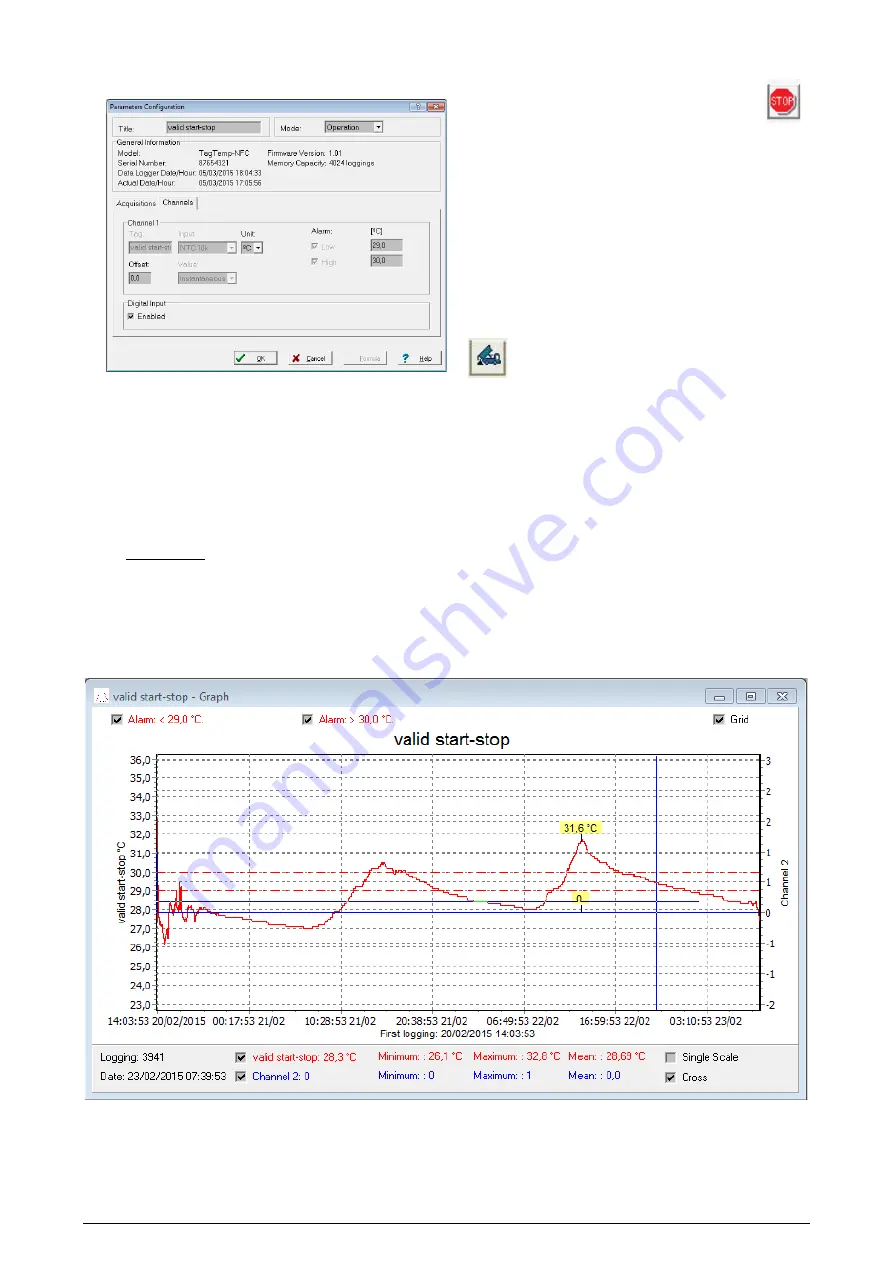
4-  Channels: Displays other parameters related to temperature 

measurement: 


Fig. 24 – Configuration Parameters screen


Unit: Defines the unit of the value measured: ºC  or  ºF  for 

channel 1 (temperature). 
Value:  Define  the  recorded value  will be the  instantaneous 

value, i.e., the stored value  is equal to the  measured value. 

Measurement  occurs at the end  of the  defined interval. The 

minimum interval between records is 1 minute.  
Offset: Makes possible to correct the value logged. 
Alarm: Defines limit values that, when exceeded, characterize 

an  alarm condition. Alarm events are informed to the user 

through a flashing mode of the Alarm Indicator

After filling all the fields select “OK” and settings will be sent to the 

equipment. 

Stop Button 

The stop button is enable with a fully configured device. 

The Stop button allows stop records permanently, so that the device 

will only register again after a new configuration by the user. 


6.4


Offloading and data visualization 

Data collected are send from equipment to PC. Data can be collected 

any time, at the end of the acquisition process or while they are being 

acquired. If data collection takes place during the acquisition 

process, the process will not be interrupted, following the equipment 

configuration. 
It is important to "wake up" the equipment before starting 

communication. 

6.5


Offloading data 

Data offload is accomplished by clicking the button Offload Data


During data transference, a status bar indicates remaining data to be 

transferred. Data offloading time is proportional to the number of 

readings logged. 

6.6


Visualizing data 

At the end of values transfer, data can be displayed in a graphical 

form. 
6.6.1


Chart Window 

It is possible to select a region of the chart to zoom in. Zoom 

commands can be accessed through the View  menu or through 

zoom icons from the task bar. 
It is also possible to select an area from the chart to zoom in by 

clicking and dragging the mouse, thus creating a zoom region 

starting from the upper left corner on the chart area. 
The graphic curves can be vertically dragged with a right-click and 

dragging the mouse up and down. 


Fig. 25 - Visualizing Data screen

Summary of Contents for 8813700000

Page 1: ...he other way is to use a double sided adhesive tape on the back of the equipment avoiding placing it above the identification label In both cases the temperature sensor should be placed near the place where you want to measure the temperature Fig 01 Mounting holes on the TagTemp NFC 3 TECHNICAL DATA Measure Range Temperature 40 0 C to 70 0 C Accuracy 0 5 ºC 25 ºC 1 C max over the full measuring ra...

Page 2: ...lowed by a slow one beginning or ending of records If the LED is always off there are two possible reasons 1 The equipment is in low power mode 2 The battery is dead The LED flashing light is intentionally weak and can be difficult to be viewed in bright places 4 4 Button The S button on the front panel can be used to start and or stop the records depending on the configuration chosen To start the...

Page 3: ...takes a few seconds depending on the smartphone model The application has six screens 1 Status 2 Setup 3 Events 4 Data Visualization 5 Preferences 6 Manage Collects 5 2 1 Device Status Fig 04 Status Screen Last Recorded Value Displays the last recorded value performed by the TagTemp NFC Not necessarily the actual temperature Loggings Displays the basic information of the TagTemp NFC Log Interval D...

Page 4: ... digital input Digital Input Events Number of events occurred Last Event Indicates the time of the last event occurred Last State Indicates the state of the last event occurred Longest Period in ON Indicates the longest time that remained in ON state High Excursions Indicates when the measured value exceeds the upper limit specified First Occurrence Time and value of the first occurrence above the...

Page 5: ...nce as shown in Fig 10 Fig 11 and Fig 12 If there is no occurrences in the Digital input neither high or low Excursions messages appear in the Fig 13 Fig 14 and Fig 15 Fig 10 Digital Input Events Screen Fig 11 High Excursions Screen Fig 12 Low Excursions Screen Fig 13 Message for Events in the Digital Input screen for No event Fig 14 Message for High Excursions for No occurrences Fig 15 Message fo...

Page 6: ...ences screen Fig 18 Share Screen 5 2 5 Preference Settings Default share options The user can set the preferences screen according to the desired data received through sharing Keep downloaded data in smartphone Maintains files previously selected in the sharing options in a folder named LogChartNFCFiles in the internal memory of the smartphone Export Logs CSV Share a file in CSV format with all re...

Page 7: ...equipment In order to configure the device is necessary to place the TagTemp NFC over the NFC USB reader After the serial port is selected click on the button The Parameters Configuration screen is displayed In this screen the user can define the equipment operation mode and also obtains general information about the device Fig 23 Parameters Configuration screen Fields are 1 Title In this field th...

Page 8: ...zation Data collected are send from equipment to PC Data can be collected any time at the end of the acquisition process or while they are being acquired If data collection takes place during the acquisition process the process will not be interrupted following the equipment configuration It is important to wake up the equipment before starting communication 6 5 Offloading data Data offload is acc...

Page 9: ... displayed by pressing the icon Parameter Viewing Fig 27 General information 6 7 Exporting data Logged data can be exported to different file formats for further analysis To export access File Export or click the icon 6 8 Diagnostic Screen Battery Level Indicates the level of battery voltage When you observe that the battery level is low replace it immediately for proper device operation Device St...

Reviews: