


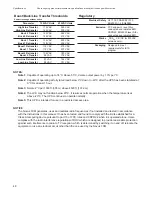


38
Communication
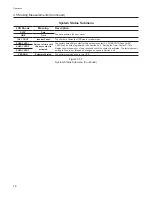
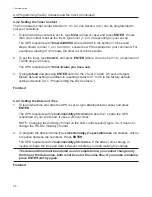
4.4.2 Setting the Timer Contact
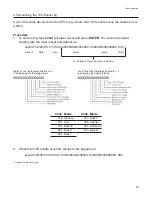
The front panel’s timer contact (Section 1.3.1; C4 and Section 4.4.1) can be programmed to
suit your conditions.
1. To learn what the contact is set to, type
timer
(all lower case) and press
ENTER
. If more
than one contact is set as the timer, type timer (1, 2 or 3) depending on your set up.
The UPS responds with
*timerX=XXXXX
where XXXXX is the setting in 0.5 second
steps, timerX is timer 1, 2 or 3 and the * shows the UPS responded to your command. For
example a reading of 120 shows the timer is set to 60 seconds.
2. To set the timer, type
timer=X
, and press
ENTER
(where X can be from 1 to a maximum of
14,400 steps (2 hours)).
The UPS responds with
*timer=(value you have set)
.
3. Typing
default
and pressing
ENTER
sets it to the 2 hour (14,400, 0.5 second steps)
factory default setting in addition to resetting contacts C1 to C5 to the factory default
settings (Section 4.4.1, “Programming the Dry Contacts.”)
Finished
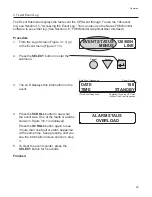
4.4.3 Setting the Date and Time
1. To learn what time and date the UPS is set to, type
clock
(all lower case) and press
ENTER
.
The UPS responds with
*clock=mm/dd/yy hh:mm:ss
where the * shows the UPS
responded to your command. It uses a 24-hour clock.
NOTE: Changing the mm/dd/yy format on the LCD control panel (Figure 3.4.1) does not
change the RS-232 mm/dd/yy format.
2. To program the date and time type
clock=mmddyy(1 space)hhmmss
(no slashes, colons
or spaces between the numbers). Press
ENTER
.
The UPS responds with *
clock=mm/dd/yy hh:mm:ss
. If the date or time change is
invalid, it shows the time and date it was set to before you tried making the change.
The date and time must be entered as one complete line; you cannot change only
the time or the date alone, both must be set at the same time. If you make a mistake,
press ENTER and try again.
Finished
4.4 Programming the Dry Contacts and the Clock (Continued)
Summary of Contents for 500
Page 2: ...Power Alpha Technologies ...


