background image

Using the Novell Client Tray Application

11

n

ov

do

cx (e

n)

  11
 Ju

ly 20

08

3

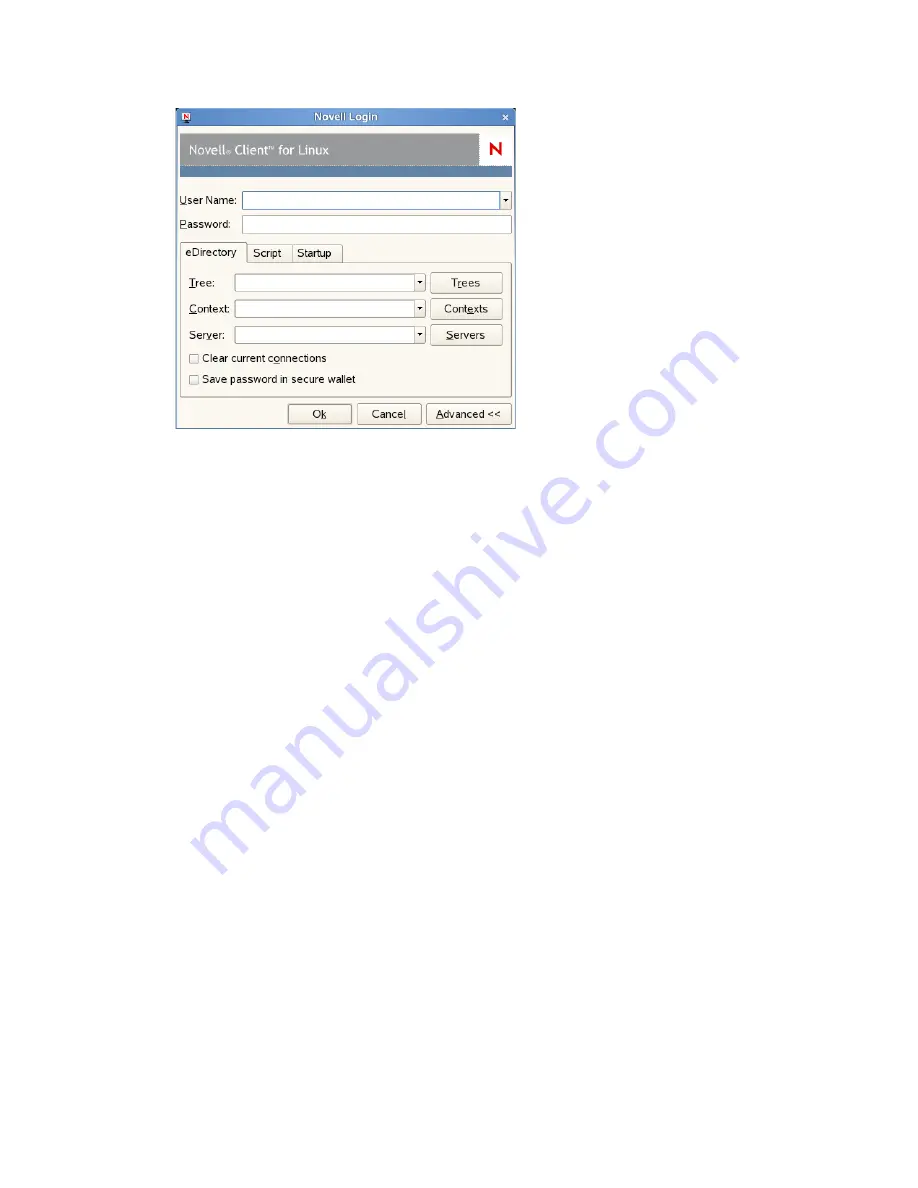
Specify the tree, context, and server information for the server you want to connect to. 
You can type a DNS name or an IP address for the server. See your network administrator for 
this information. 
If your network has SLP set up, you can browse a list of available trees, contexts, and servers 
by clicking their associated buttons. 

4

(Optional) To clear any existing connections to servers before logging in, select 

Clear current 

connections

5

(Optional) To store your eDirectory password in your desktop’s secure wallet program, select 

Save password in secure wallet

.

6

(Optional) To run login scripts during this login session, click the 

Script

 tab, then select the 

options needed to run the login scripts. 
For more information on login scripts, see 

Section 1.2.1, “Running Novell Login Scripts 

During Login,” on page 11

.

7

(Optional) To configure integrated login, click the 

Startup

 tab, make sure the 

Run Novell Client 

Login at Session Startup

 is selected (it is selected by default), then click 

Save profile after 

successful login

.

You must have the 

User Name

 and 

Password

 fields and the 

Tree

 and 

Context

 fields on the 

eDirectory

 tab filled out for this to be saved, and you must save your profile in order for an 

integrated login to happen at the next session startup.

8

Click 

OK

 to log in to the server specified in 

Step 3

.

1.2.1  Running Novell Login Scripts During Login 

When you successfully log in to the network, one or more login scripts are executed. Login scripts 
can be used to automatically map drives and search drives to directories, display messages, set 
environment variables, and execute programs or menus.

You can specify whether login scripts are run, whether the results are displayed, and whether the 
login window is automatically closed during login. In addition, if the login script uses the 

%2, %3, 

%4, or %5 variable

, you can set these variables by clicking the 

Variables

 button. 

Summary of Contents for CLIENT FOR LINUX 2.0 SP2 - 03-2009

Page 1: ...Novell www novell com novdocx en 11 July 2008 AUTHORIZED DOCUMENTATION Novell Client 2 0 SP2 for Linux User Guide ClientTM for Linux 2 0 SP2 March 2009 User guide...

Page 2: ...t or re export to entities on the current U S export exclusion lists or to any embargoed or terrorist countries as specified in the U S export laws You agree to not use deliverables for prohibited nuc...

Page 3: ...Trademarks For Novell trademarks see the Novell Trademark and Service Mark list http www novell com company legal trademarks tmlist html Third Party Materials All third party trademarks are the prope...

Page 4: ...novdocx en 11 July 2008...

Page 5: ...ies 13 1 7 Disconnecting a Mapped Directory 14 1 8 Editing Your Login Script 14 1 9 Configuring the Novell Client 15 1 10 Viewing Novell Client Version Information 15 2 Using Novell Utilities 17 2 1 A...

Page 6: ...6 Novell Client 2 0 SP2 for Linux User Guide novdocx en 11 July 2008...

Page 7: ...www novell com documentation feedback html and enter your comments there Documentation Updates For the latest version of this documentation see the Novell Client online documentation http www novell...

Page 8: ...8 Novell Client 2 0 SP2 for Linux User Guide novdocx en 11 July 2008...

Page 9: ...r information on installing the Novell Client for Linux see the Novell Client 2 0 SP2 for Linux Installation Quick Start This section contains the following information Starting and Stopping the Novel...

Page 10: ...y KDE Click the menu button Novell Tray Enter the following command in a terminal window opt novell ncl bin ncl_tray 1 2 Logging In to the Network When you log in to the network you gain access to dir...

Page 11: ...age 11 7 Optional To configure integrated login click the Startup tab make sure the Run Novell Client Login at Session Startup is selected it is selected by default then click Save profile after succe...

Page 12: ...g connections click Novell Logout Logout If you are logged in to multiple trees and want to log out of a specific server or tree click Novell Connections select the tree or server that you want to log...

Page 13: ...d 5 Click OK 1 6 Mapping Network Directories When you map a directory you create a symbolic link or shortcut to a path on the network and assign it a name and location on your workstation After the dr...

Page 14: ...ccnt mycompany You can also click the Browse button and locate the directory you want to map 5 Optional To reestablish this drive mapping the next time you log in click Map this drive at startup 6 Cli...

Page 15: ...tings you want to configure then click Start Wizard 4 Follow the instructions in the left panel to configure the Novell Client settings 5 When you are finished click Finish 6 Conditional If you made c...

Page 16: ...age http www novell com products clients linux overview html from the About dialog box 1 Click About 2 Click the Packages tab to view information on the Novell Client for Linux packages that are loade...

Page 17: ...the System Console page 26 2 1 Assigning Rights to Volumes Files and Directories The Trustee Rights utility lets you display and give rights to volumes files and directories on a Novell server A trus...

Page 18: ...rants the right to add and remove trustees for directories and files and modify their trustee assignments and Inherited Rights Filters Supervisor Grants all rights to the directory or file and any sub...

Page 19: ...e in the list there is a set of eight check boxes one for each right that can be inherited If a check box is selected the trustee has that right The following rights can be set for each trustee Read F...

Page 20: ...ited Rights Filters and changed or revoked by lower trustee assignments The net result of all these actions the rights a user can employ are called effective rights 6 To view a trustee s properties su...

Page 21: ...nt to changed 5 To view the eDirectory rights associated with this object click the Novell Rights tab If you have Access Control rights and need to make changes to the Novell rights associated with th...

Page 22: ...f used and available disk space on the volume and information about the number of used and available directory entries on the volume The information you can view includes the following Disk Usage Grap...

Page 23: ...k Size Block size of the volume in kilobytes User Restriction Graph Amount of disk space you are using and the amount of remaining disk space that you can use Space Restriction is the disk space avail...

Page 24: ...n one of the following events occurs The Purge Delay setting times out Deleted files are purged automatically The server starts purging files if a volume starts to fill up the oldest files that have b...

Page 25: ...ies click Purge Subdirectories 5 Click Close 2 6 Sending Messages to Users Use the Send Message to User utility to send a simple message to users on the network You can send the message to a single us...

Page 26: ...essage Results dialog box shows which users or groups the message was sent to 6 Click OK then click Close 2 7 Sending Messages to the System Console Use the Send Message to System Console utility to s...

Page 27: ...urrent on updates to the documentation The documentation was updated on the following dates Section A 1 August 19 2008 on page 27 Section A 2 March 24 2009 on page 27 A 1 August 19 2008 Updated the ti...

Reviews: