2
WHAT’S INCLUD-
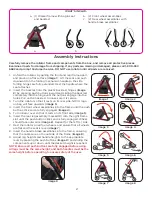
a. (1) Walker frame with bag & seat
and backrest
b. (2) Front wheel assemblies
c. (2) Rear wheel assemblies with
handle brake assemblies
Assembly Instructions
Carefully remove the rollator frame and components from the box, and remove all protective pieces.
Examine all parts for damage from shipping. If any parts are missing or damaged, please call 1-800-557-
6682 and prompt Customer Service. DO NOT use rollator until all parts are received.
1. Unfold the rollator by pulling the front and rear frame apart,
and place on a flat surface (
image 1
). Lift the seat and push
downward on the folding mechanism handle so the side
folding hinges are fully extended. Rest the handle where the
seat attaches.
2. Insert the backrest into the plastic backrest hinges (
image
2
) by pressing push buttons inward and sliding the backrest
completely into the hinge until the buttons engage into the
holes. Pull on the backrest to make sure it is secure.
3. Turn the rollator so that it rests on its rear side. NOVA logo
on bag will face upwards (
image 3
).
4. Insert the front wheel assemblies into the frame until the push
buttons click and are fully engaged (
image 4
).
5. Turn rollator over so that it rests on its front side (
image 5
).
6. Insert the rear leg assembly marked (R) into the right frame
slot until the push button clicks and is fully engaged. Wheel
should face outwards. (
image 6
). Repeat for the left (L) side.
7. Rest the rollator on all four wheels, and ensure that all wheels
are flat and the seat is level (
image 7
).
8. Insert the handle brake assemblies into the frame, ensuring
that the cables are on the outside of the frame (
image 8
).
9. Adjust leg heights and handle heights to the appropriate
level by pressing the push buttons (
image 9
) and sliding the
components up or down until the desired height is reached.
NOTE: Ensure all push buttons are fully engaged before using.
All legs must be the same height, and both handles must be the
same height before operating to ensure safety of the user.
a.
b.
c.
image 1
image 5
image 3
image 7
image 2
image 6
image 4
image 8
image 9


