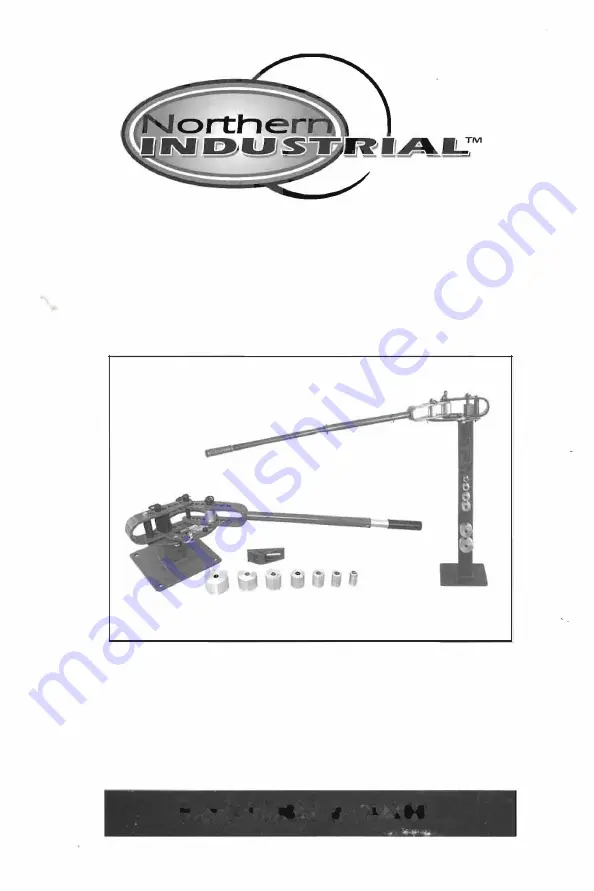
Northern Industrial 144207 Instruction Manual Download Page 1

[OMPA[T  BEI\IDER 

Instruction  Manual 

WARNING: 

Read and  understand  RULES FOR SAFE OPERATION 

and instructions carefully  before  operating. 

Failure  to  follow the safety rules and other  basic  safety 

precautions  may result in  serious  personal  injury. 

Item# 

144207  &  144208 

Summary of Contents for 144207

Page 1: ...Manual WARNING Read and understand RULES FOR SAFE OPERATION and instructions carefully before operating Failure to follow the safety rules and other basic safety precautions may result in serious personal injury Item 144207 144208 ...

Page 2: ......

Page 3: ...o all warnings ALWAYS keep the work area free of obstructions ALWAYS wear safety goggles when bending parts and when grinding or sanding them ALWAYS be sure that enough material extends beyond the stop block and forming die when making bends to be surethe material does not come free and allow the handle to release suddenly ALWAYS insert the hinge pins fully before making bends NEVER try to bend ma...

Page 4: ...he extension arm install the pin in the outer hole and reinstall the hairciip 4 Set the Bender in theposition where youintend it to be used Rotatethe handle as far as it will go in both directions to be sure there will be no obstructions when bending Also be sure there will be enough space behind the Bender to insert and maneuver long material to be bent If the unit will be located next to a wall ...

Page 5: ... the piece from the Bender and turn rt end for end or upside down Hole Identification In the examples shown in this manual the holes in the loop and those inthe handle are identified by a number Refer to the illustration at right Measuring Bend Angles When accuracy is required you will need a suitable device for measuring the bend angles Fixed and Adjustable Stops If you are making mu iple parts w...

Page 6: ...k that is to select the proper orientation and the proper hole in the loop 1 Connectthe handle to the center pin ofthe loop with the appropriate die installed on the center pin 2 Install the appropriate die at the appropriate hole in the handle 3 Insert a piece of the material to be formed With the handle all the way back counterclockwise install the stop block in the orientation that places it as...

Page 7: ...pare the illus tration on page 6 with the stop block Install the support in the 113 loop hole so it will support the attachment but not interfere with inserting the hitch pin all the way through the allachmenl s hole and the lower hole in the loop Clamping The material should not need to be clamped when using the sharp angle bend attachment Bending the Material Make thin chalk marks on the fiat ma...

Page 8: ...s in 26 Die 2 2 in 13 Stop adjustable 27 Die 3 in 14 Stop fixed 28 Base Item No 144207 only 2 Ordering Parts T o order replacement parts use the Part N os shewn and contact TEL 800 222 5381 FAX 612 894 0063 Part Descriptions ReI No Description Qty 1 Spacer loop 2 B oh 3 s x 431 in 3 Washer flat 3fs in 4 Ring assembly Or mail y our order te N orthern Inc P O B ox 1499 Burnsville MN 55337 0499 ReI N...

Page 9: ..._ _____ _ 22 _ 23 l I I Replacement Parts continued 21 _ 24 m 25 m 26 ru 27 17 28 not illustrated Stand for Item No 144207 9 ...

Page 10: ... pin install the stop block oriented as in A 3 Insert the round stock into the Bender so that it extends 2 in beyond the STOCK REOUIRED lor thi example center pin die see B and make the first bend to 90 One 9 in length of s _in ound stock 4 Turn the part end for end position it as in C and make the second 90 Two pieces of flat stock of desired size bend Remove the stock from the Bender 5 Drill5fa ...

Page 11: ...and the 3 and 4 marks are on the opposite face STOCK REQUIRED for this example 3 Insert thellat stock into the Benderto the 1 mark as in AJ and make a 90 bend Check the angle before continuing One9 in length of 1I in x i in hot rolled nat stock 4 Set the adjustable stop so each bend will be gOO 5 Turn the stock end for end Insert itto the 2 mark as inBJ and make a BEND SE UENCE gOO bend 2 3 4 6 Tu...

Page 12: ...extends 1 in beyond the center pin die as in B Clamp the stock against the stop block using a vice grip pliers to pre vent the stock from Slipping 4 Make the first bend by pulling the handle around until the handle die runs off the end of the piece 5 Remove the stop block and the two dies Change the handle connection and install the sharp angle bend attachment as in C Slide the piece as far left a...

Page 13: ...nsert it into the Bender SO that it ex1ends 13 in beyond the center pin die as in C 6 Make the second bend by pulling the handle around until the handle die runs off the end of the piece 7 Remove the stop block and install the sharp angle bend attachment 8 You will have to temporarily remove the center pin to insert the piece into the Bender Slide the piece as far left as possible against the cen ...

Page 14: ...r pin holes Install a 1 in die on the center pin With a short hinge pin install a 2 in die in the handle 2 hole 2 With a long hinge pin install the stop block Orient the block appropri ately forthe diameterofthe boltblank 2 orientation for I in or in bolts 4 orientation for I in bolts 3 Insert the bolt blank into the Bender so that the unthreaded end ex tends beyond the stop block z in for I in bo...

Page 15: ...le to make a U bo that is 1 in longer add 2 in to the blank leng1h Bend Radius Eight bend radiuses are possible by selecting from the seven forming dies or by using Ihe center pin w hout a die However to avoid bending the center pin always use a forming die with round stock larger than 3 B in diameter Notes Because blank stock may vary slightly in content or size we recom mend making a test bend u...

Page 16: ...nding U Bolts from I in Round Stock FINISHED SIZE SETUP FOR BENDING Blank Loop Stop Block St ck Center Handle Handle Length 1 0 Length Hole No e Orientation Pin Die Ole Hole No 2 H l J 61 1 1 s s 11 4 2 2 3 1 7 a 2 4 1 2 2 2 3 l Jt 7 2 4 3 13 2 2 3 2 2 83 2 4 1S 6 2 2 2 aending U Bolts from 3 in Round Stock RNISHED SIZE SETUP FOR BENDING Blank Loop Stop Block St ck Center Handle Handle Length 1 0 ...

Page 17: ...tion Pin Die Die Hole No 2 1 1 I 7 lt 2 4 1 1 3 3 3 13 8 2 4 1 1 1 1 3 3 3 2 a e 2 3 1 2 2 3 4 2 1 10 1 2 2 1 2 12 2 3 4 ft 3 1 1 t 3 4 1 3 2 3 Bending U Bolts from le in Round Stock Die 1 FINISHED SIZE SETUP FOR BENDING Blank Loop Slop Block S Block Center Handle Handle Length 1 0 Length Hole No Orientation eas Pin Die Hole No 3 2 gl I 2 2 1 2 3 3 4 11 2 f 2 g 11 lt 2 1 1 2 3 12 17 8 5 3 3 4 3 2 ...

Page 18: ...ep Notes Use only hot rolled mild steel for forming the letters Follow the bending steps exactly and in the sequence given This is especially important for the letter SO which is the most difficult to form To avoid wasting material practice some of the letters using Iwin stock that is only I in wide before you attempt the finished version If you have two or more identical letters make all of them ...

Page 19: ...tock into the Bender to the 1 chalk mark as in A and bend it to 76 Recheck the angle before you go on to the second bend Bend No 2 Slide the stock to the 2 chalk mark as in B and bend it to 76 Recheck the angle To remove the part from the Bender remove the pin that holds the sharp angle bend a lachment Finishing Tack weld the 3 in insert piece between the legs of the A parallel to the top edge Gri...

Page 20: ... the ring or set a stop for ease of repeating the 45 bend Bend No 2 Slide the stock to the 2 chalk mark as in 8 and bend it to 45 Recheck the angle Bend No 3 Reverse the stock end for end Slide it to the 3 chalk mark as in C and bend it to 45 Recheck the angle Bend No 4 Again reverse the stock end far end Move rt to the 4 chalk mark as in D and bend it to 45 Recheck the angle To remove the part fr...

Page 21: ...lk mark as in A and bend illo 45 Recheck the angle before you go on to the second bend Chalk mark the ring or set a stop for ease of repeating the 45 bend Bend No 2 Slide the stock to the 2 chalk mark as in B and bend it to 45 Recheck the angle Bend No 3 Slide the stock to the 3 chalk mark as in C and bend it to 45 Recheck the angle Bend No_ 4 Reverse the stock end for end Slide it to the 4 chalk ...

Page 22: ... bend to45 Recheckthe Continued angle To remove the part from the Bender remove the pin that holds the sharp angle bend attachment Finishing Grind and sand all sharp corners E F o o STOCK REQUIRED lj 6 in stock 2 in max width One 121h in blank One S in blank BEND SEQUENCE 3 4 r 3 j 1 1 1 2 6 j Setup Make chalk marks on the two 12 in blank as shown on the Bend Sequence continued on next page 22 ...

Page 23: ...k the angle Remove the blank from the Bender Recheck that the bent leg is at 90 to A the front of the D Bend No 3 o Reverse the stock end for end Slide it to the 3 chalk mark as in C and bend it to 45 Recheck the angle Bend No 4 Slide the stock to the 4 chalk mark as in 0 and bend it to 45 the angle Recheck that the two legs are parallel To remove the part from the Bender remove the pin that holds...

Page 24: ...re you go on to the second bend Bend No 2 Slide the stock to the 2 chalk mark as in B and bend it to 90 Recheck the angle Bend No 3 Reverse the stock end for end Slide it to the 3 chalk mark as in C and bend it to 45 Recheck the angle Bend No 4 Slide the stock to the 4 chalk mark as in OJ and bend it to 90 Recheck the angle Check that the top and bottom of the E are parallel B To remove the part f...

Page 25: ...sand all sharp corners T STOCK REQUIRED 3 win stockj 2 in max width One 14 in blank One 3 in blank BEND Setup Make a letter C as shown on page 21 Bend Insert the 3 in blank into the Bender to the chalk mark and bend it to 90 Recheck 1he angle To remove the part from 1he bender remove the pin that holds the sharp angle bend attachment Finishing Pos ion the 3 in piece as shown and tack weld Grind an...

Page 26: ...T 3 1 Make chalk marks on the 5 in blanks as shown on the Bend Sequence Bend 1 Insert the blank into the Bender to the 1 chalk mark and bend it to 45 Recheck the angle Chalk mark the ring or set a stop for ease of repeating the 45 bend Bend 2 Reverse the stock end for end Slide it to the 2 chalk mark and bend it to 45 Recheck the angle 8 To remove the part from the bender remove the pin that holds...

Page 27: ... as in A and bend it to 45 Recheck the angle before you go on to the second bend Chalk mark the ring orset a stop for ease of repeating the 45 bend Bend No 2 Slide the stock to the 2 chalk mark as in B and bend to 45 Recheck the angle Bend No 3 Slide the stock to the 3 chalk mark as in C and bend to 45 Recheck the angle To remOVe the part from the Bender remove the pin that holds the sharp angle b...

Page 28: ...ck that the outer tips of the bent piece are equal distances from the straight piece Grind and sand all sharp corners STOCK REQUIRED BEND SEQUENCE I s in stockj 2 in max width 2 T 6 1 One 1 l rin blank Setup Make chalk marks on the blank as shown on the Bend Sequence A Bend 1 Insert the blank into the Bender to the 1 chalk mark and bend it to 45 Recheck the angle Bend 2 Slide the stock to the 2 ch...

Page 29: ...th One B s in blank Two 6 in blanks BEND SEQUENCE 8 n blank 2 1 11 I I I I Setup Make chalk marks on the 8 win blank as shown on the Bend Sequence Bend 1 Insert the blank into the Bender to the 1 chalk mark as in A and bend illo 73 Recheck the angle Bend 2 Reverse the stock end for end Slide it to the 2 chalk mark and bend it to 73 Recheck the angle To remove the part from the bender remove the pi...

Page 30: ...sharp corners STOCK REQUIRED l1r in stock 2 in max width One 81 in blank One 6 in blank Setup Make part of a letter B page 20 the straight piece and one loop Finishing Tack weld the pieces together Grind and sand all sharp corners STOCK REQUIRED 3 u in 6tock 2 io max width One 14 in blank One 3JIa in blank One 2 in blank One 3 in blank Setup Make a letter 0 above Finishing Tack weld the short piec...

Page 31: ...AUTION Because of the number of bends it is especially important to check all bend angles carefully when making the letter S Setup Make chalk marks on the blank as shown on the Bend Sequence Note that the five chalk marks on one end of the blank must be on the opposite face from the five marks on the other end Bend 1 Insert the blank into the Bender to the 1 chalk mark as in A and bend it to 45 Re...

Page 32: ...nd 84 Slide the blank back to the 4 chalk mark as in D and bend it to45 Continued Bend 5 Reverse the stock end for end Slide Ihe blank 10 the 5 chalk mark as in E and bend illo 45 Reche k Ihe angle B Bend 6 Slide the blank back 10 the 6 cI dlk lnark as in F and bend it 1045 o Recheck the angle continued on next page c D o E o F 32 ...

Page 33: ...ngle Bend 9 Reverse the stock end for end Pullthe pin in the sharp angle bend attach ment to allow space for the blank Insert the blank and reinstall the pin Slide the blank to the 9 chalk mark as in I and bend it to 45 Recheck the angle Bend 10 Again reverse the stock end for end Slide the blank to the 1 0 chalk mark as in J and bend rt to 45 Recheck the angle and check that the top and bottom of...

Page 34: ...ender to the 1 chalk marl as in A and bend tt to 45 Recheck the angle Chalk mark the ring or set a stop for ease of repeating the 45 bend Bend 2 A Reverse the stock end for end Slide ij to the 2 chalk mark as in B and bend ij to 45 Recheck the angle o Finishing Grind and sand all sharp corners STOCK REQUIRED J ln stock 2 in max width One 14lJ in blank BEND SEQUENCE J 4 2 11 1 I 1 1 1 Setup Make ch...

Page 35: ... the 45 bend Bend 412 Continued Slide the blank to the 2 chalk mark as in 8 and bend it to 45 Recheck the angle Bend 413 Reverse the stock end for end Slide to the 3 chalk mark as in C and bend to 45 Recheck the angle Bend 414 Slide the stock to the 4 chalk mark as in D and bend to 45 Recheck the angle and check that the legs of the U are parallel Finishing Grind and sand all sharp ccrners A B o o...

Page 36: ...up Make chalk marks on the blank as shown on the Bend Sequence Bond 11 Insert the blank into the Bendertothe 1 chalk mark as in A and bend illo 75 Bend 2 Slide the blank to the 2 chalk mark as in B and bend it to 75 To remove the part pull the pin in the sharp angle bend attachment Fini hing Grind and sand all sharp corners A B 36 ...

Page 37: ...Make a chalk marks on each blank as shown under Bend Bend Insert the blank into the Bender to the chalk mark and bend it until the outside dimension is 6 in as shown Finishing Tack weld the two pieces together Check that the parts are parallel Grind and sand ali sharp corners STOCK REQUIRED 3h6 in stock 2 in max width One 9 2 in blank One 33 in blank Setup BEND SEQUENCE 9 rin blank 2 1 Make a chal...

Page 38: ... o STOCK REQUIRED BEND SEQUENCE 7 I n blank 3 t in stock 2 in max width 1 2 One 71 rin blank Two 41 rin blanks Setup I 11 1 1 Make chalk marks on the 7 t in blank as shown on the Bend Sequence Bend 111 Insert the blank into the Bender to the 1 chalk mark as in A and bend it to 50 Recheck the angle Bend 112 Reverse the part end for end Slide it to the 2 chalk mark as in B and end it to 50 Finishing...

Page 39: ...ricks cement and other masonry products Arsenic and chromium from chemically treated lumber Your risk from these exposures varies depending on how often you do this type of work To reduce your exposure to these chemicals work in a well ventilated area and use approved personal protective equipment such as those dust masks that are specially designed to filter out microscopic particles Distributed ...

Page 40: ......

Reviews: