background image

7 Connecting the power supply and setting the USB driver

54

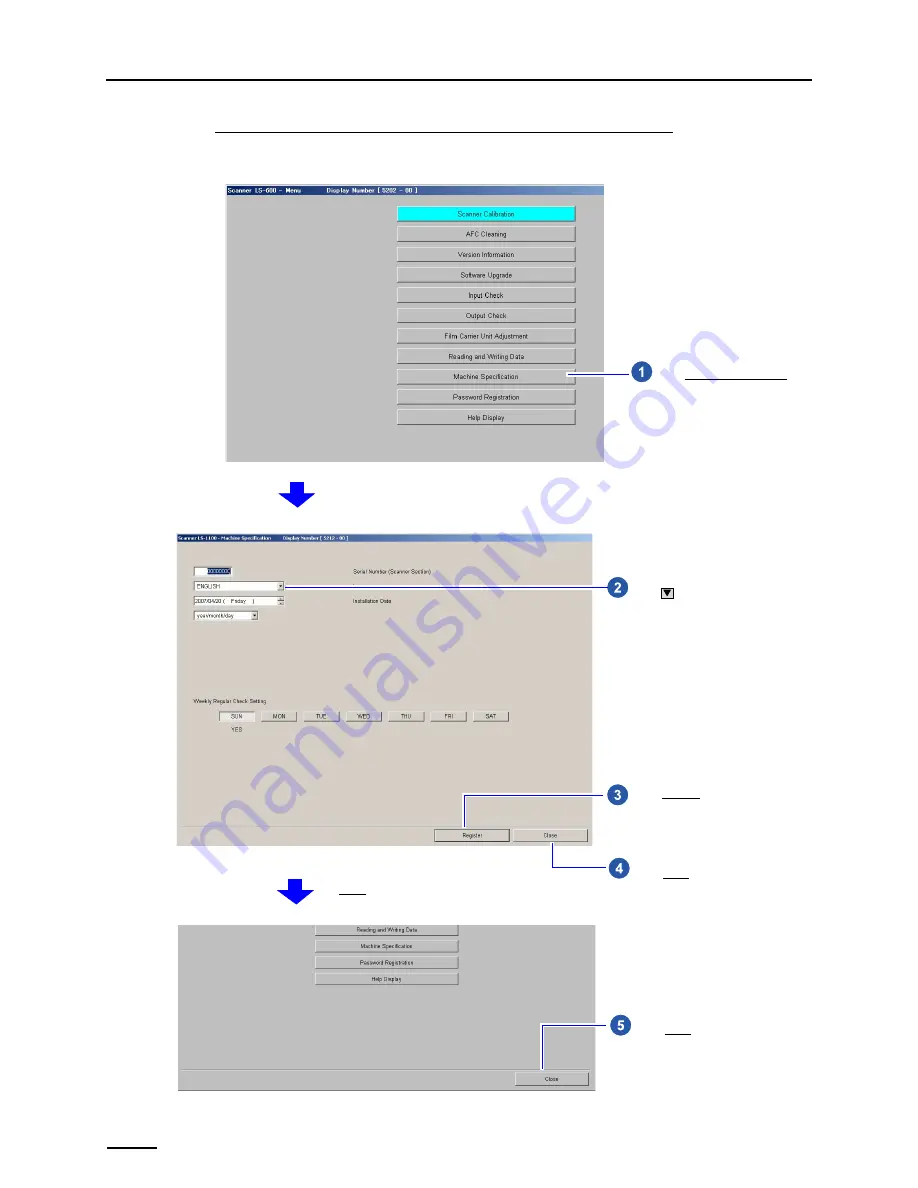
If connecting the scanner to the PC on which the controller is not installed

Change the language to be used as needed.

Example: 

Menu

 display

Click Machine Specification.

S5202-00-UM02

Click 

 and select a language to be 

used for software displays.

Click Register.

Click Close.

The Menu display is shown.

S5212-00-UM02

Click Close.

S5202-00-UM03

Summary of Contents for LS-1100

Page 1: ...S 600 LS 1100 Installation Manual Before installation carefully read and understand Workflow explained in this Installation Manual For details see 1 1 Workflow Windows XP or 1 2 Workflow Windows Vista...

Page 2: ......

Page 3: ...u should lose or heavily damage the manual contact your place of purchase Issued in June 2008 It is prohibited to copy or reproduce this manual The manual is subject to change without notice Illustrat...

Page 4: ...warnings include a signal word the type and extent of the danger and information on avoiding the danger Carefully read and understand the warnings included in this manual and on the warning labels bef...

Page 5: ...ates useful information on functions and instructions The Important symbol indicates supplementary explanations operations or procedures that require caution and instructions that must be followed Thi...

Page 6: ...g the TWAIN driver 27 5 1 Installation procedure 27 5 2 Installing the Windows Installer 3 1 29 5 3 Installing the Microsoft Visual C 2005 SP1 Redistributable 30 5 4 Installing the Microsoft NET Frame...

Page 7: ...v 10 Quick reference 66 10 1 If installing TWAIN driver or SYSTEM PROGRAM failed 66 10 2 If connecting the USB cable and starting the PC before installing the scanner software 71...

Page 8: ...This page is intentionally blank...

Page 9: ...3 Configuring monitor display settings Setting up the PC For details see 4 Setting up the PC Installing the TWAIN driver For details see 5 Installing the TWAIN driver Installing the SYSTEM PROGRAM For...

Page 10: ...ing monitor display settings Setting up the PC For details see 4 Setting up the PC Installing the TWAIN driver For details see 5 Installing the TWAIN driver Installing the SYSTEM PROGRAM For details s...

Page 11: ...ox 17 5 kg Conditions for installation place Requires strength to support the scanner weight Must be level and not cause vibration Vibration should be 3 m s2 0 3 G or less in each direction at the ins...

Page 12: ...over left Required item Required item PC See the Specifications for details about the recommended specification of the PC Grounding adapter as necessary Philips blade screwdriver large Power cord Powe...

Page 13: ...then securely close the front cover 2 Remove the antirust material from the back of the product This completes removing packing angle brackets and antirust material Next go to 2 Confirming the compon...

Page 14: ...mpletes confirming the component parts Next go to If connecting the scanner to the PC on which the controller is not installed If connecting the scanner to the PC on which the controller is installed...

Page 15: ...t the Settings tab to configure the resolution setting and color setting of the monitor display Configure the resolution and color settings of the display monitor as shown below Screen resolution Matc...

Page 16: ...Classic for Theme in the Themes tab 5 Click OK For Windows Vista 1 Start the PC Turn on the power of the display monitor 2 Access the Personalization display Bringing up the display Start Control Pan...

Page 17: ...lay monitor as shown below Screen resolution Match the resolution to the recommended resolution of the monitor IMPORTANT Confirm the recommended resolution in the Operator s Manual of the monitor Exam...

Page 18: ...3 Configuring monitor display settings 10 5 Click OK 6 Click Theme S091796 S091811...

Page 19: ...tings 11 7 Select Windows Classic for Theme 8 Click OK 9 Click the Close button at the upper right of the Personalization display to close it This completes configuring monitor display settings Next g...

Page 20: ...lay Start Control Panel 2 Double click the Power Options icon The icon slightly varies depending on the OS Example The Power Options Properties display is shown 3 Select Never for all the items below...

Page 21: ...e Power Options display Bringing up the display Start Control Panel Hardware and Sound Power Options 2 Select High performance and click Change plan settings The Edit Plan Settings display is shown 3...

Page 22: ...rd disk after Never Wireless Adapter Settings Power Savings Mode Maximum Performance Sleep Sleep after Never Hibernate after Never USB settings USB selective suspend setting Disabled PCI Express Link...

Page 23: ...erating system but the procedure is the same 1 Access the System Properties display For Windows XP 1 Access the Control Panel display Bringing up the display Start Control Panel 2 Double click the Sys...

Page 24: ...ge settings The System Properties display is shown 2 Click the Advanced tab and click Settings of Performance The Performance Options display is shown 3 Click the Advanced tab and click Change of Virt...

Page 25: ...play may be shown depending on the settings of the PC If the following display is shown click Yes 8 Click OK to close the Performance Options and System Properties displays 9 Click the Close button at...

Page 26: ...ging up the display Start Control Panel 2 Double click the System icon Example The System Properties display is shown For Windows Vista 1 Access the System display Bringing up the display Start Contro...

Page 27: ...rimary IDE Channel and Secondary IDE Channel varies depending on the settings of the PC Configure all Primary IDE Channel and Secondary IDE Channel that are shown onscreen Bringing up the display Doub...

Page 28: ...E Channel and Secondary IDE Channel in the same procedure as Step 3 and Step 4 7 Click in the upper right corner of the Device Manager display to close it 8 Click OK to close the System Properties dis...

Page 29: ...The Group Policy display is shown 3 Select Computer Configuration Administrative Templates System in the left of the Group Policy display 4 Double click Turn off Autoplay The Turn off Autoplay Proper...

Page 30: ...1 Access the AutoPlay display Bringing up the display Start Control Panel Hardware and Sound AutoPlay 2 Clear the Use AutoPlay for all media and devices check box 3 Click Save 4 Click the Close butto...

Page 31: ...lication icon shown in the right of taskbar turning off the function is required Hotkey shortcut key is a function to operate the frequently used function with the key operation of keyboard instead of...

Page 32: ...Start Control Panel User Accounts User Accounts 2 Click Turn User Account Control on or off 3 If the User Account Control display is shown click Continue 4 Clear the Use User Account Control UAC to he...

Page 33: ...t the upper right of the Windows Security Center display to close it 4 Click the Close button at the upper right of the Security display to close it This completes the User Account Control settings 4...

Page 34: ...rt Sidebar when Windows starts check box 3 Click OK 4 Click the Close button at the upper right of the Appearance and Personalization display to close it This completes the Sidebar settings Next go to...

Page 35: ...r 7 3 0 EZ Controller EZ Controller ImgDataProc Additional Software System Capture 1 Not installed for Windows Vista IMPORTANT A screen newly displayed may not come to the front while the software is...

Page 36: ...se display is shown 3 Select the drive to which the CD ROM was inserted Setup exe and click Open 4 Click OK The installer starts and the InstallShield Wizard display is shown The display slightly vari...

Page 37: ...tallation display for Windows Installer 3 1 is not shown go to 5 3 Installing the Microsoft Visual C 2005 SP1 Redistributable Click Next without selecting any option Next install Windows Installer 3 1...

Page 38: ...lect it However be sure to select it otherwise the restarting performed at the end of the installation may take several minutes Click Finish Next install Microsoft Visual C 2005 SP1 Redistributable Te...

Page 39: ...check box Select I accept the terms of the License Agreement Click Install S091227 Double click the Microsoft NET Framework 3 0 icon on the taskbar at the lower right of the screen The confirmation di...

Page 40: ...Installing the MSXML 4 0 SP2 Parser and SDK Click End Next install the PostgreSQL8 1 S091229 If the display does not change to the following installation display click the button of the screen newly d...

Page 41: ...6 0 Parser Next install the MSXML 4 0 SP2 Parser and SDK Wait for a while until the display is closed G087707 If the display does not change to the following installation display click the button of...

Page 42: ...t I accept the terms in the License Agreement S087709 Click Next NOTE Information such as the name of the PC on which the software is installed is shown in User Name and Organization You do not need t...

Page 43: ...ection Installer 7 3 0 Terms of use is shown S087712 If the display does not change to the following installation display click the button of the screen newly displayed on the taskbar The screen newly...

Page 44: ...MSXML 6 0 Parser is not shown go to 5 8 Installing the Sentinel Protection Installer 7 3 0 Click OK Next install the MSXML 6 0 Parser S087715 Installation of the MSXML 6 0 Parser starts Click Yes Go...

Page 45: ...Installing the TWAIN driver 37 Click Next Select I accept the terms in the license agreement S088695 Click Next NOTE You do not need to change the Name and Company Example S088696 Click Install S08869...

Page 46: ...otection Installer 7 3 0 If the installation display for the Sentinel Protection Installer 7 3 0 is not shown go to 5 9 Installing the EZ Controller Click Finish Next install the Sentinel Protection I...

Page 47: ...5 Installing the TWAIN driver 39 Click Next Select I accept the terms in the license agreement S088642 Click Next Select Complete S088643 Click Install S088644...

Page 48: ...AIN driver 40 Click Yes S088739 Click Finish S088646 Installing the EZ Controller starts Click No This display may not be shown depending on the setting Go to the next step if the following display is...

Page 49: ...5 10 Installing the EZ Controller ImgDataProc Additional Software Wait for seconds until the installation is completed Next install the EZ Controller ImgDataProc Additional Software S088703 Click Nex...

Page 50: ...ve the program is shown S091232 Click Next without selecting any option The EZ Controller ImgDataProc Additional Software installation starts The completion screen is shown after the installation is f...

Page 51: ...on display of License Agreement is shown S091235 Click Yes The confirmation display of the location to save the program is shown S091236 Click Next without changing the settings The installation of Sy...

Page 52: ...to For Windows XP For Windows Vista Perform 6 Installing the SYSTEM PROGRAM Perform 7 1 Connecting the power supply Click Finish The completion screen is shown after the installation is finished S0912...

Page 53: ...Installation procedure 1 Prepare the following CD LS SYSTEM PROGRAM CD 1 LS SYSTEM PROGRAM 1 is printed on the label 1 The model name is shown in 2 Insert the SYSTEM PROGRAM CD ROM 3 Run the installe...

Page 54: ...lled Example If LS 600 SYSTEM PROGRAM was installed Example If LS 600 SYSTEM PROGRAM was installed Example If LS 600 SYSTEM PROGRAM was installed The display slightly varies depending on the operating...

Page 55: ...to restart my computer now Remove the CD ROM Select Install this driver software anyway If the scanner power cord and USB cable are not connected correctly The message Connect the device USB Scanner i...

Page 56: ...er is installed the Startup check menu display is shown Go to the next step while the Startup check menu display is shown Next go to For Windows XP For Windows Vista Perform 7 Connecting the power sup...

Page 57: ...g whether to supply power from household socket or from the connected printer to this product If supplying power from household socket Set the transfer switch to the downside If supplying power from t...

Page 58: ...Vista 7 2 Configuring USB driver settings Procedure 1 Connect the scanner to the PC with the supplied USB cable PC side Perform 7 2 Configuring USB driver settings Perform only Step 1 in 7 2 Configuri...

Page 59: ...he following display is shown click Cancel For Windows XP The display to install the USB driver is shown Go to Step 2 2 Install the USB driver Next go to 6 Installing the SYSTEM PROGRAM USB cable USB...

Page 60: ...nized uninstall the software Perform the operations from Step 2 to Step 6 in 10 2 If connecting the USB cable and starting the PC before installing the scanner software This display may not be shown d...

Page 61: ...Example Menu display If the Menu display is shown the installation was normally performed If the Menu display is not shown the installation failed Follow the instructions explained in 10 1 If install...

Page 62: ...n which the controller is not installed Change the language to be used as needed Example Menu display Click Machine Specification S5202 00 UM02 Click and select a language to be used for software disp...

Page 63: ...7 Connecting the power supply and setting the USB driver 55 This completes configuring the USB driver settings Perform 8 Configuring various settings...

Page 64: ...arting Guide 8 1 Configuring the USB power Management setting This section uses Windows XP displays but the procedures are the same for Windows Vista If the PC purchased from us is used this step is n...

Page 65: ...erties display The number of displayed USB Root Hub varies depending on the PC settings Configure the settings for all displayed USB Root Hub Bringing up the display Double click Universal Serial Bus...

Page 66: ...the close button in the upper right corner of the Control Panel display to close it This completes configuring the USB power management settings 8 2 Configuring the installation date and display setti...

Page 67: ...he controller is not installed Example Adobe Photoshop display Example Scan Setting display S5113 00 UM00 The Menu display is shown Go to Step 2 Start image editing software such as Adobe Photoshop Se...

Page 68: ...used for software displays Installation Date Enter the installation date Date and Time Display Select the displayed order of year month and date This setting can be configured only for the PC that the...

Page 69: ...the unit of images and resolution displayed on the Scan Setting display 1 Access the Environment display If connecting the scanner to the PC on which the controller is installed Bringing up the displa...

Page 70: ...The Environment display is shown Go to Step 2 Click the Environment tab S5200 00 UM01 The Environment display is shown Click and select the unit of input image size shown on the Scan Setting display...

Page 71: ...ation of the scanner Be sure to keep the supplied CD ROM manual and accessories Perform scanning and confirm that the scanner works normally For details see 5 4 Scanning 135 type film in the Starting...

Page 72: ...Bringing up the display Click F on Controller Main Display Management Tool Print Channel Example Print Channel Selection display 3 Select a source print channel and click Copy 4 Select the copy desti...

Page 73: ...lm catcher Hold the film so that the image and the frame numbers are facing upwards Then insert the film from the larger frame number Film catcher G088618 Eject button Cartridge holder Press the eject...

Page 74: ...er the reinstallation this completes installing the software Bringing up the display On the Windows desktop display click Start All Programs Click LS 600 or LS 1100 If it does not start normally go to...

Page 75: ...aProc Additional Software and click Change Remove or Uninstall and Change Uninstallation of EZ Controller ImgDataProc Additional Software starts 7 Select Sentinel Protection Installer 7 3 0 and click...

Page 76: ...ta Uninstallation of MSXML 4 0 SP2 KB starts 11 Select PostgreSQL 8 1 and click Remove or Uninstall Uninstallation of PostgreSQL 8 1 starts IMPORTANT After removing PostgreSQL8 1 manually delete the P...

Page 77: ...mation display of processing status of the uninstallation is shown If the following screen is shown after the uninstallation is completed click End 13 Select Microsoft NET Framework 2 0 and click Chan...

Page 78: ...ft Visual C 2005 SP1 Redistributable and click Remove or Uninstall Uninstallation of Microsoft Visual C 2005 SP1 Redistributable starts 15 Select Windows Installer 3 1 KB893803 and click Remove For Wi...

Page 79: ...Reinstall the software following the procedure of 5 Installing the TWAIN driver If the Menu display is normally shown after the reinstallation this completes installing the software Bringing up the di...

Page 80: ...instructions shown on the display The Windows display is shown 2 Access the Computer Management display Bringing up the display Start Right click My Computer Manage Pattern A Pattern B Select No not t...

Page 81: ...USB scanner in Other devices and click Uninstall 5 Click OK 6 Install SYSTEM PROGRAM again For details see 6 Installing the SYSTEM PROGRAM The display to install the USB driver is shown Perform the op...

Page 82: ...This page is intentionally blank...

Reviews: