


57
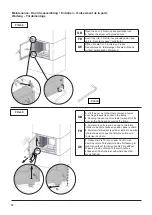
FIG 38a
FIG 38b
LA-SAL01-010
LA-SAL01-020
Placing the Thermotte
Positionnez les éléments réfractaires en Thermotte
Thermotte positionieren
Attention! Push both the bottom parts all the way towards the back wall
Attention ! Poussez les deux éléments inférieurs jusqu’au fond contre la paroi arrière.
Hinweis! Schieben Sie die beiden unteren Teile komplett bis zur Rückwand.
Summary of Contents for PN-SAL01-300
Page 32: ...32 FIG 4 A B CO SAL01 02A CO SAL01 010 CO SAL01 010 1 A 1 B 2 A PI SAL01 010 PI SAL01 010 2 B...
Page 34: ...34 PI SAL01 04A PI SAL01 04B FIG 6 PI SAL01 030 FIG 5...
Page 36: ...36 FIG 8 A CO SAL01 020 CO SAL01 020 FIG 8 B CO SAL01 020 x4 A cryl x4 A cryl...
Page 47: ...47 Salzburg L Convection Salzburg L Convection 1 extension FIG 24 a FIG 24 b...
Page 51: ...51 8 mm FIG 30 A c r y l Acryl...
Page 52: ...52 FIG 31 IS SAL02 040 FIG 32 CO SAL01 060 22 SAL01 180 x 2...
Page 58: ...58 FIG 38d FIG 38c 10x6 LA SAL01 060...
Page 59: ...59 FIG 40 FIG 39 LA SAL01 070...
Page 60: ...60 FIG 41 FIG 42 LA SAL01 080 LA SAL01 090...
Page 61: ...61 FIG 44 FIG 43 180 20 Q27FL 010 22 SAL01 170 22 SAL01 160 A cryl...
Page 62: ...62 FIG 45 1 1 2 2...
Page 66: ...66 FIG 52 Salzburg L Convection 1 2 FIG Z A cryl A c r y l...


