77
70
75
74
81
82
89
104
88
94
96
20
76
34
7
72
67
73
23
90
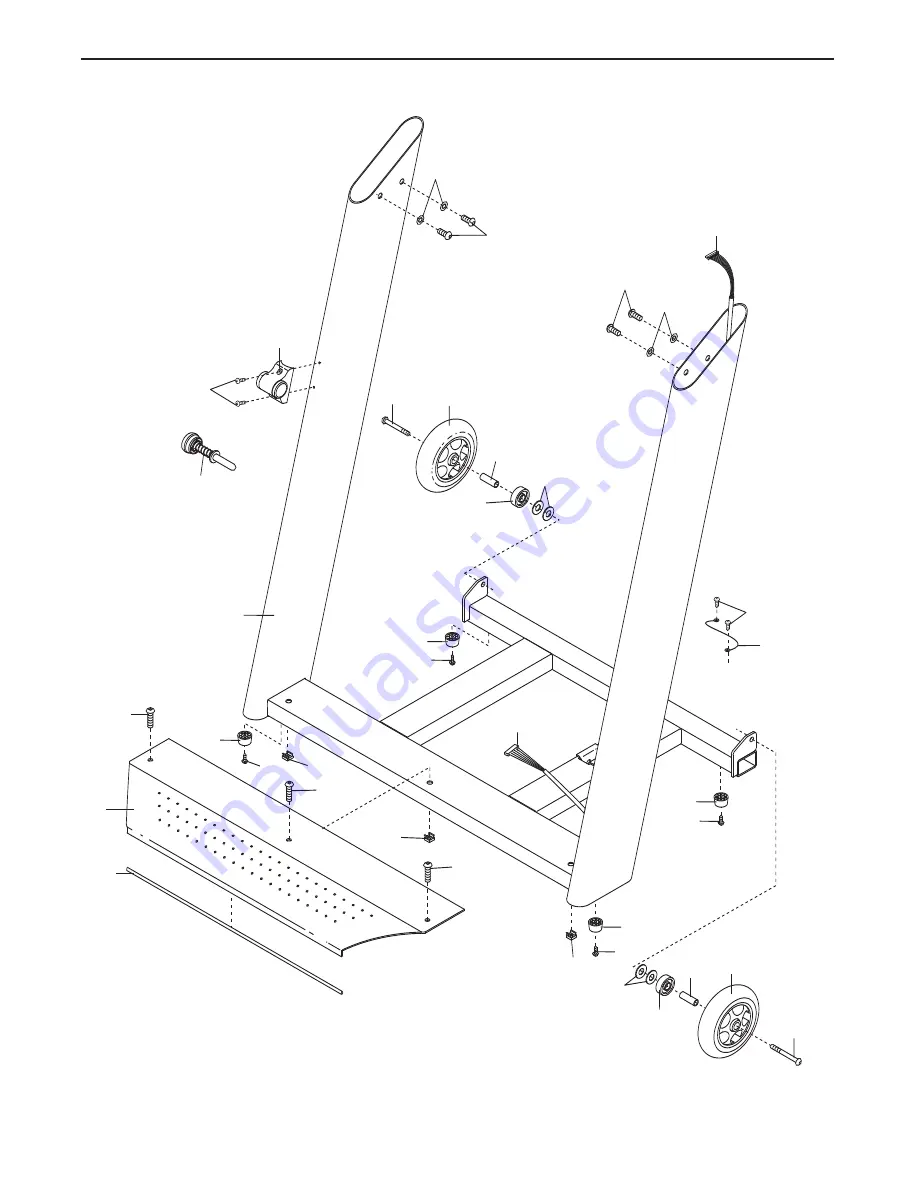
EXPLODED DRAWING C—Model No. 30705.3
R0408A
Page 1: ...d to providing complete customer satisfaction If you have questions or if parts are damaged or missing PLEASE DO NOT CONTACT THE STORE For assistance contact our Customer Service Department CALL TOLL...
Page 2: ...RAWING 32 ORDERING REPLACEMENT PARTS Back Cover LIMITED WARRANTY Back Cover NordicTrack is a registered trademark of ICON IP Inc 2 These drawings show the locations of the warning decals If a decal is...
Page 3: ...specifications described on page 10 To purchase a surge suppressor call the telephone number on the front cover of this manual 13 Failure to use a properly functioning surge suppressor could result in...
Page 4: ...them 25 Inspect and properly tighten all parts of the treadmill regularly 26 Never insert or drop any object into any opening on the treadmill 27 DANGER Always unplug the power cord immediately after...
Page 5: ...using the treadmill If you have questions after read ing this manual please see the front cover of this man ual To help us assist you note the product model number and serial number before contacting...
Page 6: ...aner Assembly requires the included hex key and your own Phillips screwdriver standard screwdriver and wire cutters For help identifying the assembly hard ware see the hardware drawings below To avoid...
Page 7: ...again IF THE CONNECTORS ARE NOT CON NECTED PROPERLY THE CONSOLE MAY BE DAMAGED WHEN THE POWER IS TURNED ON Then insert the connectors into the right Upright 20 3 20 81 82 81 81 81 Console Assembly Co...
Page 8: ...storage position and make sure that the latch pin is engaged as de scribed on page 24 Position the Base Plate 75 on the treadmill as shown Attach the Base Plate to the Upright 20 with the three Base...
Page 9: ...B 2 While a second person holds the Console 105 connect the wire on the receiver A to the indi cated wire extending from the Console Next hold the receiver so the small cylinder is ori ented as shown...
Page 10: ...east resistance for electric current to reduce the risk of elec tric shock This product is equipped with a cord having an equipment grounding conductor and a grounding plug Plug the power cord into a...
Page 11: ...Workout Cards containing workout programs designed to help you achieve spe cific fitness goals For example lose unwanted pounds with the 8 week Weight Loss program or train for a long distance run wit...
Page 12: ...d from the console adjust the position of the clip HOW TO PERSONALIZE CONSOLE SETTINGS The console features a user mode that allows you to designate yourself as User 1 or User 2 view your workout hist...
Page 13: ...e button beside the User Enter button to highlight OFF to turn off the demo mode LOGO to display a logo ROAD to display an animation of a runner on a road or VISUAL EQ to display a visual Then press t...
Page 14: ...To restart the walking belt press the Start button the Speed button or one of the twelve 1 Step Speed buttons 5 Change the incline of the treadmill as desired To change the incline of the treadmill p...
Page 15: ...se sensor at the same time the display will not show your heart rate accurately To use the handgrip pulse sensor first re move the sheets of clear plastic from the metal contacts on the hand grip puls...
Page 16: ...s the Display button repeatedly to select the desired display mode If the first or second display mode is selected a profile of the speed settings of the program will appear in the display A small arr...
Page 17: ...To stop the program at any time press the Stop button To restart the program press the Start but ton The walking belt will begin to move at 1 mph When the next segment of the program begins the tread...
Page 18: ...utive segments 5 Adjust the maximum target heart rate setting if desired To adjust the maximum target heart rate setting press the increase and decrease buttons beside the User Enter button see EXERCI...
Page 19: ...the Speed or Incline buttons however when the console compares your heart rate to the current target heart rate set ting the speed or incline of the treadmill may automatically change To stop the prog...
Page 20: ...t will begin to move Hold the handrails and begin walking 5 Select a display mode and program the desired speed and incline settings When a Record program is selected the console of fers three display...
Page 21: ...cally adjust to the first speed and in cline settings that you programmed previously Hold the handrails and begin walking 5 Select a display mode and monitor your progress with the display and the tra...
Page 22: ...walking 5 Select a display mode and monitor your progress with the display and the training zone bar When an iFIT program is selected the console of fers three display modes see step 6 on pages 14 and...
Page 23: ...s fully plugged in Next press the Play button on your MP3 player or CD player Then adjust the volume of your MP3 player or CD player If you are using a portable CD player and the CD skips set the CD p...
Page 24: ...he pin on the latch knob Release the latch knob Make sure that the latch plate is resting against the pin as shown To protect the floor or carpet from damage place a mat under the treadmill Keep the t...
Page 25: ...d as shown Using your left hand pull the latch knob to the left and hold it Pivot the frame down until it is past the pin on the latch knob 2 Hold the frame firmly with both hands and lower it to the...
Page 26: ...t breaker see the drawing above If the circuit breaker has tripped wait for five minutes and then press the switch to the reset position b Make sure that the power cord is plugged in If the power cord...
Page 27: ...he left rear roller bolt clockwise 1 2 of a turn if the walk ing belt has shifted to the right turn the left rear roller bolt counterclockwise 1 2 of a turn Be careful not to overtighten the walking b...
Page 28: ...must be aerobic Aerobic exercise is activity that requires large amounts of oxygen for prolonged periods of time This increases the demand on the heart to pump blood to the muscles and on the lungs to...
Page 29: ...lles Stretch With one leg in front of the other reach forward and place your hands against a wall Keep your back leg straight and your back foot flat on the floor Bend your front leg lean forward and...
Page 30: ...sformer 43 1 Controller 44 1 Foot Pad Left 45 1 Belly Pan 46 1 Power Cord Grommet 47 1 Power Cord 48 1 Off Reset Circuit Breaker 49 1 Platform Support Bracket 50 3 Tie Holder 51 1 Releasable Tie 52 10...
Page 31: ...an Grommet 102 1 Hole Plug 103 1 Key Clip 104 2 Front Wheel Bolt 105 1 Console 106 1 Support Bracket 107 4 Fan Screw 4 Black Wire M F 6 Blue Wire 2F 4 Red Wire M F User s Manual These parts are not il...
Page 32: ...6 14 12 12 10 8 69 3 44 16 65 15 2 2 5 9 5 9 1 71 6 64 27 36 59 35 2 5 9 62 60 51 87 50 52 49 53 53 18 17 24 7 87 32 11 29 59 28 2 27 32 5 9 62 60 11 61 61 13 EXPLODED DRAWING A Model No 30705 3 R0408...
Page 33: ...97 32 57 63 79 22 21 87 26 30 87 87 87 30 38 32 4 19 4 19 1 14 23 23 23 78 43 33 99 99 23 54 40 41 32 42 83 85 46 47 48 45 7 7 85 7 106 7 91 7 23 92 101 102 37 91 32 25 86 EXPLODED DRAWING B Model No...
Page 34: ...77 77 70 77 75 74 70 70 81 82 89 104 88 94 96 81 82 89 104 88 94 96 81 82 20 76 34 7 72 67 67 72 73 81 82 73 23 90 34 EXPLODED DRAWING C Model No 30705 3 R0408A...
Page 35: ...103 98 105 66 68 66 95 7 7 7 7 7 7 7 7 7 7 7 7 7 93 7 7 23 100 107 107 107 39 35 EXPLODED DRAWING D Model No 30705 3 R0408A...
Page 36: ...ON ICON is not responsible or liable for indirect special or consequential damages arising out of or in con nection with the use or performance of the product or damages with respect to any economic l...