background image

I

UK

D

E

F

NL

P

S

DK

FIN

B

GR

CZ

EE

LV

LT

H

M

PL

SK

SLO

17

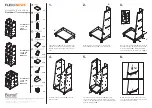
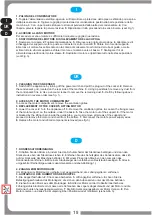
UTILIZZO CORRETTO - CORRECT USE

HT

H1

H0

H2

*

Se si utilizza la cappa non completamente aperta

H1

e poi si dovesse

cambiarle di nuovo l

altezza d

apertura in

H2 ...

, prima vanno resettati gli

attuatori (A), portando SEMPRE a fine corsa, superiore o inferiore, la cappa.
Per evitare eventuali disassamenti fra loro.

IMPORTANTISSIMO

When using the dome not completely open

H1

and afterwards one changes

again the height of the opening like

H2

, you have to reset before the

lifting motors (motoreducers) (A) bringing the dome ALWAYS at its upper or
lower limit stop. This to avoid any eventual misalignment between the two
motoreducers.

VERY IMPORTANT !

Sollte die Haube nicht vollständig geöffnet sein (H1) und Sie möchten die
Position der Haube ändern (H2), so müssen Sie vorher die Haube mit den
Getriebemotoren (A) einmal komplett herunterfahren (H0) oder komplett
hochfahren (HT). Sollten Sie dieses nicht beachten, kann es zwischen den
eiden Getriebemotoren zu einer Fehlausrichtung der Haube kommen.

SEHR WICHTIG

Si la campana se usa no completamente elevada H1 y

MUY IMPORTANTE.

en seguida se cambia el nivel de elevación en H2 , hay que reajustar los
motores ( A) llevando SIEMPRE la campana, hasta el limite, inferior o
superior, para evitar posible desviaciones entre los motores.

Dans le cas où le couvercle n'est pas complètement ouvert « H1 » et vous
devez le ouvrir encore en «H2 » , avant de faire ça il faut réinitialiser les
motoreducteurs (A) en conduisant TOUJOURS en fin de course vers le haut
ou vers le bas, le couvercle.
Cela pour éviter tout défaut d'alignement entre eux.

TRES IMPORTANT

*

IT

ALIA

ENGLAND

ESP

AÑA

DEUTSCHLAND

FRANCE

*

*

Fig.10

Summary of Contents for 4554642092

Page 1: ...Bedienungsanweisung Salatbar ISOLA 4 M UM Art 4554642092 2019 07...

Page 2: ...Italiano English Deutsch Espa ol Fran ais MANUTENZIONE MAINTENANCE INSTANDHALTUNG MANTENIMIENTO ENTRETIEN I UK D E F NL P S DK FIN B GR CZ EE LV LT H M PL SK SLO 2...

Page 3: ...ANAMENTE MEDIANTE IL RUBINETTO 1 APERTURA DELL IMBALLAGGIO IMBALLAGGIO IN SCATOLA DI CARTONE 1a Tagliare la reggia sfilare la scatola verso l alto IMBALLO IN CASSA DI LEGNO 1b Schiodare le tavole di l...

Page 4: ...Tasto 6 UP Tasto 7 DOWN 9 CONTROLLO DI UN REGOLARE FUNZIONAMENTO CONTROLLARE CHE 1 2 La spina sia inserita L interruttore dell impianto refrigerante sia inserito luce verde accesa Il termometro indich...

Page 5: ...t the compressor will continue to operate leading to a wasteful consumption of electricity and poor performance Our products are for internal use only do not install outside restaurants shops Remove e...

Page 6: ...t point which can be changed by pressing key 5 SET or P 6 UP 7 DOWN or see fig 6 9 CHECKING CORRECT OPERATION Make sure that 1 2 the plug is connected the refrigeration unit switch is on green light l...

Page 7: ...ellten Produkte nicht ber die Ablagen oder Gitter hinnausstrecken d rfen Sollte es durch die 12 Luftfeuchtigkeit oder die zu k hlenden Produkte zu au ergew hnlicher Bildung von Eis auf dem Verdampfer...

Page 8: ...uf der Vorderseite befinden Zum ffnen und Schlie en der Kuppel 1 Schalter zum Anheben der Kuppel Position II Anhub Position O Stillstand Position I Absenkung Zum Einschalten der 2 Lichtschalter Innenb...

Page 9: ...a humedad del aire o de los productos que se quieren refrigerar les aconsejamos que paren el compresor y que saquen y coloquen los alimentos en espec ficos contenedores refrigerados a la misma tempera...

Page 10: ...I 2 Interruptor luz 3 Interruptor refrigeraci n 4 Term metro Sirve para encender la instalaci n refrigeradora Indica la temperatura del equipo Regula la temperatura del equipo a Si se pulsa la Termost...

Page 11: ...roduits r frig rer nous vous conseillons de fermer le compresseur et de disposer la marchandise dans un r cipient r frig r la m me temp rature pour toute la dur e n cessaire au d givrage si vous laiss...

Page 12: ...ion II pour lever Position O pour arr ter Position I pour abaisser il sert allumer la lumi re interne 2 Int Lumi re 3 Int de r frig ration 4 Thermom tre il sert allumer le syst me de r frig ration il...

Page 13: ...Manuale del manutentore Manuel du pr pos l entretien Wartungshandbuch Maintenance manual Manual de mantenimiento I UK D E F I UK D E F NL P S DK FIN B GR CZ EE LV LT H M PL SK SLO 13 VT VTL...

Page 14: ...anuale del manutentore Manuel du pr pos l entretien Wartungshandbuch Maintenance manual Manual de mantenimiento I UK D E F I UK D E F NL P S DK FIN B GR CZ EE LV LT H M PL SK SLO 14 5 FIG 1 FIG 3 VT V...

Page 15: ...ee fig 1 2 ACCESS TO THE MOTOR COMPARTMENT To access the motor compartment remove the ventilation grilles 3 REPLACEMENT OF THE COVER S LIFTING MOTOR 1 2 3 4 Lower the cover Turn the appliance off Remo...

Page 16: ...entaci n el ctrica del motor Sustituir el motor y volver a colocar todo en las mismas posiciones V ase figura 3 1 NETTOYAGE DU CONDENSATEUR 1 Couper la tension lectrique en agissant sur l interrupteur...

Page 17: ...net sein H1 und Sie m chten die Position der Haube ndern H2 so m ssen Sie vorher die Haube mit den Getriebemotoren A einmal komplett herunterfahren H0 oder komplett hochfahren HT Sollten Sie dieses ni...

Reviews: