16 | NorD PIaNo 5 USEr maNUaL oS V1.1x
In this example, the Program Select 1 button has been pressed. The
dash (-) indicates that another digit can be entered, to select program
11-15.
To set up a transpose that affects
all
programs, use the Global
Transpose parameter in the System Menu.
The Transpose parameter can be applied to
MIDI
in two different ways,
either transposing
outgoing
or
incoming
mIDI, based on the "Transpose
mIDI at" setting in the mIDI menu. read more about this on page 22.
moNo
Press
MONO
(Shift + Transpose) to set the outputs of the Nord Piano
5 to mono. This is a global setting which affects all programs until it is
deactivated or the Nord Piano 5 is turned off.
KB SPLIT
When a
KB SPLIT
(Keyboard Split) is active the keyboard is divided into
two zones, allowing for a variety of split and layered configurations.
Layers are assigned to the lower and upper sides of the split point by
using the KB Split
LO
and
UP
settings in the Piano and Sample Synth
sections.
CHooSINg a SPLIT PoSITIoN
Press
KEY
to move the split point incrementally be-
tween the 7 keyboard split positions, C3-C6, until the
desired location is reached. LEDs are provided above
the keyboard, indicating which split position is active.
Holding down the
CLEAR
button, as indicated by the
“
6
“ symbol, resets the KB Split setting for all active layers.
SPLIT x-FaDE SETTINgS
Normally the transition between two keyboard zones is immediate, with
no overlap between the sounds selected for each zone. By activating
one of the
X-FADE
settings, sounds can instead be mixed or “cross-
faded” across the split point, creating a smooth transition between the
sounds. The three available options are:
When x-Fade is turned
Off
there is no cross-fade between sounds.
The
1
setting represents a total width of 12 semitones. The sound
below
the split point fades out across 6 notes
above
it and sounds
above
the
split point will similarily reach 6 notes
below
it.
The
2
setting provides a width of 24 semitones, 12 below the split point
and 12 above it.
mIDI LED INDICaTor
The
MIDI
LED, located below the master Level dial, blinks as
incoming mIDI messages are received by the mIDI In port, or
over USB.
Program DIaL
The
PROGRAM
dial to the left of the Display is used to
select programs, to set parameter values and to enter
characters in program names. Pressing
SHIFT
while turning
the dial activates the
LIST
function, which will display all
programs in a list.
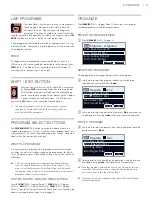
Program LIST, aBC aND CaT
The
LIST
(Shift + Program dial) view provides great overview when
browsing programs linearly (
Num
selected in the display) but also
presents two additional sort modes:
Abc
(Program Select 2) and
Cat
(Program Select 3).
Abc
sorts the list alphabetically while
Cat
will display all programs of the
selected category. To select a specific character or category, hold down
the
Abc
or
Cat
soft button respectively (as indicated by the “
6
“ symbol)
and use the dial.
NUmErIC PaD NaVIgaTIoN moDE
There are two distinct options for how programs and banks are
navigated: The default "page based" mode and the
Numeric Pad
mode.
To enable or disable Numeric Pad mode press
NUM PAD
(Shift + Prog
View).
In Numeric Pad mode the Program Select 1-5 buttons are used
for
entering any program number (11-55) within the current bank, rather
than directly switching between the 5 programs on a page. as an
example, to select program
12
within the current bank, first press
Program Select 1 (to select page 1) and then Program Select 2 (to
select program 2 within that page). Here are some additional points to
keep in mind:
• The Program dial can be used for switching programs incrementally,
just as in the default navigation mode.
• a “num” symbol at the top of the display indicates that Numeric Pad
navigation is active.
Program EPiano2
A:31 Grand Imperial
A:32 Ballad EP 1
A:33 Bambino Upright
A:34 Mellotron Flutes
Num
Abc
Cat
A:1-
White Grand
num


