21
Figure 19: Cable Configurations: C03, C11, C12, C13 and C16
7.
Connect the 6-pin shroud (S6) on the valve interface cable (C12) to T6 on C11. Route C12
to the Hardi main lift valve block located on the bottom of the sprayer near the axle.
8.
Insert the 2 sets of tees between the matching Hardi main lift valve connections according
to the labels on the wires.
9.
Connect the 3-pin tower (T3) on the roll pigtail cable (C16) to S3 on C11.
10.
Connect the wires labeled “
LEFT
” and “
RIGHT
” on C16 to the Hardi PCB. Insert the
NORAC wires under the screw terminals with the existing Brown HARDI wires (Tilt L +
[Black wire] and Tilt R + [White wire]) as shown in
Figure 20
.
C16 may have labels “CW” and “CCW” on it instead of “LEFT” and
“RIGHT”, respectively. “LEFT” or “CW” is the black wire on C16.
“RIGHT” or “CCW” is the white wire on C16.
Figure 20: HARDI Junction Box
Summary of Contents for UC4.5
Page 1: ...Hardi Aftermarket New Navigator New Commander Installation Manual HD7 HD12 ...
Page 6: ...3 3 Kit Parts 3 1 Kit Overview Figure 2 HD7 System Parts ...
Page 7: ...4 3 2 Hydraulic Plumbing Figure 3 Single Acting Force Boom Hydraulic Plumbing ...
Page 8: ...5 Figure 4 Double Acting Eagle Boom Hydraulic Plumbing ...
Page 22: ...19 Figure 17 Roll Sensors Mounted on an SPC Eagle Boom ...
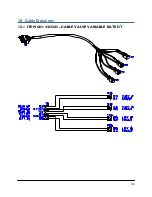
Page 37: ...34 10 Cable Drawings 10 1 ITEM C03 44656D CABLE VALVE VARIABLE RATE DT ...
Page 38: ...35 10 2 ITEM C05 43210 20 CABLE UC5 NETWORK 18 AWG 20M ...
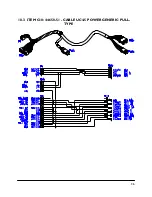
Page 39: ...36 10 3 ITEM C10 44650 51 CABLE UC4 5 POWER GENERIC PULL TYPE ...
Page 40: ...37 10 4 ITEM C11 44651 50 CABLE UC4 5 EXTENSION VALVE GENERIC ...
Page 41: ...38 10 5 ITEM C12 44658 42 CABLE UC4 INTERFACE AMP ML ONLY ...
Page 42: ...39 10 6 ITEM C13 44658 60 CABLE UC4 INTERFACE BYPASS AMP SUPERSEAL ...
Page 43: ...40 10 7 ITEM C16 44658 49 CABLE UC4 VALVE ROLL PIGTAIL ...
Page 44: ...41 10 8 ITEM C30 43250 06 CABLE UC5 BATTERY PIGTAIL FUSED ...


