background image

GB 36

PROBLEM SOLVING

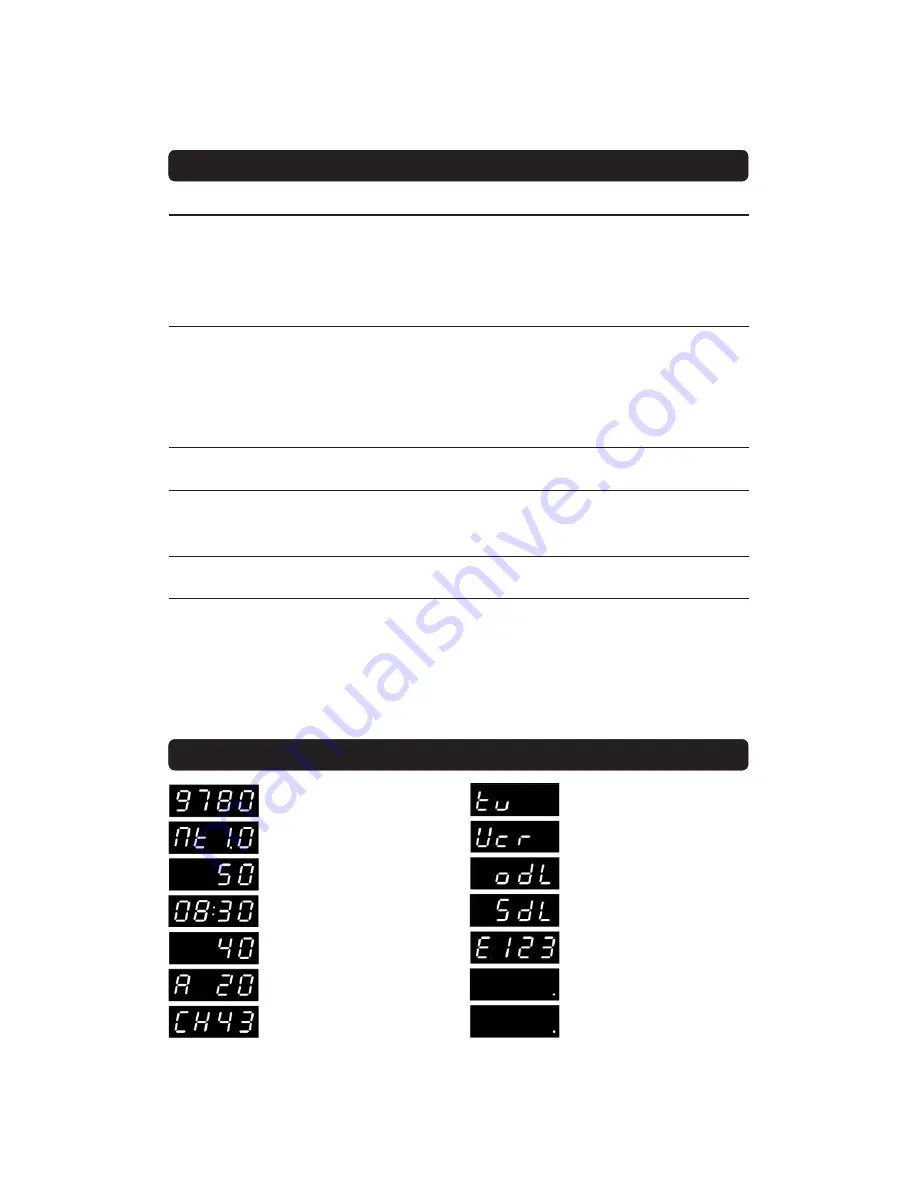
FRONT PANEL DISPLAY

Problem

The remote control is not working.

You see the on-screen message.

Viewing card error.

You have forgotten your secret PIN
code.

CA Module is not working.

Black picture.

Possible causes

Battery exhausted.
Remote control is incorrectly
aimed.

The Mediamaster is in standby
mode.

The Mediamaster can’t recognise
your Smartcard.

CA module is not installed.
CA module is not correctly
inserted.

CA module is inserted but not
working correctly.

What to do

Change the batteries (both).
Aim the remote control at box.
Check that nothing blocks the front
panel.
Check if (.) is flashing on the front
panel display when you press a button.
If not replace the batteries (both).

Check that you are using the proper
Smartcard. Check that the Smartcard
has been correctly inserted with the
gold chip downwards. If the problem
persists, you may have a problem with
the card.
Contact your dealer or Service Pro-
vider.

Contact your Service Provider.
They will help you set it up again.

Check that the CA module has been
correctly inserted.
Contact your dealer or Service Pro-
vider.

Eject the CA module and reinsert it
again.

Please note:

 The first thing to do before sending the Mediamaster to service is to:

1: Perform ”Diagnostic” procedure in System Information menu.
2: Try to download a new software into the Mediamaster.
A new software may solve the problem. See the relevant section ”Receiver Upgrade” earlier on in this
manual.

What to do if you can’t solve the problem

If you have tried all of the actions suggested above, without solving the problem, please contact your
Service Provider.

Channel number in TV mode.

The Mediamaster is in standby
mode, and current time is shown.

In TV  mode.

Channel number in radio mode.

Flashes when pressing a button
on the remote control.

RF channel in tuning mode.

Lights when no signal is being re-
ceived.

When power-up, boot version,
product family and system software
version is shown.

When starting from standby, prod-
uct variant and system software
version is shown.

Remaining time in percent during
the download procedure.

In video mode.

Error messages. For service per-
sonnel

When downloading new software
via the air.

When downloading new software
via the Serial RS232 socket.

Summary of Contents for MEDIAMASTER 9780 S

Page 1: ...Owner s Manual MEDIAMASTER 9780 S ...

Page 2: ......

Page 3: ...witching on for the First Time with SCART Connections 11 When RF connections are used 11 First time installation 12 General Information 12 The Welcome Menu 12 Language 12 Antenna Satellite Selection 13 Antenna with one LNB for Sirius 13 About Signal Strength AGC and Signal Quality SNR 14 LNB type 14 Other Antenna Satellite Combinations 14 One Antenna One LNB Configuration 14 Multisatellite DiSEqC ...

Page 4: ...cess to the Internet it is a good advice to visit the Viasat homepage www viasat se now and then to get fur ther information concerning the functions of the Mediamaster Allow clear space around the Media master for sufficient ventilation Do not cover the Mediamaster or place it on a unit that emits heat Use a soft cloth and a mild solution of washing up liquid to clean the casing Never allow liqui...

Page 5: ...o enter teletext if available MENU To display or exit from the Main Menu screen GUIDE Start the downloading of the Viasat Programme Guide P P To change channels up and down by one unit To leave an automatically downloaded application and return to TV radio mode To change page in a menu list text if more than one page is available To browse through teletext history To move up down in the menus and ...

Page 6: ...on to the TV AUX SCART for connection to a VCR or an analogue satellite receiver LNB cable also feeds the LNB with a supply voltage of 13 18 V V H polarisation and a 0 22 kHz signal bandswitch Max LNB current 400 mA DIGITAL AUDIO phono connector S PDIF output for connection to a HiFi system Mains lead 95 250 V AC 50 60 Hz ANTENNA Satellite dish input F connec tor SERIAL PORT to read and load data ...

Page 7: ...l need this code when you want to communicate with Viasat via the telephone modem ABOUT THE SMARTCARD General To be able to receive scrambled digital satellite channels you will need a Smartcard from your Service Provider Viasat The Service Provider is the programme distributor Important To be able to use the box the card has to be inserted in the slot If the card is missing the box is locked Furt...

Page 8: ...wner s manual License agreement Quick guide Phone cable RF lead Preparing the Remote Control Remove the cover on the battery compartment at the bottom of the remote control Insert the 2 AAA 1 5 V batteries as shown in the diagram taking care to observe the and markings indicated inside Replace the cover Installing the Satellite Dish Connect the coaxial cable with F connectors fitted from the LNB o...

Page 9: ... SCART Connecting a TV and VCR Refer to your VCR s manual for full instructions Connect one SCART lead between the main SCART socket on the TV and the TV SCART socket on the Mediamaster Connect another SCART lead between the VCR and the AUX SCART socket on the Mediamaster Connect the RF lead from the RF output on the VCR to the TV aerial input on the TV Connect the TV aerial to the RF input socket...

Page 10: ... to the RF input socket on the VCR Connect the TV aerial to the RF input socket on the analogue receiver In order to switch the signal from the dish between the ana logue and digital receivers you need a Nokia Smart switch at A B in the diagram or a Universal Twin LNB Nokia Smart switch Connect a coaxial cable between output A on the switch ac cessory to the LNB socket on the analogue receiver Con...

Page 11: ...mber displayed on the front panel of the Mediamaster When you have correctly changed the UHF channel number you will see the Welcome menu on the TV screen If there is interference from other channels you will have to change the chosen UHF channel Follow the instructions in your TV manual to store this UHF chan nel as the channel used by your Mediamaster You will have to select it when you want to ...

Page 12: ...p in the installation process However and this is important often more than one value has to be entered in a menu First perform all necessary settings on the different lines Then confirm them all simultane ously by pressing OK You can always go back to the previous menu by pressing the BACK button Use the buttons to move upwards and downwards from one line to another Use to change settings You can...

Page 13: ...ther antenna and satellite combinations FIRST TIME INSTALLATION 3 The bar at the top of the menu will now change to a red yel low green Signal Quality SNR indicator for that specific channel If you have found a digital signal from Sirius the background will change and show a TV picture It may take a few seconds be fore the picture appears If you do not get a picture you may be tuned to an analogue...

Page 14: ...wing SNR The bar is now red yellow and green and will indicate the signal quality from that spe cific channel Other Antenna Satellite Combinations Select this alternative a when you do not use a Universal LNB b when you use 2 LNBs One Antenna One LNB Configuration Select this alternative when you use a LNB that is not a so called Universal LNB LNB type Select the local oscillator L O frequency val...

Page 15: ...h channels from Sirius and Thor In this case you first must connect the LNBs to an external switch since there is only one antenna input on the Mediamaster Once installed the switch automatically selects the correct LNB for the selected channel This external switch is better known as a DiSEqCTM switch Since the switch can be located close to the LNBs you only need one cable down to the Mediamaster...

Page 16: ...ed in a above Satellite In this example select Sirius because its LNB is going to be con nected to the DiSEqC 2 input on the switch Predefined channel Select one of the predefined channels and adjust the antenna as described on page 13 Antenna with one LNB for Sirius Be fore you can continue a TV picture from the predefined channel must be visible in the background When you do have a picture and p...

Page 17: ...en the search procedure has ended the screen will show how many TV and Radio channels have been found Press OK to con tinue Select Country for setting the clock Select the country where the box is used After that the clock automatically will show the correct time valid for that country Finishing the first time installation After selecting the country press OK The channels found at the search proce...

Page 18: ... this information will be shown The information may include Current time Channel list Channel number and name Name of the current and next programme The start and total time of the current programme A bar indicating the elapsed time of the current programme Recommended lowest age limit for watching the programme The start and total time of the next programme Programme information will only be avai...

Page 19: ...the current channel and red when information for another channel is shown In this view you can select to get information about the current and next programme by using the buttons You can leave the menus at any time and return to viewing TV by pressing EXIT Guide By pressing the GUIDE button you start the downloading of the Viasat programme guide For further instructions please follow the informati...

Page 20: ...annel name is highlighted to start watching listening to it To change one channel list page at a time use the double arrow buttons You can get extended information about a marked highlighted channel by pressing the i button VIEWING MODE Channel number and name Name of the Channel list Indicates a locked channel Channel found at a new channel search Options Green Button By pressing the OPTION butto...

Page 21: ...eletext page if Teletext is transmitted Select teletext pages with the numeric buttons on the remote control You can also quickly step to the different page alternatives shown in any page by pressing Press OK on a selected number to go to that page Press EXIT BACK or TEXT to return to TV Radio mode The 0 button will show the index page normally page 100 will show the next or previous teletext page...

Page 22: ...hannels By creating your own favourite lists you can make channel handling a bit more con venient Important about editing channels Before you start you must select which list TV or Radio you want to edit While you are watching TV and press the MENU button and select Edit Channels you can edit TV channels While listen ing to radio channels and doing the same you can edit radio chan nels After the s...

Page 23: ...he list Delete list If you want to delete a Favourite list completely select the list and press OK Rearrange lists If you have created several Favourite lists you can determine the sequence in which the lists will appear MAIN MENU How to give a specific name This procedure is the same whether you enter a name for the first time or change an existing Move to a new character position by using To del...

Page 24: ...s in order to prevent e g your children from watching Select the channel you want to lock and press OK Repeat the procedure for each channel you want to lock When you lock a channel in any list the channel will automatically be locked in all other lists A locked channel will be marked with a padlock symbol When watching TV you will be asked to enter your access code before you can watch a locked c...

Page 25: ...o move the selected channels to a new position within the list When the channels are in the position you want press OK MAIN MENU Delete Channels From here when the All TV list is selected in the Edit Chan nels menu you can delete channels Please note Channels deleted this way will be permanently deleted The only way to get them back is to perform a new channel search To delete channels Mark the ch...

Page 26: ...ectable 1 All Configured Satellites Will search and update the lists from those satellites you use to watch channels from If you have downloaded channels from Sirius and Thor both satel lites will be updated 2 Current Satellite Will search and update the lists from the satellite you right now are watching TV 3 Current Network Will search and update the lists from the Network the present channel be...

Page 27: ...ess OK to start the search procedure With 2 LNBs connected via a DiSEqC switch you can select from which satellite to search Also the alternative All Satellites is available which enables you to search from all satellites towards which you have LNBs and antennas adjusted Manual Search When you perform a Manual Search you first need to enter some parameters for the channel search to work The inform...

Page 28: ...change the RF channel If you change the RF channel number you must also change it to the same value on the TV If you do not the picture will become black The RF channel number will be in dicated on the front display of the Mediamaster Position of the RGB output Adjust the horizontal position of the TV picture with the but tons The TV signal see above must be set to RGB for this function to work An...

Page 29: ...tched Telephone Network PSTN However due to differences between the individual PSTNs provided in differ ent countries the approval does not of itself give an uncondi tional assurance of successful operation on every PSTN termina tion point In the event of problems you sholud contact your equipment supplier in the first instance Receiver Upgrade From this menu you can check if new software and new ...

Page 30: ... the menu language You also have access to the Parental Control and the Appearance menus Language Preferences Menu Language Here you may select in which language the menus will be shown Main and Alternative audio Ianguage If more than one audio language is transmitted you may select the main and an alternative language Subtitles If you select the Visible alternative for subtitling and more than on...

Page 31: ... the stand ard 1234 DO NOT FORGET IT Without it you do not have ac cess to any of the functions where the code is required If you forget it you have to contact an Authorized Nokia Service Center to get help Appearance Preferences Banner time out When you switch channels an information banner will be shown for a few seconds You can select for how long the banner will be shown Volume bar Select whet...

Page 32: ...t the condition of certain parts of the Mediamaster you can run a diagnostic test System Information This gives general information about which hardware and soft ware version is installed in your Mediamaster After each new download the version number will change Release info By pressing the i button while still in the System Information menu you will get a message describing the new functions in t...

Page 33: ...is means that you have to enter your smartcard PIN code to be able to watch the age rated channels The age rating of each programme is controlled by your Service Provider Do not use this Age Rating Control if you already are using the Age Rating Control within the Parental Control menu See page 31 Age Limit Select an age limit Programmes transmitted with a lower limit age will not need the access ...

Page 34: ...rder TV programmes AGC Automatic Gain Control CA Conditional Access A system to control subscriber ac cess to services programmes and events DVB The Digital Video Broadcast group was created to estab lish a technical framework for the introduction of digital video broadcasting systems EPG Electronic Programme Guide A software that enables viewers to navigate among the large number of channels prov...

Page 35: ... the VCR is not set to the channel tuned for digital satellite TV What to do Check that the mains cable is plugged into the power socket Press the standby button or any number button to bring the Media master out of standby mode Adjust the dish Check the signal level indicator in one of the channel search submenus Check the cable connections LNB and other equipment connected be tween the LNB and t...

Page 36: ...the CA module has been correctly inserted Contact your dealer or Service Pro vider Eject the CA module and reinsert it again Please note The first thing to do before sending the Mediamaster to service is to 1 Perform Diagnostic procedure in System Information menu 2 Try to download a new software into the Mediamaster A new software may solve the problem See the relevant section Receiver Upgrade ea...

Page 37: ...urn channel on the phone line Contact modular 6 pin jack Protocol V22 1200 bits sec Security information The modem connection is made according to the TNV 3 circuit type All other connections are made according to the SELV circuit type Conditional access system Embedded Viaccess Smartcard Interface Interface for one card according to ISO 7816 Supports embedded descrambler Viaccess Front panel 4x7 ...

Page 38: ...1 Switch type and port 2 LNB type 3 LNB Offset Voltage 4 Satellite 5 Predefined channel 1 2 3 8 3 4 6 7 5 2 6 1 7 1 2 1 2 1 Edit Channels Astra 1 Create List 2 Rename List 3 Rearrange Lists 4 Delete Llist 5 Select Channels 6 Lock Channels 7 Rename Channels 8 Rearrange Channels 9 Delete Channels 1 2 Antenna Satellite Configuration 1 One Antenna One LNB Configuration 2 Multisatellite DiSEqC Switch C...

Page 39: ......

Page 40: ...66 76966 10 0040 Nokia is a registered trademark of Nokia Corporation www nokia com ...

Reviews: