Installation Instructions
4/4
The system is now ready to charge. Turn Storage Tank Isolation Valve to the open position.
Turn on water at mains, open self Piercing Valve to release water into the system.
Swan neck tap should be closed during this process.
The tank will take 3-5 hours to fill. The filling noise will stop when the tank is full.
Fully discharge all the water in the Tank via the Swan Neck Tap to clean the system.
When the Tank has emptied, close the Swan Neck Tap to allow the Tank to refill. The water will now be
ready to drink
Please Note:
Water may seem to be cloudy or milky for the first week or so after installation, this is quite normal, as this
is air bubbles, and will settle after the first few charges of your system. You are now ready to enjoy the
purest water you can drink courtesy of your Noga Watercare reverse osmosis.
WARNING:
When assembling these units if any leaks occur turn water off.
Tighten any seeping joints and then turn water back on.
Mains water pressure can vary, therefore it is essential to check for leaks daily
during first week and periodically there after.
Filter Replacement
Sediment, Carbon Block & In-Line Carbon Filter.
Change every 12 months.
R.O. Membrane Filter:- Change every 24 months.
To replace filters, turn off water at mains and self-piercing valve.
Open Swan Neck Tap to release water pressure.
Carefully release housings with ring spanner supplied.
Replace filters and ensure large “O” ring in top of housing is seated evenly before re assembling the
housings to the unit. Finally tighten with ring spanner.
To replace top filter, push down the flange on the fitting and remove the ¼” pipe.
Pull filter from “C” clips. Unscrew elbow connectors from used filters and fit to new filter, apply PTFE to
threads to ensure a watertight seal.
Push ¼” pipe into new filter ensuring flow direction is left to right.
Snap filter back into “C” clips.
To replace R.O. Membrane Filter, remove pipe from connector “E” and unscrew Housing Cap.
Replace new R.O. Membrane. Ensure sealing ring is in place around neck of housing and screw head back
on Re connect pipe to connector “E”.
Always check for leaks as specified above.
System Includes:
1 X Three Stage Backet With Mounting Screws
3 X Filter Housing
1 X Membrane Housing
1 X 3.6 Gallon Plastic Tank
1 X Shut-Off Valve
1 X Flow Restrictor
1 X Check Valve
1 X Drain Clamp Adaptor
1 X Ceramic Valve 1/4 Turn Swan Neck Tap
1 X Quick Fit Self Cutting Valve
1 X Key / Wrench
1 X Polypropylene Sediment Filter 1 Micron - NW 2111 (No sealing rings)
2 X Carbon Block Filters 5 Micron - NW 2120 - (2 sealing rings, 1 each end)
1 X In-Line Activated Carbon Filter- NW 2920 - (No sealing rings)
1 X Semi Permeable R.O. Membrane Filter 1 Micron - NW 5075 - (2 small “o” rings + 1 large rubber seal)
If for any reason you experience a problem with this system.
Please call
NOGA WATERCARE TECHNICAL HELP LINE.
On 0208 400 2020 Mon-Fri 9-5pm
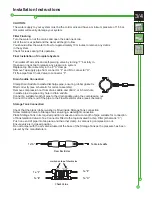
FLOW
NW 2920
NW 2111
NW 2120
NW 2120
L/H
R/H
MIDDLE
Filters can be fitted either way up
NW 5075
© Copyright LinearTools Ltd 2005
Issue 2005/9


