Installation Instructions
2/4
Reverse Osmosis
Filter Unit Fitting
This system is supplied pre-assembled and will need only 4 connections made.
Before the system can be fully installed it is necessary to flush out the 3 vertical filters to remove
any debris.
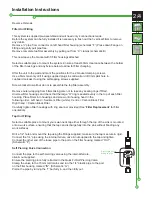
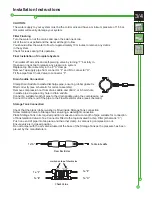
Remove ¼” pipe from connector on left hand filter housing (schematic “F”) Press down flange on
fitting and gently pull pipe free.
Remove complete top filter assembly by pulling out from “C” clamps (schematic B)
This now leaves the bracket with 3 filter housings attached
Select a suitable place to mount the system. Ensure at least 40mm clearance between the bottom
of the filter housings and any fixture below to allow for filter changing.
Offer the unit to the wall and mark the positions for the 2 bracket clamping screws.
Use a 6mm masonry drill if using supplied plugs in solid wall or drill 3mm pilot hole in
cupboard carcass if using the self-tapping screws supplied.
Screw bracket to wall but do not re assemble the top filter assembly
Remove outer wrapping from filters taking care not to lose any sealing rings if fitted.
Unscrew filter housings and check that the large “O” ring is seated evenly in the top of each filter
housing. Place filters into housings and screw onto housing head in the
following order: Left hand = Sediment Filter (white). Centre = Carbon Block Filter.
Right hand = Carbon Block Filter.
Carefully tighten filter housings with ring spanner provided (See “
Filter Replacement
” for filter
orientation).
Tap Unit Fitting
Select a suitable place to mount your swan neck tap either through the top of the sink or mounted
onto a work surface, ensuring that the tap can discharge fully into the sink without flooding any
work surfaces.
Drill a 1/2” hole and mount the tap using the fittings supplied, make sure the tap is secure & rigid.
Connect the 1/4” pipe using the internal ferrule, olive & nut supplied to the tap and tighten.
Connect the other end of the loose pipe to the port on the filter housing marked “OUT”.
(Schematic “F”)
Self Piercing Valve Connection
Connect the pipe to the self-piercing valve using the internal ferrule,
olive & nut supplied.
Ensure the piercing pin is fully retracted in the Quick Fit Self Piercing Valve.
Clamp the valve to the 15mm cold mains and run the 1/4” plastic pipe to the port
on the filter housing marked “IN”. (Schematic “G”)
Pierce the pipe by turning the ‘T’ bar fully in, and then fully out.
Retract pin before
fitting to pipe


