background image


TPC6000-CXX3 User Manual 


68 

3.5 

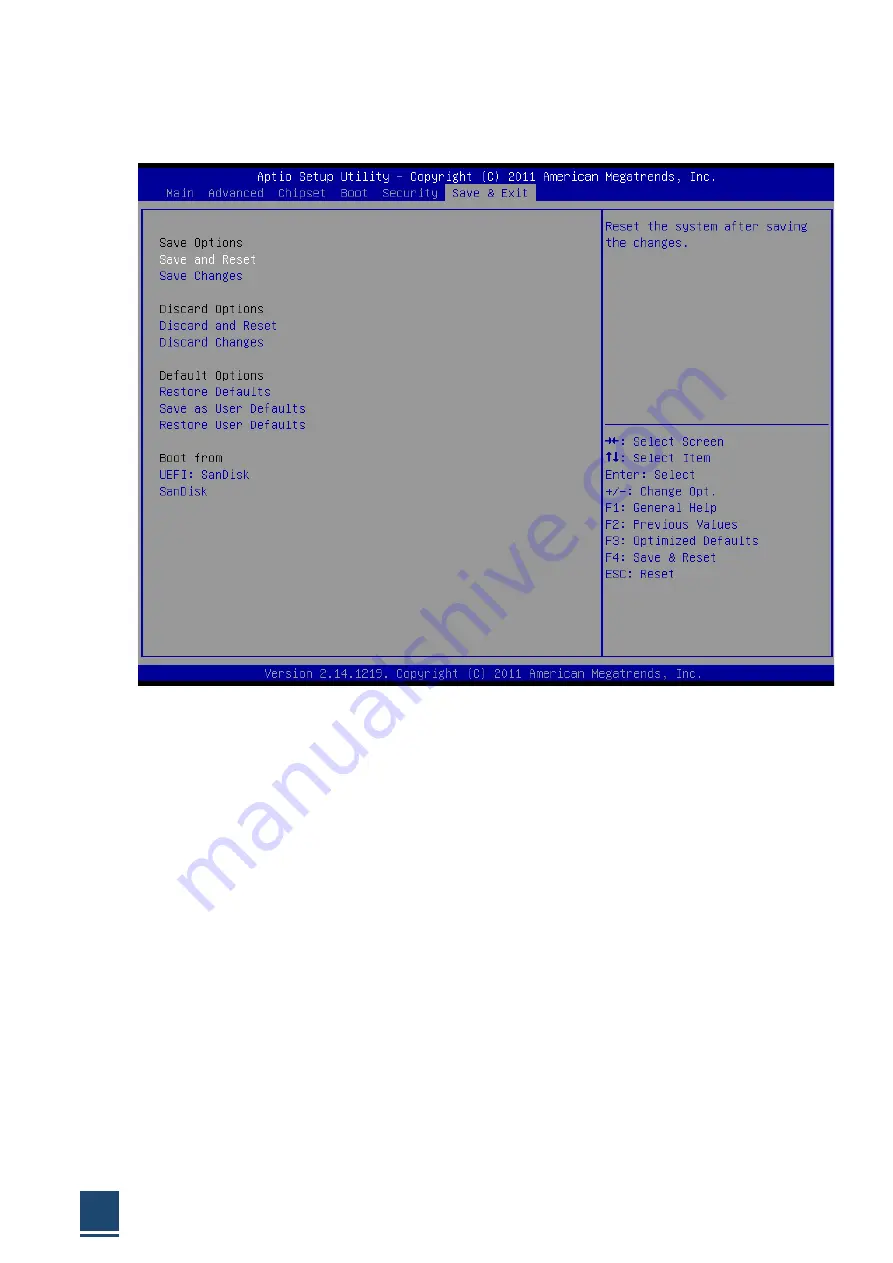
Exit Option 


Figure 3.5 Exit Option 
 

3.5.1 Save Changes and Exit 

When  you  have  completed  system  configuration,  select  this  option  to  save  your 
changes, exit BIOS setup and reboot the computer so the new system configuration 
parameters can take effect. 
 
1. Select Exit Saving Changes from the Exit menu and press <Enter>. The following 
message appears: Save Configuration Changes and Exit Now? [Ok] [Cancel] 
2. Select Ok or cancel. 

3.5.2 Discard Changes and Exit 

Select this option to quit Setup without making any permanent changes to the system 
configuration. 
1.  Select  Exit  Discarding  Changes  from  the  Exit  menu  and  press  <Enter>.  The 
following message appears: Discard Changes and Exit Setup Now? [Ok] [Cancel] 
2. Select Ok to discard changes and exit. Discard Changes 

Summary of Contents for TPC6000-C123-TH-BW5300U

Page 1: ...TPC6000 CXX3 User Manual 1 d User Manual Ver1 0 User Manual TPC6000 CXX3 Industrial Panel PC ...

Page 2: ...egistered trademarks of their respective owners AMI is a trademark of American Megatrends Inc Intel Atom are trademarks of Intel Corporation IBM PC AT PS 2 VGA are trademarks of International Business Machines Corporation Microsoft Windows is a trademark of Microsoft Corp RTL is trademark of Realtek Semiconductor Co Ltd DECLARATION OF CONFORMITY This restriction is subject to provide protection fo...

Page 3: ... C123 TH BW5500U 12 1 LCD 5 th Generation Intel 5500U 3 0G Dual Core CPU No memory No hard disk 2 RS232 or RS485 optional 2 Gigabit Ethernet ports 4 USB3 0 capacitive touch screen 1024 768 DC12V 24V input Two year warranty TPC6000 C123 TH BW5300U 12 1 LCD 5 th Generation 5300U 2 9G Dual Core CPU No memory No hard disk 2 RS232 or RS485 optional 2 Gigabit Ethernet ports 4 USB3 0 capacitive touch scr...

Page 4: ...TPC6000 C173 T BW5300U 17 LCD 5th Generation Intel 5300U 2 9G Dual Core CPU No memory No hard disk 2 RS232 or RS485 optional 2 Gigabit Ethernet ports 4 USB3 0 capacitive touch screen 1280 1024 DC12V 24V input Two year warranty C1853W Description TPC6000 C1853W T SL1503 18 5 LCD 6 th Generation Intel 3855U 1 6G Dual Core CPU No memory No hard disk 2 RS232 or RS485 optional 2 Gigabit Ethernet ports ...

Page 5: ...e touch screen 1920 1080 DC12V 24V input Two year warranty TPC6000 C2153W T BW5300U 21 5 LCD 5 th Generation Intel 5300U 2 9G Dual Core CPU No memory No hard disk 2 RS232 or RS485 optional 2 Gigabit Ethernet ports 4 USB3 0 capacitive touch screen 1920 1080 DC12V 24V input Two year warranty TECHNICAL SUPPORT AND SERVICE Please visit en nodka com to get the details User should collect the product in...

Page 6: ... power cable in a hiding place and do not cover anything on the cable 8 Please be cautious of the warnings and notices on the device 9 If the device is not used for a long time shut off the power to avoid the damages by transient over voltage 10 DO NOT allow any liquid flow into the device so that cause fire or short circuit 11 DO NOT pull the device up by yourself please let any certificated engi...

Page 7: ...ION 2 1 UNPACK THE FLAT PANEL PC 21 2 2 PACKING LIST 22 2 3 HARD DRIVE INSTALLATION 23 2 4 SSD INSTALLATION BY USING MSATA 24 2 5 BAT BUTTON BATTERY REPLACEMENT 25 2 6 MOUNTING SYSTEM 26 2 6 1 ARM MOUNTING 26 2 6 2 WALL MOUNTING 27 2 6 3 PANEL MOUNTING 28 2 7 IO CONNECTORS 30 2 7 1 LAN CONNECTION 31 2 7 2 SERIAL DEVICE CONNECTION 31 2 7 3 USB CONNECTION 32 2 7 4 VGA MONITOR CONNECTION 33 2 8 POWER...

Page 8: ...ER CONFIGURATION CHANGES 58 3 1 5 BIOS MENU BAR 58 3 2 MAIN 58 3 2 1 SYSTEM TIME SYSTEM DAT 59 3 3 ADVANCED BIOS FEATURES SETUP 59 3 3 1 PCI SUBSYSTEM SETTING 61 3 3 2 ACPI SETTING 62 3 3 3 CPU CONFIGURATION SETTING 62 3 3 4 SATA CONFIGURATION 63 3 3 5 USB CONFIGURATION 63 3 3 6 POWER ON CONFIGURATION 64 3 3 7 INTEL GRAPHIC ON CONFIGURATION 65 3 3 8 BOOT CONFIGURATION 66 3 4 SECURITY SETTINGS 67 3...

Page 9: ...TY PRECAUTIONS 72 A 1 1 GENERAL SAFETY PRECAUTIONS 73 A 1 2 ANTI STATIC PRECAUTIONS 73 A 1 3 PRODUCT DISPOSAL 74 A 2 MAINTENANCE AND CLEANING PRECAUTIONS 75 A 2 1 MAINTENANCE AND CLEANING 75 A 2 2 CLEANING TOOLS 75 B 1 HAZARDOUS MATERIALS DISCLOSURE TABLE FOR IPB PRODUCTS CERTIFIED AS ROHS COMPLIANT UNDER 2002 95 EC WITHOUT MERCURY 76 ...

Page 10: ...TPC6000 CXX3 User Manual 10 Chapter 1 OVERVIEW ...

Page 11: ...h flexible combination among the different panel sizes and system boxes customer could get various solution and replace system oe upgrade the platform without changing cabinet design Which is convenient to product maintenance replacement production and upgrade in future OS supports Windows7 WES7 Windows10 Linux Vxworks QNX Monitor can be 12 1 15 17 18 5 21 5 optional 1 2 Features Aluminum Magnesiu...

Page 12: ...power supply DC12V 24V support reverse polarity protection overvoltage protection overcurrent protection Extensive WIFI 3G 4Gwireless 1 x Mini PCIe slot 1 x EasyBUS slot Fanless degin embedded and VESA wall mounted Interfaces VGA DVI 2GLAN 4USB 2COM AUDIO 1 3 External Overview TPC6000 CXX3 make up of front panel monitor and back panel 1 3 1 Front panel The front side of TPC6000 Cxx3 is front panel...

Page 13: ...l components include the touch panel module and the motherboard The motherboard has memory a wireless module and a hard drive 3G wireless modular optional J LAN 2 K USB3 L USB4 M LAN1 N USB1 O USB2 P DVI Q VGA A DC IN 12 24V B Power C Remote switch D Power Indicator light E Hard Disk Indicator F PS 2 G Audio H COM1 I COM2 ...

Page 14: ...support automatic flow control Texpansion slot 1 x Mini PCIe slot extensible 3G WIFI wireless card 1 x EasyBUS slot I O DVI I 2 x GLAN 4 x USB 2 x COM 2 x PS2 Line out Mic in OS OS Windows 7 Windows 7 Embedded Windows8 Windows10 Ubuntu VXWORKS QNX Power Input voltage 12 24VDC 10 support reverse polarity protection overvoltage protection overcurrent protection Maximum Power Dissipation Touchscreen ...

Page 15: ...0 98 x 12 80 NW L C D LCD type 12 1 SVGA TFT 15 XGA TFT 17 SXGA TFT 18 5 HD TFT 21 5 Full HD TFT Resolution 800 x 600 1024 x 768 optional 1024 x 768 1280 x 1024 1366 x 768 1920 x 1080 Colors 16 7MB 16 7MB 16 7MB 16 7MB 16 7MB Active Area W x H 246mm x 184 5mm 9 68 x 7 26 304 13mm x 228 10mm 11 97 x 8 98 338mm x 270mm 13 31 x 10 63 409 8mm x 230 4mm 16 13 x 9 07 476 64mm x 268 11mm 18 77 x 10 56 Ba...

Page 16: ...TPC6000 CXX3 User Manual 16 1 6 Dimensions 1 7 ...

Page 17: ...TPC6000 CXX3 User Manual 17 ...

Page 18: ...TPC6000 CXX3 User Manual 18 ...

Page 19: ...TPC6000 CXX3 User Manual 19 Figure 1 5 TPC6000 C123 C153 C173 C1853W C2153W dimensions ...

Page 20: ...TPC6000 CXX3 User Manual 20 Chapter 2 INSTALLATIONS ...

Page 21: ... wristband or similar device The installation steps below should be followed in order Step 1 Unpack the flat panel PC Step 2 Check all the required parts are included Step 3 Install the hard drive Step 4 Install the compact flash card Step 5 Mount the flat panel PC Step 6 Connect peripheral devices to the bottom panel of the flat panel PC Step 7 Connect the power cable Step 8 configure the system ...

Page 22: ...out all items by following list when you open the package Item Picture Quantity TPC6000 CXX3 1 Power cord 1 Power adapter 1 Mounting Clamps 4 Table 2 1 Packing List If any items are missing or damaged contact the distributor or sales representative immediately ...

Page 23: ...ow Step 1 Flip over this device and you can see its back Step 2 On the machine find the orange HDD cover Table 2 1 Step 3 Open up the hard disk cover and remove it Step 4 Locate the HDD bracket Step 5 Paste the pull and push label and height pad on HDD Table 2 2 Step 6 Insert the hard disk into the slot along the chute Step 7 Recover the organge HDD hard disk cover Table 2 1 Table 2 2 ...

Page 24: ...s device and you can see its back Step 2 Find the expansion slot baffle on the right side of the machine and remove two screws table 2 3 Step 3 Remove the expansion slot baffle and can see the mSATA SSD slot Step 4 Install mSATA SSD and cover and screws table 2 4 Step 5 Recover the expension slot baffl Table 2 3 Table 2 4 mSATA SSD install ...

Page 25: ...ent of button battery Please follow the steps below Step 1 Flip over this device and you can see its back Step 2 Find the BAT battery cover on the right of machine Figure 2 5 Step 3 Remove the battery cover Step 4 Replace the 3 3V button battery Figure 2 4 Step 5 Recover the expension slot baffle Figure 2 5 Figure 2 4 ...

Page 26: ...TPC6000 CXX3 User Manual 26 Figure 2 6 Monitor stand 2 6 1 Arm mounting TPC6000 CXX3 can be installed on any arm that supports the standard VESA mounting interface An example wall arm is shown below ...

Page 27: ...he mounting arm has been firmly attached to the surface lift the flat panel PC onto the interface pad of the mounting Step 3 Align the retention screw holes on the mounting arm interface with those in the flat panel PC Step 4 Secure the flat panel PC to the interface pad by inserting four retention screws through the bottom of the mounting arm interface pad and into the flat panel PC 2 6 2 Wall mo...

Page 28: ...oles on the bracket Step 8 Carefully insert the screws through the holes and gently pull the monitor downwards until the monitor rests securely in the slotted holes And ensure that all four of the mounting screws fit snuggly into their respective slotted holes Step 9 Secure the panel PC by fastening the retention screw of the wall mounting bracket 2 6 3 Panel mounting To mount the TPC6000 CXX3 fla...

Page 29: ...il the frame is flush against the panel Step 4 Insert the panel mounting clamps into the pre formed holes along the edges of the chassis on the two side of the frame Step 5 Tighten the screws that pass through the panel mounting clamps until the caps at the front of all the screws are firmly secured to the panel ...

Page 30: ...n The RJ 45 connectors enable connection to an extend network To connect a LAN cable with a RJ 45 connector please follow the instructions below Step 1 Locate the RJ 45 connector on the bottom panel of the TPC6000 CXX3 J LAN 2 K USB3 L USB4 M LAN 1 N USB1 O USB2 P DVI Q VGA A DC IN 12 24V B Power switch C Remote switch D Power Indicator light E Hard Disk Indicator F PS 2 G Audio H COM 1 I COM 2 ...

Page 31: ...erial device connector to the external interface by tightening the two retention screws on either side of the connector 2 7 2 Serial device connection To connect USB device to the TPC6000 CXX3 please follow the instruction below Step 1 Locate the DB 9 connector The location of the DB 9 connector is shown in chapter 2 Step 2 Insert the serial connector Insert the DB 9 connector of a serial device i...

Page 32: ...To connect USB device to the TPC6000 CXX3 please follow the instruction below Step 1 Located the USB connectors The locations of the USB connectors are shown in Chapter 2 Step 2 Align the connectors Align the USB device connector with one of the connectors on the bottom panel Please See Figure 2 15 Figure 2 15 USB Device connector Step 3 Insert the device connector Once aligned gently insert the U...

Page 33: ...face Step 3 Insert the VGA connector Once the connectors are properly aligned with the insert the male connector from the VGA screen into female connector on the TPC6000 CXX3 please see the figure 2 16 Figure 2 16 VGA connection Step 4 Secure the VGA connector Secure the DB 15 VGA connector from the VGA monitor to the external interface by tightening the two retention screws on either side of the ...

Page 34: ...TTING FUNCTION 1 2 5V 3 4 12V 5 6 Ring Default Table 2 3 Jumper of PIN9 on DB9 USB We provide a standard single deck USB port in front panel and 2 x 2 standard double deck USB interface on I O interfaces you can use the 5 USB interfaces at the same time and here is the interface definition Table 2 5 USB PIN SIGNAL RS 232 RS 485 Only COM6 1 DCD Data 2 RXD Data 3 TXD N A 4 DTR N A 5 GND GND 6 DSR N ...

Page 35: ...ight side Table 2 6 LAN connector Network status Left LILED double colors Orange Green Right ACTLED single color Yellow 1000M N A Constant ON FLASH OFF 100M Constant ON N A FLASH OFF 10M OFF OFF FLASH OFF Active description GREEN ORANGE Data Transferring No Data Transferring Linking indicator Active status indicator Table 2 7 Indicator of LAN connector PS2 Keyboard Mouse PS2 Keyboard Mouse Connect...

Page 36: ...ect it directly Here is the definition 1 6 11 5 10 15 PIN SIGNAL PIN SIGNAL 1 RED 9 5V 2 GREEN 10 GND 3 BLUE 11 GND 4 NC 12 DDC_Data 5 GND 13 HS 6 GND_R 14 VS 7 GND_G 15 DDC_Clock 8 GND_B Table 2 8 VGA Monitor DVI interface We provide a DVI D interface in the rear panel can be double display with VGA under the system The definition is below ...

Page 37: ...0 Power connector PWR hard drive status indicators We provide a set of power hard drive status indicators you can know the procedure status by these indicators green light constantly is for power up Red light flashing on hard drive indicator is shows that the hard drive is reading writing data for now 2 10 Driver installation 1 Please download the driver from http en nodka com 2 Select the model m...

Page 38: ...TPC6000 CXX3 User Manual 38 3 Click the download button and download the necessary drivers 2 10 1 Chipset driver Double click the setup chipset driver program ...

Page 39: ...TPC6000 CXX3 User Manual 39 Wait for its loading Press NEXT then go to the next step ...

Page 40: ...TPC6000 CXX3 User Manual 40 Press Accept to agree the License agreement then go to the next step Press Install to continue ...

Page 41: ...then the NEXT key will been set to active then press NEXT to continue After finish this installation you should restart the computer immediately then you can install other device s driver Select the Yes I want to restart this computer now and press Finish to reboot the computer ...

Page 42: ... 2 Graphics driver Double click the graphics driver program Please select Automatically run WinSAT and enable the Windows Aero desktop theme if supported then press NEXT to go to the next install page Press Yes to get to the next step ...

Page 43: ...TPC6000 CXX3 User Manual 43 Press NEXT to go on Press NEXT to go on ...

Page 44: ... Manual 44 After finish this installation you should restart the computer immediately then you can install other device s driver Select the Yes I want to restart this computer now and press Finish to reboot the computer ...

Page 45: ...TPC6000 CXX3 User Manual 45 2 10 3 Audio driver Double click the graphics driver program Wait for loading preparations Press YES to continue ...

Page 46: ...h this installation you should restart the computer immediately then you can install other device s driver Select the Yes I want to restart this computer now and press OK to reboot the computer 2 10 4 LAN driver Double click Run as administrator Wait for preparing setup ...

Page 47: ...TPC6000 CXX3 User Manual 47 Press Yes to continue All Selected should be installed into the computer then press NEXT ...

Page 48: ...TPC6000 CXX3 User Manual 48 Press I accept the terms in the license agreement Press NEXT to go on ...

Page 49: ...tallation process to complete then click Finish 2 10 5 Touch screen driver Browse the product s driver disc or D Backup Drivers 5 touch RisintechSetup exe you will see the driver file as following figure Double click the touch pad driver program ...

Page 50: ...TPC6000 CXX3 User Manual 50 Press NEXT to continue Press NEXT to continue ...

Page 51: ...TPC6000 CXX3 User Manual 51 Press NEXT to continue Press INSTALL to continue ...

Page 52: ...fter finish this installation you should restart the computer immediately then you can install other device s driver Select the Yes I want to restart this computer now and press OK to reboot the computer All drivers are been installed into this computer so far ...

Page 53: ...nual 53 All drivers are been installed into this computer so far 2 10 6 PCI installation Right click the desktop icon Computer choose Computer Management choose Device Manager Choose Browse my computer for driver software ...

Page 54: ...TPC6000 CXX3 User Manual 54 Click Browse choose the driver within ME ...

Page 55: ...TPC6000 CXX3 User Manual 55 Press NEXT to continue Press close to finish the installation ...

Page 56: ...TPC6000 CXX3 User Manual 56 Chapter 3 BIOS Setting ...

Page 57: ...ppears before the DEL key is pressed restarted the computer and try again 3 1 2 Using setup Use the arrow keys to highlight items Press ENTER to select use the PAGE UP and PAGE DOWN keys to change entries Press F1 for help and press ESC to quit Navigation keys are shown in Key Function Up arrow Move to previous item Down arrow Move to next item Left arrow Move to the item on the left side Right ar...

Page 58: ...ain items Main Changes the basic system configuration Advanced Changes the advanced system settings PCI PnP Changes the advanced PCI PnP settings Boot Changes the system boot configuration Security Sets user and supervisor passwords Chipset Changes the chipset settings Exit Selects exit options and loads default settings The following sections completely describe the configuration options found in...

Page 59: ...e System Date Use this option to change the system time and date Highlight System Time or System Date using the Arrow keys Enter new values through the keyboard Press the Tab key or the Arrow keys to move between fields The date must be entered in MM DD YY format The time must be entered in HH MM SS format 3 3 Advanced BIOS features setup Select the Advanced tab from the TPC6000 CXX3 setup screen ...

Page 60: ...ser Manual 60 Advanced BIOS Setup options are described in this section The Advanced BIOS Setup screens is shown below The sub menus are described on the following pages Figure 3 3 Advanced BIOS Features Setup Screen ...

Page 61: ...TPC6000 CXX3 User Manual 61 3 3 1 PCI Subsystem Setting Figure 3 3 1 PCI Subsystem Configuration Setting ...

Page 62: ...TPC6000 CXX3 User Manual 62 3 3 2 ACPI Setting Figure 3 3 2 ACPI Configuration Setting 3 3 3 CPU Configuration Setting Figure 3 3 3 CPU Configuration Setting ...

Page 63: ...6000 CXX3 User Manual 63 3 3 4 SATA Configuration Figure 3 3 4 SATA Configuration SATA Configuration This item allows you to select Disabled IDE AHCI 3 3 5 USB Configuration Figure 3 3 5 USB Configuration ...

Page 64: ... After accidental power off the device will automatically boot up when po wer on again Last State After accidental power off the device will recover to the state of the form er state before power off i e If the former state is Power On then the device will a utomatically boot up when power on again if the former state is Power off then the device will remain power off when the power on again ...

Page 65: ... 65 3 3 7 Intel graphic configuration Figure3 3 7 Intel graphic configuration This selection item mainly for display application configuration IGFX Boot Type is for configuration of boot up main display VGA LVDS VBIOS Default ...

Page 66: ...TPC6000 CXX3 User Manual 66 3 3 8 BOOT Configuration Figure3 3 8 Boot configuration ...

Page 67: ...TPC6000 CXX3 User Manual 67 3 4 Security settings Figure 3 4 Security settings ...

Page 68: ...ct Exit Saving Changes from the Exit menu and press Enter The following message appears Save Configuration Changes and Exit Now Ok Cancel 2 Select Ok or cancel 3 5 2 Discard Changes and Exit Select this option to quit Setup without making any permanent changes to the system configuration 1 Select Exit Discarding Changes from the Exit menu and press Enter The following message appears Discard Chang...

Page 69: ...ures all setup items to optimal settings when you select this option Optimized Defaults are designed for maximum system performance but may not work best for all computer applications In particular do not use the Optimal Defaults if your computer is experiencing system configuration problems Select Load Optimal Defaults from the Exit menu and press Enter ...

Page 70: ...TPC6000 CXX3 User Manual 70 Chapter 4 System Maintenance ...

Page 71: ...ible after opening the rear cover 4 3 Cover Removal Warning Turn off the power before removing the back cover Risk of electrocution Severe damage to the product and injury to the body may occur if internal parts are touched while the power is still on Warning Take antistatic precautions when working on the internal components Some internal components are easily damaged or destroyed by electrostati...

Page 72: ...TPC6000 CXX3 User Manual 72 A Safety Precautions ...

Page 73: ...nge Doing so may cause fire and or an electrical shock Electric shocks can occur if the TPC6000 CXX3 chassis is opened when the TPC6000 CXX3 is running Do not drop or insert any objects into the ventilation openings of the TPC6000 CXX3 If considerable amounts of dust water or fluids enter the TPC6000 CXX3 turn off the power supply immediately unplug the power cord and contact the TPC6000 CXX3 vend...

Page 74: ...ctrical component hold the electrical component by its edges A 1 3 Product Disposal CAUTION Risk of explosion if battery is replaced by and incorrect type only certified engineers should replace the on board battery Dispose of used batteries according to instructions and local regulations Outside the European Union If you wish to dispose of used electrical and electronic products outside the Europ...

Page 75: ...ble allergic reactions to solvents or chemicals used when cleaning Avoid eating drinking and smoking nearby A 2 2 Cleaning Tools Some components may only be cleaned using a product specifically designed for the purpose In such case the product will be explicitly mentioned in the cleaning tips Below is a list of items to use for cleaning Cloth Although paper towels or tissues can be used a soft cle...

Page 76: ...TPC6000 CXX3 User Manual 76 Foam swabs Whenever possible it is best to use lint free swabs such as foam swabs for cleaning ...

Page 77: ...TPC6000 CXX3 User Manual 77 B Hazardous Materials Disclosure ...

Page 78: ... the presences of small quantities of certain materials in the product and is applicable to China RoHS only A label will be placed on each product to indicate the estimated Environmentally Friendly Use Period EFUP This is an estimate of the number of years that these substances would not leak out or undergo abrupt change This product may contain replaceable sub assemblies components which have a s...

Page 79: ...cuit Board X O O O O X Metal Fasteners X O O O O O Cable Assembly X O O O O X Fan Assembly X O O O O X Fan Assembly X O O O O X Battery O O O O O O O This toxic or hazardous substance is contained in all of the homogeneous materials for the part is below the limit requirement in SJ T11363 2006 X This toxic or hazardous substance is contained in at least one of the homogeneous materials for this pa...

Page 80: ...TPC6000 CXX3 User Manual 80 Chapter 5 Appendix A ...

Reviews: