background image

OPERATION

10

TrailBlazer

 Series (11–01)

PROPER STORAGE

When the vacuum is not in use, it should be stored in
a dry place.

WARNING: To reduce the risk of fire, electric

shock or injury, empty the filter bag after every
use and before storage. Some types of dust and
debris may combust.

PROPER VACUUMING MOTION FOR
LARGE AREAS WITH DIRECT SUCTION
TOOLS

1.  Begin with the wand parallel to your body.

2.  Draw the top of the wand in toward your waist and

twist at the waist walking backward or forward 
(a side–to–side motion) (Figure 20).

FIG. 20

3.

The motion is similar to mopping and keeps the
upper body and arms from tiring.

WARNING: DO NOT use machine to pick up

flammable or combustible materials or anything
that is burning or smoking, such as cigarettes,
matches, or hot ashes.

ERGONOMICS

The weight of the vacuum should be carried on the
operator’s hips and be evenly distributed.

The padded waist belt or waist and shoulder straps
are adjustable for a custom fit.

The backpack vacuums have a ventilated backplate
to keep the operator cool.

The on/off switch is conveniently placed for easy
access on the waist belt of  the TrailBlazer and on
the left side of the Trailblazer Lite body.

Use the proper attachments for the job. Pro–Team has
attachments to perform most jobs without requiring
that the operator bend over or get into difficult
positions.

CARING FOR YOUR VACUUM

WARNING: To reduce the risk of fire, electric

shock or injury unplug unit from wall outlet when
not in use and before servicing.

1.

Every time you finish vacuuming, shake out the
cloth and Micro filters.

2.

Each week, rinse, dry and return the foam/filter
diffuser to the bottom of the TrailBlazer below the
motor.

3.

After each shift, wipe the inside and outside of the
vacuum with a household cleaning agent.

PREVENTATIVE MAINTENANCE

ATTENTION:  The following information is for use
by qualified service personnel only and is to
provide guidance for troubleshooting and
maintenance.

WARNING: To reduce the risk of fire, electric

shock or injury unplug unit from wall outlet when
not in use and before servicing.

UNPLUG the vacuum when working on the motor or
any electrical part.

CHECK the condition of all electrical cords before
each use.

Have a qualified service person at an authorized
Nobles Service Dealer CHECK the carbon brushes
on the motor every six months and replace any
brush worn down to 

½

” in length.

DO NOT lubricate the motor; it is equipped with
sealed bearings.

Summary of Contents for TrailBlazer 613017

Page 1: ...8 TrailBlazer Lite includes EZ Glide Kit 613019 TrailBlazer XL includes EZ Glide Kit Operator and Parts Manual Backpack Vacuums TrailBlazer Series 612909 Rev 00 11 01 CUSTOMER SERVICE 1 800 365 6625 FAX 1 800 678 4240 NOBLES 12875 RANSOM STREET HOLLAND MI 49424 U S A ...

Page 2: ...ed parts and service center distributor or from any of the manufacturer s subsidiaries This machine will provide excellent service However the best results will be obtained at minimum costs if The machine is operated with reasonable care The machine is maintained regularly per the machine care instructions provided The machine is maintained with manufacturer supplied or equivalent parts This machi...

Page 3: ...LARGE AREAS WITH DIRECT SUCTION TOOLS 10 ERGONOMICS 10 CARING FOR YOUR VACUUM 10 PREVENTATIVE MAINTENANCE 10 TROUBLESHOOTING 11 FILTER MAINTENANCE 11 TRAILBLAZER AND TRAILBLAZER LITE 11 TRAILBLAZER XL 12 RECOMMENDED STOCK ITEMS 13 SPECIFICATIONS 13 PARTS LIST 14 TRAILBLAZER 14 TRAILBLAZER LITE 16 TRAILBLAZER XL 18 OPTIONS 20 RESTAURANT VAC TOOL KIT 20 COMMERCIAL VAC TOOL KIT 20 E Z GLIDE COMMERCIA...

Page 4: ... has been dropped damaged left outdoors or exposed to water return it to an authorized servicing dealer for inspection 11 Do not pull or carry the vacuum by the cord or use the cord as a handle Do not close a door on the cord or pull the cord around sharp edges or corners Do not run over the cord Keep the cord away from heated surfaces 12 Do not pull on the cord to unplug Grasp the plug at the out...

Page 5: ...ed with the unit Improper connection of the equipment grounding connector conductor can result in a risk of electrical shock Check with a qualified electrician or service person if you doubt that the outlet is properly grounded Do not modify the plug provided with the vacuum If it will not fit the outlet have a proper outlet installed by a qualified electrician Grounded 3 Hole Outlet Ground Pin 12...

Page 6: ...lectric shock or injury do not pull or carry the vacuum by the cord or use the cord as a handle Do not close door on cord or pull the cord around sharp edges or corners Do not run over the cord Keep the cord away from heated surfaces Do not pull on the cord to unplug Grasp the plug at the outlet and pull Work within cord length to avoid stress and damage FIG 5 8 To attach tools to an aluminum wand...

Page 7: ...r The vacuum can also be worn around the waist with or without the monostrap for support 5 Detach the Velcro strap a from the base of the waistbelt and lift the strap Figure 8 FIG 8 6 Slide the Velcro strap a under the molded plastic handle of the vacuum and back around over the top of the handle Attach the end of the strap to the Velcro tab Figure 9 FIG 9 7 With the waistbelt facing you use your ...

Page 8: ...the monostrap to the ring up on the end of the Velcro strap a Attach the hook on the other end of the monostrap to any of the four rings on the waistbelt Attach to rings on flap c if right handed and flap b if left handed 11 Twist the aluminum wand into the hose Check hose cuffs at both ends to make sure that they are tight TRAILBLAZER XL MODEL 1 Unlatch and remove the top cap and pull out the clo...

Page 9: ...o not pull on the cord to unplug Grasp the plug at the outlet and pull Work within cord length to avoid stress and damage 8 Check the wear on the cord by the vacuum body and at the plug Place the extension cord between the waist belt s strap and padded area to signal you if you have run out of cord while vacuuming Figure 19 FIG 19 9 To attach tools to a 1 aluminum wand LOOSEN the plastic nut at th...

Page 10: ...railBlazer and on the left side of the Trailblazer Lite body Use the proper attachments for the job Pro Team has attachments to perform most jobs without requiring that the operator bend over or get into difficult positions CARING FOR YOUR VACUUM WARNING To reduce the risk of fire electric shock or injury unplug unit from wall outlet when not in use and before servicing 1 Every time you finish vac...

Page 11: ...Check that the cap is properly attached to the body FILTER MAINTENANCE TRAILBLAZER AND TRAILBLAZER LITE MODELS WARNING To reduce the risk of fire electric shock or injury unplug unit from wall outlet when not in use and before servicing 1 Check the Micro filter EACH and EVERY time you start and finish vacuuming A clogged and dirty filter restricts airflow and results in reduced suction and overhea...

Page 12: ...unplug unit from wall outlet when not in use and before servicing 1 Check the Micro filter EACH and EVERY time you start and finish vacuuming A clogged and dirty filter restricts airflow and results in reduced suction and overheating 2 While vacuuming stop every two hours or as needed to check the Micro filter Replace with new Micro filter when necessary To install a Micro filter slide the gasket ...

Page 13: ...ECOMMENDED STOCK ITEMS Refer to Parts List section for recommended stock items Stock Items are clearly identified with a bullet preceding the parts description See example below SPECIFICATIONS MODEL TrailBlazer TrailBlazer Lite TrailBlazer XL WEIGHT 4 1 Kg 9 lbs 3 4 Kg 7 5 lbs 5 2 Kg 11 5 lbs VACUUM MOTOR 120V 1 25 HP 2 stage 120V 1 1 HP 1 stage 120V 1 8 HP 1 stage WATER LIFT 234 cm 92 in 160 cm 6...

Page 14: ...PARTS LIST TrailBlazer Series 11 01 14 TRAILBLAZER ...

Page 15: ...338 CORD SWITCH W CRIMPS 1 13 612342 SWITCH BOX W VELCRO AND SCREWS 1 14 612316 SWITCH DP ON OFF 1 15 612343 SOUND MUFFLER 1 RECOMMENDED STOCK ITEMS REF PART DESCRIPTION QTY 16 612344 AIR DIFFUSER PLASTIC W SCREWS 1 17 612345 RING MOTOR COMPRESSION W SCREWS 1 612346 KIT COMPRESSION RING 1 18 612347 TETRASEAL 1 19 612348 CARBON BRUSH SET FOR 928W MOTOR 1 20 612368 MOTOR VAC W CRIMPS 928W 120V 1 612...

Page 16: ...PARTS LIST TrailBlazer Series 11 01 16 TRAILBLAZER LITE ...

Page 17: ...RAP 1 11 612307 KIT STEP CAP SCREW 1 12 612069 DEFLECTOR SHROUD ASSEMB 1 13 612309 SEAL MOTOR 1 RECOMMENDED STOCK ITEMS REF PART DESCRIPTION QTY 14 612310 MOTOR FAN 802 WATT 120 V 1 612352 MOTOR FAN W RECTIFIER AND 1 612352 RECTIFIER MOTOR AVIATION VAC 1 15 613023 CARBON BRUSH SET FOR 802W MOTOR 1 16 613056 KIT FAN AND BRUSH COVER 1 17 612313 KIT MOTOR MOUNT SCREW 1 18 612314 PLATE DIRECTOR 1 19 6...

Page 18: ...PARTS LIST TrailBlazer Series 11 01 18 TRAILBLAZER XL ...

Page 19: ...024 ASM BACKPLATE TWO PIECE W CENTER PAD 1 12 612330 KIT NUT BARREL SET 1 13 612331 BACKPLATE BLACK CONNECTION SET 1 14 612332 KEEPER WAIST BELT 1 RECOMMENDED STOCK ITEMS REF PART DESCRIPTION QTY 15 612333 LATCH WAIST BELT 1 16 612334 WAIST BELT 1 613022 BACKPLATE TWO PIECE SYSTEM COMPLETE 1 17 613062 MOTOR PLATE 1 18 612346 KIT COMPRESSION RING 1 19 613025 ASM POWER CORD 18 16 3 1 20 612340 KIT C...

Page 20: ...T DESCRIPTION QTY 612576 KIT VAC TOOL COMMERCIAL 1 1 2 1 1 612596 TOOL WAND 1 1 2 56 2 PC 2 BEND ALUM W BUTTON LOCK 1 2 612600 TOOL FLOOR 1 1 2 14 W SCAL LOPS 1 3 612582 TOOL DUST BRUSH 1 1 2 3 W REDUCER 1 4 612579 TOOL CREVICE 1 1 2 17 1 5 612586 TOOL UPHOLSTERY 1 1 2 5 1 E Z GLIDE COMMERCIAL VAC TOOL KIT 2 1 4 5 3 REF PART DESCRIPTION QTY 612283 KIT VAC TOOL E Z GLIDE COMMERCIAL 1 1 2 1 1 612596...

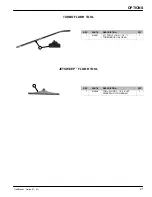
Page 21: ...er Series 11 01 21 TURBO FLOOR TOOL 1 REF PART DESCRIPTION QTY 1 612607 KIT TOOL FLOOR 1 1 4 11 TURBO BRUSH W WAND 1 JETSWEEP FLOOR TOOL 1 REF PART DESCRIPTION QTY 1 612648 TOOL FLOOR 1 1 2 20 JET SWEEP W NYLON BRUSH 1 ...

Page 22: ...d parts on all of its machines to be free from defects in materials and workmanship under normal use and service for ten 10 years to the original end user Under this warranty Nobles guarantees the performance of non polyethylene parts and components on Nobles models to be free from defects for up to three 3 years or 2 500 hours of operation whichever comes first to the original end user Parts re p...

Reviews: