Use and maintenance manual model “UNICA 10 V/C” - WOOD
ENGLISH
11
the optional canalization kit and a disassembly/
reassembly diagram for the decorative cover of
the appliance.
This chapter also deals with non-standard
installation options. Pipes which are not supplied
with the product can still be purchased from your
trusted dealer/service center.
The installation, disassembly and reassembly of the
device must be carried out by qualified personnel
authorized by Nobis Srl.
Please note that having the device opened/
disassembled by unauthorized personnel will
invalidate the product warranty.
CONNECTION TO THE SMOKE EXHAUST SYSTEM
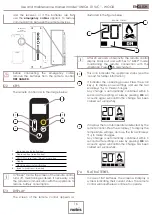
When installing the first section of the flue pipe,
always remove the two upper diffusers to avoid
damaging the paint.
First and foremost, unscrew the 4 screws highlighted
on the back side and lift the two diffusers (held by
magnets on the front).
Insert the first section of the flue pipe (
Ø130mm
).
This must be of good quality and resistant to the
high temperatures it could be subjected in the
event of the opening of the safety bypass hatch.
Reassemble all the parts following the instructions
in reverse.
WARNING: THE SECTION OF THE EXHAUST PIPE MUST
WITHSTAND TEMPERATURES WHICH CAN EASILY
REACH EVEN MORE THAN 600°C.
THE DEPRESSION OF THE SMOKE EXHAUST SYSTEM
MUST RESPECT THE VALUE OF 12Pa.
ASSEMBLY OF THE CANALIZATION KIT (OPTIONAL)
Remove the screws securing the upper left cover
of the diffuser.
Remove the wooden cover (which is attached on
the underside by means of magnets). Then unhook
the side panel by unscrewing the two upper fixing
screws. Remove it by lifting it from the lower screws
(bayonet joint). Loosen the two screws holding the
rear panel at the top (highlighted by the circles)
and remove it.
Detach the pre-drilled sheet metal on the left or
the one on the back, depending on the desired
orientation of the canalization.
Fix the canalization kit using the 5 screws
(highlighted) already present in the stove. After
properly securing the carter with the motor, plug in
the electrical connection using the wiring already
present in the device and already in place. Don't
forget to activate the single pipe option in the
user menu (via remote control).

