background image

Use and Maintenance Manual model “A10V - A10C PLUS QUADRA”


31 

ENGLISH

ENGLISH

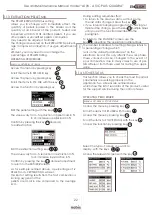
Lift the “cold lever”, supplied with the product, 

to release the door and allow 

fire door opening, as in the figure below:  

To extract the flame trap, lift it slightly as in the figure 

below:

Remove it by bringing the lever towards you with 

slight movement downwards as in the figure below:

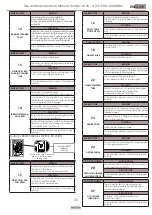
Each alarm condition causes the appliance to 

immediately switch off. Press the switch on key P3 

to reset the alarm. Before switching back on the 

appliance, check 

signalling is resolved.

18 CLEANING THE APPLIANCE

Before carrying out any cleaning operation on the ap-

pliance, take the following precautions:

• 

switch off the product and in “OFF” status 

   disconnect the power supply cable; 

• 

ensure all the parts are cold to touch;

• 

ensure the combustion ash is 

   completely out.

To clean the surfaces, on the painted metal parts, 

use a cloth soaked in water and soap. 

Use of abrasive detergents or diluents causes 

damage to the surface of the product.

18.1 CLEANING THE FIREPLACE

Open the fire door, using the specific 

tool and:

• vacuum the slide bringing the ash to the brazier; • 

dismantle the flame trap, vacuum the compartment 

hidden  by  the  flame  trap  (paying  utmost  attention 

not to damage  the sensor placed behind the flame 

trap). 

• 

the vermiculite does not require cleaning, in any 

case if you intend eliminating the soot dust, only use 

a soft bristle brush.   

Please carefully adhere to the following 

instructions for correct cleaning of the appliance. 

Non-compliance could cause its

malfunctioning.

OPERATING PROCEDURE:

Open the fire door using the “cold lever”  

supplied with the product and Insert the “cold lever” 

in the specific compartment, as indicated 

in the figure below:  

Summary of Contents for A10 C PLUS QUADRA

Page 1: ...EN Installation use and maintenance manual A10 V PLUS QUADRA A10 C PLUS QUADRA...

Page 2: ...appropriate place having carefully consulted it Improper installation maintenance not carried out correctly and improper use of the product relieve the manufacturer of any liability towards people or...

Page 3: ...vice keys 14 7 3 Description of handheld device display 14 7 4 Flat battery signalling 15 7 5 Concise icons diagram 15 8 Menu browsing 16 9 First start up instructions 16 9 1 Date and time setting 16...

Page 4: ...ctivity and maintenance of safety devices do not remove or bypass this devices 1 3 IMPROPER USE The product must be intended for the use for which it was expressly designed for any other use the manu...

Page 5: ...ce non conforming installation with that specified by the manufacturer refer to the installation and use manual supplied with the appliance further damage caused by wrong intervention by the user in a...

Page 6: ...making it less comfortable and reducing the overall efficiency of the system Hermetic prod ucts can also be installed in the presence of forced ventilation or in premises which can go into negative p...

Page 7: ...r rooms garage etc and must have a net useful section equal or higher than 80 cm2 pellet burning stoves and thermostoves EN 14785 and 100 cm2 for boilers EN 303 5 The air intake is not necessary for i...

Page 8: ...In Italy only roof discharge is permitted 3 4 CHIMNEY STACK The standard UNI 10683 states the stack must meet the following characteristics the smoke outlet section must be at least double the inner...

Page 9: ...able parts such as wood etc In both cases insert adequate insulation 5 be tween the chimney flue and the attic You are advised to check and comply with the plate data of the chimney flue in particular...

Page 10: ...ith hot parts and must remain accessible after installation To carry out electrical connection proceed as de scribed below connect the power supply cable on the back of the appliance connect the cable...

Page 11: ...ch excellent product operation is not guaranteed In this phase the authorised technician should completely and accurately clean the smoke pipes check the sealing status of all the gaskets remove broke...

Page 12: ...a il presente disegno non potr essere utilizzato per la costruzione dell oggetto rappresentato n venire comunicato a terzi o riprodotto La Societ proprietaria tutela i propri diritti a rigore di legge...

Page 13: ...loaded by inserting pellets from the upper part of the product opening the door Ensure the content of the bag of pellets does not fall around the edges of the tank paying particular attention to cent...

Page 14: ...chapter carefully relating to use of the receiver and the handheld device as well as their related functions INFORMATIVE NOTE frequency bands and transmitted power used by the equipment as reported in...

Page 15: ...appliance see Concise icons diagram 7 4 FLAT BATTERIES SIGNAL If batteries are flat the display presents a symbol which indicates their limit status however maintaining the functions enabled of the ha...

Page 16: ...ll the items to SETTINGS with the key Access the menu by pressing key Scroll the items to TIME DATE with the key On the TIME DATE menu item key The screen appears to adjust the time and calendar as in...

Page 17: ...its manual management of the op tional fan with the exception of the fan setting on OFF In this case the appliance autonomously only manages power to the fireplace Ventilation remains disabled 9 5 FIR...

Page 18: ...mode also en sures if the home has a good energy class a fuel saving through intelligent switch off of the product reaching or required of the desired setting The procedure follows to enable the funct...

Page 19: ...Y screen use the key repeating the operation multiple times OK OK Edit the value with the keys The logic relating to this type of management is as follows USER the user reserves the right to set the a...

Page 20: ...ostat with timer function you can program for each day of the week automatic switch on and off of the product with 4 independent time intervals PROGRAM 1 2 3 4 The steps are outlined below to follow s...

Page 21: ...switch on phase of the appliance after accurate cleaning was conducted of the hopper pellet con tainer to remove sawdust which over time is creat ed on the base See the chapter Routine mainte nance o...

Page 22: ...and 3 EXTRACTION was set this kind of setting results from the fact combustion is lacking oxygen and the pellets are small in size compared to the average 2cm OK Select the type of screen you want to...

Page 23: ...installed has not yet reached the temperature required the writing T OFF if in the room the ambient temperature is reached 11 6 LANGUAGE Based on the destination country or the user acquir ing the pr...

Page 24: ...mply approach the appliance to re establish communication 12 CHANNEL where planned The products of the range equipped with channel ling are in two types single duct channelling or double duct channell...

Page 25: ...channel with the help of an optional ambient probe provided on request of Nobis s r l not supplies as standard OK If the flag is enabled for channelling temperature management with the external therm...

Page 26: ...setting from the handheld device but rather from the external ther mostat Having confirmed setting of the RH channelling confirm with the key and re peat the same sequence of operations for the LH cha...

Page 27: ...PHASE DESCRIPTION Ambient setting in MAN therefore the appliance only works with the power to the fireplace set never going to saving MAN WORK 14 FUNCTIONS CONCISE DIAGRAM Edit the data highlighted us...

Page 28: ...ntrolling correct combustion For safety purposes while waiting for the technician the appliance is set to saving mode The maximum smoke temperature threshold has been reached the appliance for a perio...

Page 29: ...ice ALARM CODE REASON 05 EXTRACTOR ROTATIONS NOT RESPECTED The rotations of the smoke extractor show a loss of efficiency due to obstruction of the fan or a drop in voltage SOLUTION If the problem per...

Page 30: ...persists contact the Support Service ALARM CODE REASON 16 PELLET TANK DOOR OPEN During the pellet loading phase of the product the tank door was not closed properly SOLUTION Check the pellet tank door...

Page 31: ...are cold to touch ensure the combustion ash is completely out To clean the surfaces on the painted metal parts use a cloth soaked in water and soap Use of abrasive detergents or diluents causes damag...

Page 32: ...which could damage the appliance used for cleaning The cleaning operations depend on the quality of the pellets used and the frequency of use of the product It can happen that such operations must be...

Page 33: ...pliance operation PARTS FREQUENCY TIME Ash pan approx time 7 DD Glass 2 3 DD Extraction pipe 1 SE Door seal ash pan 1 SE Tube bundle scraper where present 7 DD Chimney flue 1 SE Combustion chamber 2 3...

Page 34: ...SET THERMAL SWITCH CONTACT DOOR ASH PAN 1 PELLET TANK 2 220V SOCKET WITH ON OFF SWITCH AND FUSE SAFETY VACUUM SWITCH VENTILATION FRONT K J PC CONNECTION technical support only USB CONNECTION technical...

Page 35: ......

Page 36: ...N 11 25037 Pontoglio BS www nobisfire it Nobis Srl cannot be held in any way liable for any errors in this manual and considers itself free to change the features of its products without prior warnin...

Reviews: