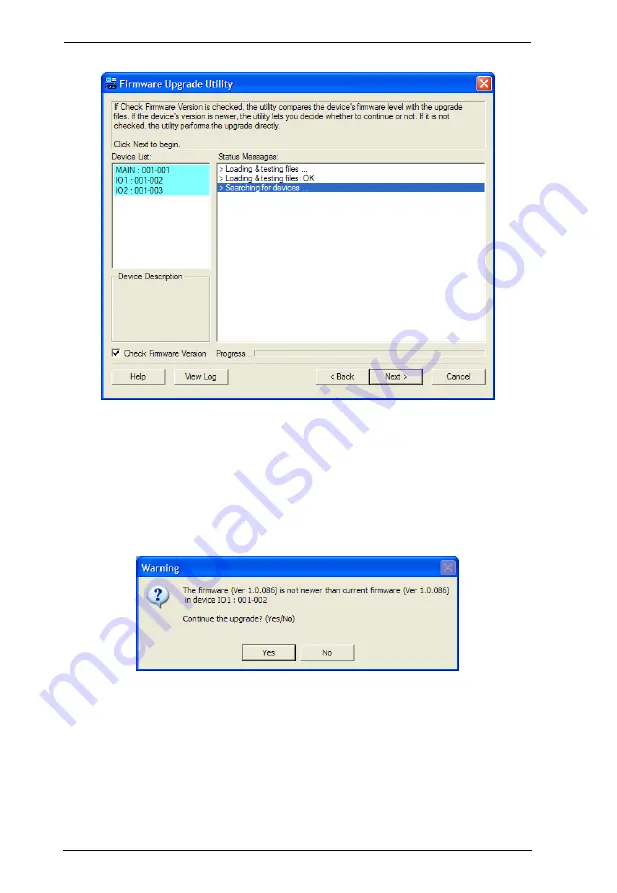
Nisuta NS-KVMUV16 User Manual Download Page 53

44

4. Click 

Next

 to perform the upgrade.

If you enabled 

Check Firmware Version

, the Utility compares the device's 

firmware level with that of the upgrade files. If it finds that the device's 

version is higher than the upgrade version, it brings up a dialog box 

informing you of the situation and gives you the option to continue or 

cancel.

If you didn't enable 

Check Firmware Version

, the Utility installs the 

upgrade files without checking whether they are a higher level, or not.
As the upgrade proceeds, status messages appear in the 

Status Messages

panel, and the progress toward completion is shown on the 

Progress

 bar.

NS-KVMUV8 / NS-KVMUV16 User Manual

Summary of Contents for NS-KVMUV16

Page 1: ...KVM Switch NS KVMUV8 NS KVMUV16 User Manual...

Page 2: ...this equipment in a residential area is likely to cause harmful interference in which case the user will be required to correct the interference at his own expense The device complies with Part 15 of...

Page 3: ...ld the programs prove defective following their purchase the buyer and not the manufacturer its distributor or its dealer assumes the entire cost of all necessary servicing repair and any incidental o...

Page 4: ...got damaged in shipping If you encounter a problem contact your dealer Read this manual thoroughly and follow the installation and operation procedures carefully to prevent any damage to the unit and...

Page 5: ...Features 2 Requirements 3 Console 3 Computers 3 Cables 3 Operating Systems 4 Components 5 Front View 5 Rear View 6 Chapter 2 Hardware Setup Overview 7 Before You Begin 7 Stacking and Rack Mounting 8 S...

Page 6: ...ET 23 F4 ADM 25 F5 SKP 28 F6 BRC 28 F7 SCAN 29 F8 LOUT 30 Chapter 5 Keyboard Port Operation Hotkey Port Control 31 Invoke Hotkey Mode 31 Number Lock and Minus Keys 31 Control and F12 Keys 32 Select th...

Page 7: ...41 Preparation 42 Starting the Upgrade 43 Upgrade Succeeded 45 Upgrade Failed 45 Firmware Upgrade Recovery 46 Appendix Safety Instructions 47 General 47 Rack Mounting 49 Specifications 50 Restoring F...

Page 8: ...vided Chapter 3 Basic Operation explains the fundamental concepts involved in operating the NS KVMUV8 NS KVMUV16 Chapter 4 OSD Operation provides a complete description of the NS KVMUV8 NS KVMUV16 OSD...

Page 9: ...f keys need to be chorded they appear together in the same bracket with a plus sign between them Ctrl Alt 1 Numbered lists represent procedures with sequential steps Bullet lists provide information b...

Page 10: ...console and computers The NS KVMUV8 NS KVMUV16 intercepts keyboard input directly thus eliminating the need for any software configuration Switching between computers can be easily accomplished eithe...

Page 11: ...or video quality up to 2048 x 1536 DDC2B Convenient computer switching via front panel pushbuttons hotkeys or multilingual on screen display OSD menu Two level password security only authorized users...

Page 12: ...monitor capable of displaying the highest resolution provided by any computer in the installation A keyboard and mouse USB or PS 2 Computers The following hardware components are required for each com...

Page 13: ...i h d n a 0 0 0 2 s w o d n i W r e h g i h d n a 1 7 t a H d e R x u n i L r e h g i h d n a 2 8 E S u S Mandriva Mandrake 9 0 and higher r e h g i h d n a 3 4 X I A X I N U r e h g i h d n a 2 4 D S...

Page 14: ...rms a system reset When the system is reset the NS KVMUV8 NS KVMUV16 beeps and then the KVM port LEDs flash in succession until the reset is completed After the reset is completed you can login again...

Page 15: ...he computers plug in here Note The shape of these 15 pin connectors has been specifically modified so that only custom KVM cables designed to work with this switch can plug in See Cables page 3 for de...

Page 16: ...ter connection Custom cables of various lengths are listed in the Cables section on page 5 Consult your dealer to find out which one fit your needs best Before You Begin 1 Important safety information...

Page 17: ...urposes the NS KVMUV16 is pictured in the diagrams that follow However the NS KVMUV8 is the same as the NS KVMUV16 except that it has 8 KVM ports instead of 16 Stacking The KVMUV8 NS KVMUV16 can be pl...

Page 18: ...ws from the left and right side panels near the front of the switch 2 screws total 2 Use the M3 x 8 Phillips hex head screws supplied with the rack mount kit to screw the rack mounting brackets onto t...

Page 19: ...page 3 Place the NS KVMUV8 NS KVMUV16 in the rack Position it so that the holes in the mounting brackets line up with the hole s in the rack Secure the mounting brackets to the front of the rack NS KV...

Page 20: ...each from the left and right sides of the switch 2 screws total near the rear of the unit 2 Use the M3 x 8 Phillips head hex screws supplied with the rack mount kit to screw the rack mounting bracket...

Page 21: ...the mounting brackets to the rear of the rack Grounding To prevent damage to your installation it is important that all devices are properly grounded Use a grounding wire to ground the NS KVMUV8 NS K...

Page 22: ...ort Refer to the Cable Connection Diagrams on the following page 3 Use KVM cable sets as described in the Cables section on page 3 to connect any available KVM port to the keyboard video and mouse por...

Page 23: ...NS KVMUV8 NS KVMUV16 User Manual 14 Cable Connection Diagrams Console Cable Installation Diagram KVM Cable Installation Diagrams 2 S P B S U VGA USB KVM Cable Connection PS 2 KVM Cable Connection...

Page 24: ...console cable provided connect a keyboard mouse and monitor to the NS KVMUV8 NS KVMUV16 console port Refer to the Cable Connection Diagrams on the following page 3 Using a KVM cable connect any avail...

Page 25: ...16 Two Level Installation Diagram NS KVMUV8 NS KVMUV16 User Manual...

Page 26: ...properly Hot Plugging Console Ports The keyboard monitor and mouse can all be hot plugged When hot plugging the mouse You may unplug and replug the mouse to reset the mouse for example as long as you...

Page 27: ...t the KVM port number on the master and the second two digits represent the KVM port number on the slave unit that the computer is connected to For example a Port ID of 02 16 would refer to a computer...

Page 28: ...e OSD main screen displays in administrator mode In this mode you have administrator privileges with access to all administrator and user functions and can set up operations including password authori...

Page 29: ...on a switch number or move the highlight bar to it then press the right arrow key to expand the list Similarly to collapse a switch s port list click on the switch number or move the highlight bar to...

Page 30: ...at can appear on the main screen the screen will scroll To activate a port double click it or move the highlight bar to it then press Enter After executing any action you automatically go back to the...

Page 31: ...2 LIST This function lets you broaden or narrow the scope of which ports the OSD displays on the main screen The submenu choices and their meanings are given in the table below Move the highlight bar...

Page 32: ...ll Lock combination PORT ID DISPLAY POSITION Allows each user to customize the position where the port ID appears on the screen The default is the upper left corner but users can choose to have it app...

Page 33: ...n The default is ALL Note The quick view choices only show up on the administrator s screen since only he has Quick View setting rights see SET QUICK VIEW PORTS page 27 for details SCREEN BLANKER If t...

Page 34: ...name and password appears Usernames and passwords can be from 1 to 16 characters long and can consist of any combination of letters and numbers A Z 0 9 and some additional keys space 3 For each indivi...

Page 35: ...r use the navigation keys to move the highlight bar to it then press Enter 2 Key in the new port name or modify delete the old one The maximum number of characters allowed for the port name is 12 Lega...

Page 36: ...t the port operating system 1 From the list select the port for which you wish to set the com puter s operating system 2 Set the operating system by pressing Spacebar to cycle through WIN MAC SUN or O...

Page 37: ...hile skip mode is in effect the console will not function normally You must exit skip mode in order to regain control of the console To exit skip mode press Spacebar or Esc F6 BRC F6 is an administrat...

Page 38: ...bar to stop scanning If the scanning stops on an empty port or one where the computer is attached but is powered Off the monitor screen will be blank and the mouse and keyboard will have no effect Aft...

Page 39: ...s with Esc all you have to do to reenter the OSD is tap the OSD hotkey Note 1 When you reenter the OSD after logging out the screen stays blank except for the OSD main screen You must input your usern...

Page 40: ...ey mode Setting the Beeper Setting the Quick Hotkey Setting the OSD Hotkey Setting the Port Operating System Restoring the OSD Default Values Invoke Hotkey Mode All hotkey operations begin by invoking...

Page 41: ...tly access any computer on the installation with a hotkey combination that specifies the port ID of the KVM port that a computer is connected to To access a computer using hotkeys 1 Invoke hotkey mode...

Page 42: ...sing P or with a left click of the mouse During the time that auto scanning is paused the command line displays Auto Scan Paused Pausing when you want to keep the focus on a particular computer is mor...

Page 43: ...w you automatically exit hotkey mode and enter Skip mode where you can switch ports as follows Once you are in Skip mode you can keep on skipping by pressing the arrow keys You don t have to use the N...

Page 44: ...you press F5 you automatically exit Hotkey mode and regain keyboard and mouse control on the computer connected to the KVM port If you fail to regain keyboard mouse control on the computer after press...

Page 45: ...message disappears and you automatically exit Hotkey mode OSD Hotkey Control The OSD Hotkey see OSD HOTKEY page 23 can be toggled between Scroll Lock Scroll Lock and Ctrl Ctrl To toggle the OSD Hotkey...

Page 46: ...ion key you automatically exit Hotkey mode Restore Default Values This administrator only hotkey restores the NS KVMUV8 NS KVMUV16 default values See RESTORE DEFAULT VALUES page 26 To restore the defa...

Page 47: ...m to Sun F5 Performs a keyboard mouse reset on the target computer H Toggles the Quick Hotkey invocation keys between Ctrl F12 and Num Lock R Enter This administrator only hotkey restores the switch s...

Page 48: ...n the table below Note When using key combinations press and release the first key Ctrl then press and release the activation key PC Keyboard Mac Keyboard t f i h S t f i h S l r t C l r t C Ctrl 1 Ct...

Page 49: ...e When using key combinations press and release the first key Ctrl then press and release the activation key PC Keyboard Sun Keyboard p o t S T l r t C n i a g A 2 F l r t C s p o r P 3 F l r t C o d...

Page 50: ...come available new firmware upgrade packages are posted on our website Check the website regularly to find the latest information and packages Downloading the Firmware Upgrade Package To download the...

Page 51: ...ur computer to the Firmware Upgrade Port of your switch 2 Shut down all the computers on the KVM installation 3 From your KVM switch console login to the OSD as the administrator see p 19 and select t...

Page 52: ...are Upgrade Utility welcome screen appears Note The screens shown in this section are for reference only The wording and layout of the actual screens put up by the Firmware Upgrade Utility may vary sl...

Page 53: ...ersion it brings up a dialog box informing you of the situation and gives you the option to continue or cancel If you didn t enable Check Firmware Version the Utility installs the upgrade files withou...

Page 54: ...een appears to inform you that the procedure was successful Click Finish to close the Firmware Upgrade Utility Upgrade Failed If the Upgrade Succeeded screen doesn t appear it means that the upgrade f...

Page 55: ...the switch 2 Connect the Firmware Upgrade Cable to its Firmware Upgrade Port 3 Slide the Firmware Upgrade Recovery Switch to the Recover position 4 Power the switch back on and repeat the upgrade proc...

Page 56: ...ntilation has been provided Never spill liquid of any kind on the device Unplug the device from the wall outlet before cleaning Do not use liquid or aerosol cleaners Use a damp cloth for cleaning The...

Page 57: ...not attempt to service the device yourself Refer all servicing to qualified service personnel If the following conditions occur unplug the device from the wall outlet and bring it to qualified servic...

Page 58: ...nd stable before extending a device from the rack Do not overload the AC supply branch circuit that provides power to the rack The total rack load should not exceed 80 percent of the branch circuit ra...

Page 59: ...u P x 6 1 n o t t u b h s u P x 8 t r o P s e h c t i w S e d i l S x 1 e d a r g p U W F LEDs On Line 8 Orange 16 Orange Selected 8 Green 16 Green n e e r G k r a D 1 r e w o P B S U 2 S P e s u o M...

Page 60: ...KVMUV16 3 Depending on the model place a jumper cap over pins 1 2 of the J17 or J10 jumper on the mainboard 4 Plug in the NS KVMUV8 NS KVMUV16 power adapter The following directions appear on the KVM...

Page 61: ...N t r o P e d o M y a l p s i D D I t r o P s d n o c e S 5 n o i t a r u D n a c S l l A e d o M p i k S n a c S d e l b a s i D 0 r e k n a l B n e e r c S d e l b a s i D 0 t u o e m i T t u o g o...

Page 62: ...e and or Keyboard not responding Improper mouse and or keyboard reset Unplug the cable s from the console port s then plug it them back in Limited Warranty IN NO EVENT SHALL THE DIRECT VENDOR S LIABIL...

Page 63: ...26 F F1 GOTO 22 F2 LIST 22 F3 SET 23 F4 ADM 25 F5 SKP 28 F6 BRC 28 F7 SCAN 29 F8 LOUT 30 factory default settings 55 restoring 54 Firmware upgrade OSD setting 27 port 42 recovery 46 G GOTO 22 Groundi...

Page 64: ...ng Off and Restarting 18 Q quick view ports 27 R rack mounting 8 front 9 rear 11 safety information 49 Requirements OS Support 4 Restore Default Values 26 restoring factory defaults 54 RoHS ii S safet...

Reviews: