background image

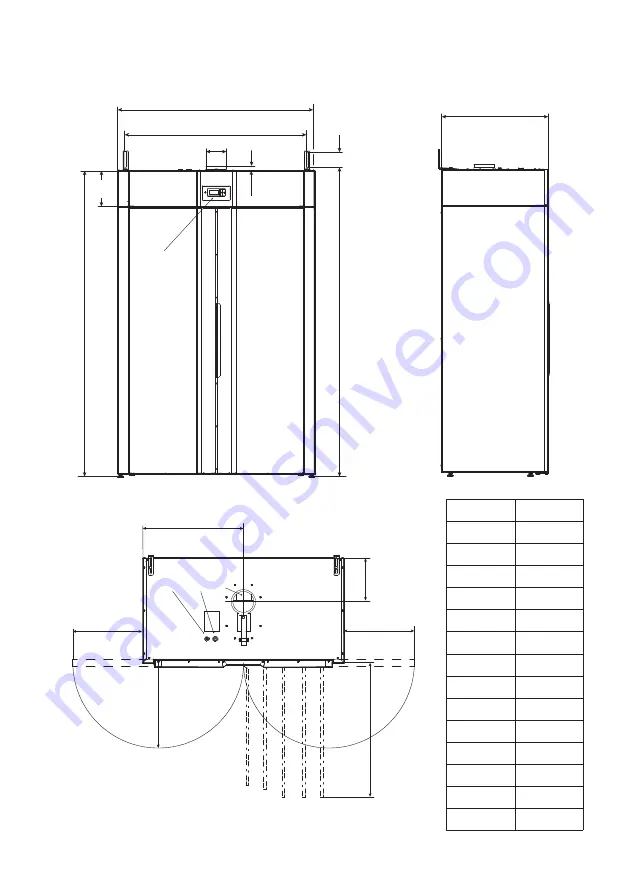
A

C

D

E

F

G

H

J

B

L

M

N

K

P

Q

1       2 


4

A

1200

B

650

C

1860

D

220

E

1100

F diam.

125

G

27

H

100

J

1880

K

434

L

600

M

262

N

471

P

551

Q

807

ENGLISH


17

mm

1  Electrical connection, external fan

2  Electrical connection, mains

3  Exhaust air connection

4  Control panel

Summary of Contents for PRO FT 120 FL

Page 1: ...FT 120 FL 427001088 ENG Drying Cabinet Service Manual Store this manual so that it is always available for future reference...

Page 2: ...0 506 488 10 nimo nimoverken com www nimoverken com 427001088 04 We reserve the right to make changes to this documentation Printed on eco paper that meets the require ments of Milj f rbundet and Nat...

Page 3: ...justment 11 4 4 4 Programming 12 4 4 5 Reset to factory default 12 4 5 Child lock 13 4 5 1 Introduction 13 4 5 2 Activation 13 4 5 3 Deactivation 13 5 Protection against overheating 14 5 1 Overheating...

Page 4: ...4 ENGLISH 1 Drying cabinet FT120FL Swingable hanger Wall mount Heating part Cabinet part Exhaust duct Control panel...

Page 5: ...net A3 User interface A1 PCB 1 1 1 1 1 1 1 11 1 10 1 1 1 1 110 1 1 Pos Ant Ben mning Material Anm ndr nr ndringens art ndringsmeddelande Godk nd av Datum 1 Inkopplingsbild ndrad X3 mq 2015 04 29 1 ENG...

Page 6: ...om the inside 3 Turn the lower bracket upside down and mount it on the other side Loosen the screw C and mount the bushing D and the washer E on the other side Be very careful not to damage the surfac...

Page 7: ...DOWN ARROW increases values or moves down the programmes 4 1 2 Display Animated symbol that shows that the drying process is in progress Top line Shows informational text during the drying process e...

Page 8: ...which is the parameter for the language setting If any other value is shown use the UP or DOWNARROW button to move to the correct parameter 3 Press the START STOP button to confirm The line will flas...

Page 9: ...ormal p Aut 60 Extra The programmes will turn off the drying process automatically when the textiles are dry SELECTING A DRYING PROGRAMME p Normal Used for drying garments of normal thickness p Extra...

Page 10: ...xtraprogrammewhentheoutlettemp has been reached P2021 Min drying time Aut 60 35 min The drying process will run for min 35 min regardless of the humidity level P2022 Max drying time Aut 60 180 min The...

Page 11: ...accordance with the parameter P2025 These are the four main parameters that are adjusted to optimize the drying process of the automatic programmes If the laundry is not dry enough when using Aut 40 N...

Page 12: ...3 Move to the preferred parameter by pressing the UP or DOWN ARROW repeatedly If you go too far you can continue until the display shows the correct parameter 4 When the display shows the correct par...

Page 13: ...ss will end 4 5 2 Activation 1 Enter the programming mode See section 4 4 4 2 Move to the parameter P115 with the UP or DOWN ARROW 3 Press START STOP to save 4 Change the parameter to the value 1 5 Pr...

Page 14: ...the lower line The overheating protection can then be reset by pressing and holding the START STOPP button for approx 4 seconds 5 2 Main regulation If the drying cabinet should overheat for some reaso...

Page 15: ...ing session 2 Make sure that the right programme has been selected for the laundry items 3 Make sure that the laundry items are not very wet not spun enough 4 Make sure that there are not too many lau...

Page 16: ...on ERR 08 Clean filter 100 hours Reset with START STOP for 5 seconds Clean filter ERR 12 Communication timeout Communication error between control panel and circuit board Press the Stop button for 5 s...

Page 17: ...1 2 3 4 A 1200 B 650 C 1860 D 220 E 1100 F diam 125 G 27 H 100 J 1880 K 434 L 600 M 262 N 471 P 551 Q 807 ENGLISH 17 mm 1 Electrical connection external fan 2 Electrical connection mains 3 Exhaust ai...

Page 18: ...hrough two rectangular holes Two fixing screws for the front hatch Front hatch 1 Open the doors 2 Detach two Torx T30 screws underneath the front hatch as illustrated 3 Slide the front hatch up wards...

Page 19: ...Label kit 102 Damper 103 Mounting screw 104 Washer 105 Wall mount 106 Cover 107 Back piece 108 Back rail 109 Side left 110 Front rail 111 Front Alt Front adapted for use by disabled persons 114 Side r...

Page 20: ...05 206 207 208 209 210 205 Se 6 1 3 201 Heating element 202 Control panel 203 Overheating protection 205 Service hatch 206 Fan motor 207 Touch protection 208 Filter 209 Lamp 210 Lamp glass 9 1 2 Compo...

Page 21: ...mmet 303 Temp sensor cabinet 304 Thermostat 305 Label 306 Temp sensor exhaust air 308 Terminal block 309 Mounting bracket 310 Circuit board 311 Contactor 312 Cable Circuit board Control panel 313 Cond...

Page 22: ...401 402 403 404 405 406 407 408 409 410 414 415 416 417 418 419 414 415 418 423 424 425 426 423 428 429 430 431 432 433 414 411 412 413 435 415 415 22 ENGLISH 9 2 Lower part...

Page 23: ...ft 413 Back piece right 414 Hinge spindle 415 Hinge 416 Bolt for upper hanger bracket 417 Washer 418 Spindle for upper hanger 419 Washer 423 Hanger bushing 424 Bolt for upper hinge spin dle 425 Lockin...

Page 24: ...Gematech Innovation...

Reviews: