background image

55

A

d

va

n

ce

d

 O

p

er

at

io

n

Th

e S

ET

 U

P M

en

u

Use the 

Format

 option from the 

SET UP

 menu (

 53) to format a memory card or the MSV-01 

hard disk (HDD). Formatting memory cards or the MSV-01 HDD will delete all data they contain.

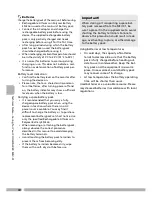
Before Formatting

 • Formatting memory cards or the MSV-01 HDD will delete all data they contain, including pictures 

hidden or protected with the camera and any other data that may be on the card or the MSV-01 HDD.

 • Before formatting a memory card, be sure to copy any pictures you would like to keep to the MSV-01 

or a computer.

 • Before formatting the MSV-01 HDD, be sure to copy any pictures you would like to keep to a 

computer or other storage media.

During Formatting

Do not remove the battery pack or memory card, or unplug the AC adapter while formatting is in 
progress.

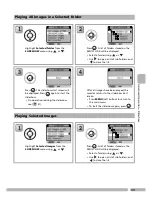
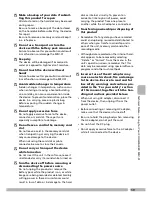
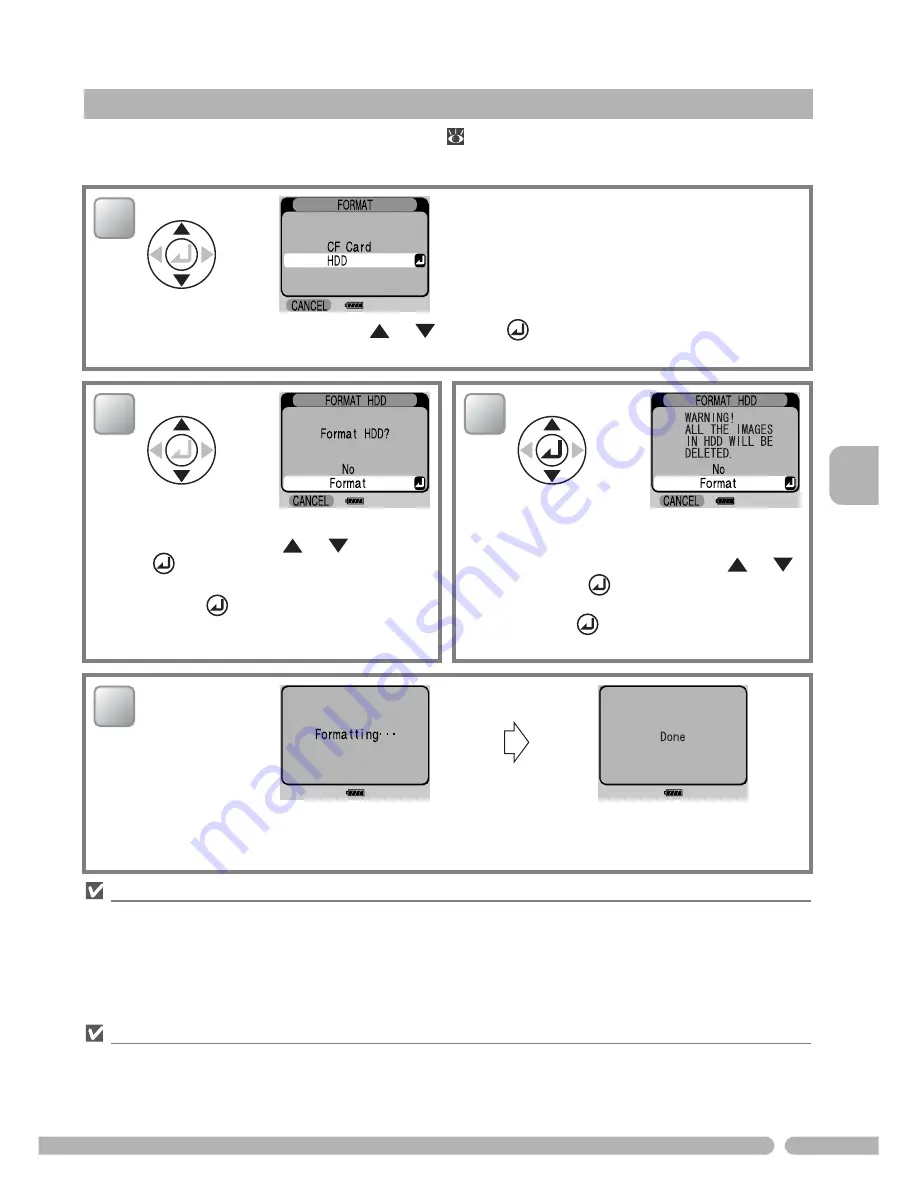
Format (CF Card/HDD)

Highlight 

CF Card

 or 

HDD

 using 

 or 

 and press 

.

 • To exit without formatting press 

CANCEL

 (Left button).

In the displayed confirmation screen high-
light 

Format

 using 

 or 

 and press 

.

 • To return to Step 1, highlight 

No

 and 

press 

.

 • To exit without formatting press 

CANCEL


(Left button).

In case of the HDD formatting, to begin 
formatting, in the displayed warning 
screen highlight 

Format

 using 

 or 


and press 

.

 • To return to Step 1, highlight 

No

 and 

press 

.

While formatting is in progress, "

Formatting...

" is displayed.

When formatting is complete, "

Done

" is displayed briefly and the monitor returns to the 

SET UP


menu.

1

2

3

4

Summary of Contents for Coolwalker

Page 1: ...En User s Manual En Preparation Basic Operation Advanced Operation Technical Notes Saving Images to a Computer Organizing Images Index Introduction ...

Page 2: ...orporation Internet is a trademark of Digital Equipment Corporation CompactFlash is a trademark of SanDisk Corporation Lexar Media is a trademark of Lexar Media Corporation Adobe and Acrobat are registered trademarks of Adobe Systems Inc Epson and USB Direct Print are trademarks of Seiko Epson Corporation PictBridge is a trademark All other trade names mentioned in this manual or the other documen...

Page 3: ...ter removing the battery pack take the equipment to a Nikon authorized service representative for inspection Do not use in the presence of flammable gas Do not use electronic equipment in the presence of flammable gas as this could result in explosion or fire Do not disassemble or modify Touching the product s internal parts could result in injury In the event of malfunction the product should be ...

Page 4: ...oduct off and make sure the power on lamp has gone out If you are using an AC adapter be sure it is unplugged Use only Rechargeable Lithium ion Polymer Battery EN EL6 the battery pack for the main unit To charge the battery pack attach it to the MSV 01 and connect the supplied AC adapter Do not use any other device or method to charge the battery pack Use only CR2025 Lithium Battery for the remote...

Page 5: ...AC adapter break open as the result of a fall or other accident unplug and take the AC adapter to a Nikon authorized service repre sentative for inspection Keep dry Do not use in the presence of flammable gas Keep the AC adapter clean of dust If dust or grime becomes attached to the metal con tacts or body of the power plug remove it with a dry cloth Continuing to use the prod uct in these circums...

Page 6: ...the instructions may cause harmful interference to radio com munications However there is no guarantee that interfer ence will not occur in a particular installation If this equipment does cause harmful interfer ence to radio or television reception which can be determined by turning the equipment off and on the user is encouraged to try to correct the interference by one or more of the follow ing...

Page 7: ...ission of the govern ment has been obtained the copying or reproduction of unused postage stamps or post cards issued by the government is pro hibited The copying or reproduction of stamps issued by the government and of certified documents stipulated by law is prohibited Cautions on certain copies and repro ductions The government has issued cautions on copies or reproductions of securities issue...

Page 8: ...ed and proven to operate within the operational and safety requirements of this electronic circuitry THE USE OF ELECTRONIC ACCESSORIES NOT APPROVED BY NIKON SPECIFICALLY FOR USE WITH THIS PRODUCT COULD DAMAGE THIS PRODUCT AND MAY VOID YOUR NIKON WARRANTY The use of third party rechargeable Li ion polymer batteries not approved by Nikon could interfere with normal operation of this Nikon product or...

Page 9: ...rd HDD 13 Viewing Images Stored on the COOLWALKER MSV 01 Play HDD images 14 Displaying Image Information 16 Taking a Closer Look Playback Zoom 17 Viewing Images Stored on a Memory Card Play CF card images 17 Button Operations List View and Image Playback 19 List View 19 Thumbnail Playback 20 Full Screen Playback 21 Movie Playback 22 Organizing Images 23 The EDIT Menu 23 Displaying the EDIT Menu 23...

Page 10: ... Card 45 Printing Images Stored on a Memory Card Using DPOF Settings 46 Finishing Direct Printing 47 Slideshow 48 Playing All Images in HDD 48 Playing All Images in a Selected Folder 49 Playing Selected Images 49 Operations During the Slideshow 51 Deselect images 51 Set interval 52 The SET UP Menu 53 Brightness 53 Language 54 Auto power off 54 Video mode 54 Format CF Card HDD 55 The INFORMATION Sc...

Page 11: ...lectronic Image Format files RAW files containing embedded preview images Images taken with cameras from other manufacturers or images edited using a computer may not be displayed or printed correctly The DPOF printset function supports only JPEG images stored on a CompactFlash card The COOLWALKER MSV 01 supports JPEG images for printing via direct USB connection PictBridge For information on imag...

Page 12: ...t you have all the items listed below COOLWALKER MSV 01 AC Adapter DSA 0151F 05 User s Manual this manual Remote Control Unit ML CW1 CR2025 Lithium Battery included Warranty Audio Video A V cable EG CW1 Soft Case CF CW1 USB interface cable UC E9 MSV 01 Windows 98 SE Driver Installer CD Battery pack case for use with the removed battery pack ...

Page 13: ...er on lamp 10 Power switch 10 HDD Access lamp flashes during reading from or writing to the internal HDD LCD Monitor Right function button Right button 6 Multi selector 6 Memory card slot cover 12 Remote control sensor 6 Enter button 6 Left function button Left button 6 Memory card slot 12 ...

Page 14: ...k or when operating the MSV 01 Make sure to turn the MSV 01 main unit off and disconnect the AC adapter before removing the bat tery pack DC in connector 8 Interface connector cover USB connector 30 42 Audio Video out connector 35 Battery pack Rechargeable Li ion Polymer Battery EN EL6 8 Battery release button 8 Interface connector cover ...

Page 15: ... holder at the base of the remote control unit in the direction indicated by the arrow in the illustration 2 Place the battery in the battery holder 3 Insert the battery holder into the remote control unit Push it in until the latch locks in place Power OFF button 10 Left function button Left button 6 Multi selector 6 Battery holder CR2025 lithium battery Remote control transmitter Rotate button R...

Page 16: ...te control sensor located beside the memory card slot of the main unit 3 The Power OFF button on the remote control unit turns the MSV 01 main unit off The Rotate button rotates by 90 steps counter clockwise the image currently displayed in full screen playback mode 15 All buttons except for the Power OFF and Rotate buttons on the remote control work in the same way as the equivalent buttons on th...

Page 17: ... data recorded within a memory card onto the MSV 01 hard disk drive 13 Play HDD images View image files stored on the MSV 01 hard disk drive 14 Play CF card images View image files stored on a memory card 17 Copy HDD CF card Copy data stored on the MSV 01 hard disk drive to a memory card 36 Print Print to a PictBridge printer connected to the MSV 01 via direct USB connection or set DPOF printing f...

Page 18: ...battery release button and slide the bat tery pack in the direction of the arrow to remove it from the the MSV 01 main unit 2 Installing the Battery Pack 1 Align the battery pack horizontally with the bot tom of the MSV 01 main unit as shown on the illustration Make sure that the battery pack terminals do not extend over the main unit pro truding part 2 Slide the battery pack in the direction of t...

Page 19: ...e MSV 01 is off disconnect the AC adapter and attach the battery pack The AC Adapter Accidental disconnection of the AC adapter while the MSV 01 is turned on may damage the device When using the device be careful not to disconnect the AC adapter Be sure to read and follow the precautions in the For Your Safety i iii section and notes on using the AC adapter 59 in this manual The Battery Pack When ...

Page 20: ...This setting can be changed using the Auto power off option in the SET UP menu 54 The Auto power off function is disabled when the MSV 01 is running on the AC power supply Checking the Battery Level The battery status is displayed at the bottom of the MSV 01 monitor During operation the display may temporarily indicate a lower than the actual remaining battery charge Using the MSV 01 from an AC Po...

Page 21: ...play the SET UP menu Highlight Language using or and press Highlight Deutsch German English Español Spanish or Français French and press The selected language will be set for menus and messages and the screen will return to the SET UP menu Press MENU Left button to return to the main menu 1 2 3 4 ...

Page 22: ...oved for use with the COOLWALKER MSV 01 see Approved Memory Cards 57 1 Turn the MSV 01 off Confirm that the monitor is off and the power on lamp is off or if the AC adapter is connected is lit or flashing orange 10 2 Open the memory card slot cover Gently slide the memory card slot cover downwards to expose the memory card slot 3 Insert a memory card Insert a memory card into the memory card slot ...

Page 23: ... created on the same date e g 20040601 001 Insert a memory card into the memory card slot 12 then turn the MSV 01 on The monitor will go on and display the main menu When using the battery pack check the battery level indicated on the monitor 10 Highlight Copy CF card HDD using or Press Copying will begin immediately Copying is displayed on the monitor while copying is in progress Press CANCEL Lef...

Page 24: ...ss to display a list of sub folders in the folder Using or highlight the DCIM folder Press to hide a list of sub folders Press to display a list of sub folders in the DCIM folder Using or highlight a folder containing images inside the DCIM folder example 100NCD70 100NIKON etc Press to display thumbnails of images and sub folders inside the folder Select an image to play full screen moving the cur...

Page 25: ...layback guide are displayed 16 For image files with attached voice memos in full screen playback a voice memo icon and a voice memo playback guide are displayed 16 File and folder names set or edited using the computer may not be displayed correctly on the MSV 01 Long file and folder names that exceed maximum length will be abbreviated with an asterisk Viewing Images in Rotated Orientation In full...

Page 26: ...ges with an attached voice memo or movies 2 Viewing an image without File Information 3 Shooting Data 1 Camera type Metering method Exposure mode Shutter speed File name 4 Shooting Data 2 Aperture Exposure compensation Focal length Digital zoom ratio File size Sensitivity ISO equivalency White balance 5 Histogram Shows the distribution of tones in the image the horizontal axis corresponds to pixel...

Page 27: ...g the multi selector Viewing Images Stored on a Memory Card Play CF card images Select Play CF card images from the main menu to view images stored in a memory card To Press Description View other areas of the picture Use or to scroll to areas of the image not visible in the monitor Zoom in JPEG only Right button Zoom increases each time button is pressed Zoom out Left button Zoom decreases each t...

Page 28: ...s of folders con taining images Using or select a folder Press to display thumbnails of the images stored in the folder Select an image to play full screen moving the cursor a yellow frame with or on the multi selector The file name of the currently selected image is displayed bottom left Press to view the image in full screen playback To display the next or previous image press or Press Left butt...

Page 29: ...lable in the list view mode List View To Press Description Highlight folders Press or on the multi selector to highlight folders Open a folder Open a selected folder to list up sub folders inside it sub folders are displayed up to the sixth level Close a folder Close a list of sub folders inside the selected folder Display thumbnails Display sub folders or images in a selected folder in the thumbn...

Page 30: ...n or display the thumbnails of the contents in the highlighted sub folder Select an image and press to view the high lighted image full screen Select a sub folder and press to display the thumb nails of the contents in the highlighted sub folder Go to the EDIT menu EDIT Right button Go to the EDIT menu to edit the selected folder or image file 23 Return to the LIST screen Play HDD images LIST Left...

Page 31: ...hooting information and histogram will be displayed 16 Play Pause voice memo Press to play back a voice memo when a voice memo icon appears for the currently displayed image Press to pause the voice memo playback Play back a movie for movies only Press to play back a movie when a movie icon appears for the currently displayed image 22 Zoom in for still images only Press to zoom in on a still image...

Page 32: ...Small size 320 and smaller than TV movie 640 captured at up to 15 frames per second and Small size 320 or smaller size movies captured at up to 30 frames per second Movie Playback To Press Description Start Pause Resume movie playback Press to start playback While playback is in progress press to pause playback Press again to resume When the movie ends first frame of the movie will be displayed Fa...

Page 33: ...cted image file or folder to a new destina tion inside the MSV 01 HDD 25 Copy Copy the selected image file or folder to a different destination folder inside the MSV 01 HDD 26 New folder Create a new folder 27 Rename Rename an existing image file or folder 28 Search Search for image files created within a specified range of dates 28 BACK Right button Go back to the previous step list view thumbnai...

Page 34: ...tected with the camera Be sure that any pictures you would like to keep have been transferred to another storage device or computer Delete Press EDIT Right button to display the EDIT menu 23 then using or highlight Delete Press A confirmation screen will be displayed Using or select Yes to delete a file or folder No to exit without deleting Press to execute the selected option and return to the li...

Page 35: ... the highlighted option Press CANCEL Left button to abort the operation After completing the operation the screen will return to the list thumbnail or full screen playback view of the source location When in the full screen playback mode an image next after the moved one will be displayed SAME FILE NAME EXISTS OVERWRITE will appear if a file with the same name already exists in the destination fol...

Page 36: ...ored folders will appear Using or select a destination folder To copy to the root level select the root folder at the top of the list Press A confirmation screen will be displayed Using or highlight Yes or No Press to execute the highlighted option Press CANCEL Left button to abort the operation After completing the operation the screen will return to the list thumbnail or full screen playback vie...

Page 37: ...ill return to the list view or playback display Press CANCEL Left button to cancel the operation File or folder names cannot begin with a space or period Name Input Screen Operations To enter a character highlight the required key using and press The entered characters are displayed in the upper section of the monitor To edit the entered name move cursor to the upper section of the screen by press...

Page 38: ...27 After you have edited the name press OK Right button The folder will be renamed and the monitor will return to the list view or playback display Press CANCEL Left button to cancel the operation When inputting the name do not input the file extension letters The file exten sion will be added to the entered name automatically File or folder names cannot begin with a space or period Search Press E...

Page 39: ...r more images only 400 will be displayed 6 Press to view image in full screen playback To return to the SEARCH RESULT press Left button View previous result Select View previous result from the SEARCH menu using or and press The previ ous search results in contact sheets of six thumbnail images will be displayed Displaying Search Results To ensure that the file creation dates reflect the dates on ...

Page 40: ...ers Complete the following procedure to install the software before connecting the MSV 01 to the computer Using the MSV 01 with Other Operation Systems You do not have to install the MSV 01 USB Drivers Continue on to Connecting the USB Cable 32 Driver Software Installation Windows 98 Second Edition Only Before Installing MSV 01 USB Drivers Turn off any virus checking software Exit all other applic...

Page 41: ... The uninstaller will start up Follow the on screen instructions to complete uninstallation 3 The destination folder for Nikon COOLWALKER MSV 01 USB Drivers will be displayed under Destination Folder Click Install to begin the installation To change the installation destination click Browse by default the destination location is set to C Program Files Nikon COOLWALKER MSV 01 4 Click Finish to comp...

Page 42: ...lace the MSV 01 on a flat and stable surface When connecting the MSV 01 to a computer use the DSA 0151F 05 AC adapter Connect the MSV 01 directly to the computer do not connect the cable via a USB hub or keyboard When the MSV 01 is connected to a computer Connecting via USB is displayed on the monitor all controls are disabled When disconnecting the MSV 01 from a computer disconnect the USB cable ...

Page 43: ...isk drive refer to the user s manuals or help for your computer or applications Windows Open the COOLWALKER icon representing the MSV 01 from My Computer and copy files and folders stored on the MSV 01 to your computer using a simple copy and paste operation Macintosh Open the COOLWALKER icon representing the MSV 01 displayed on the desktop and copy files and folders stored on the MSV 01 to your c...

Page 44: ...r and select Safely remove USB Mass Storage Device from the menu that appears Windows 2000 Professional Click the Unplug or Eject Hardware icon in the task bar and select Stop USB Mass Storage Device from the menu that appears Windows Millennium Edition Me Click the Unplug or Eject Hardware icon in the task bar and select Stop USB Disk Drive from the menu that appears Windows 98 Second Edition SE ...

Page 45: ...cidentally disconnect the cables 1 Turn the MSV 01 off Turn the MSV 01 off before connecting or disconnect ing the A V cable 2 Connect the A V cable Open the interface cover and insert the black plug of the supplied A V cable into the audio video out inter face connector of the MSV 01 Insert the yellow plug into the video in jack and the white plug into the audio in jack on the television or VCR 3...

Page 46: ...ard from the main menu Press A list of the folders stored on the MSV 01 HDD will appear allowing to select a folder or an image you want to copy From the displayed list using or select a folder you want to copy from and press COPY Right button A list of the folders stored on the memory card will appear Using or navigate through the list to the copy destination folder Press A confirmation screen wi...

Page 47: ...d list using or select the sub folder inside the DCIM folder that con tains the image you want to copy Press to display the contents of the selected folder in the thumbnail playback mode Using or select a thumb nail of an image you want to copy To return to Step 1 press LIST Left but ton Press to confirm the selected image in full screen playback Press COPY Right button to finalize your selection ...

Page 48: ...stry wide standard that allows pictures to be printed from print orders stored on the memory card Before printing check that the printer or print service supports DPOF PictBridge PictBridge is an industry standard that enables direct printing from a digital USB device without the need to use a computer and ensures compatibility across digital USB devices and printers produced by different makers I...

Page 49: ...ry card into the MSV 01 before turning it on 12 Turn the MSV 01 on and highlight Print using or Press to display the Print menu Highlight DPOF printset using or To return to the main menu press MENU Left button Press to display the DPOF PRINTSET menu To return to the PRINT menu press CANCEL Left button Highlight Select images using or Press to display selection screen Using or scroll through image...

Page 50: ... 7 Use or to specify the number of prints up to 9 To deselect an image press when the number of prints is 1 Repeat Steps 6 to 8 to select additional images Press SET Right button to complete select ing images and display menu of print options To print the date of recording on all pic tures in the print order highlight Date and press ON will be indicated for the Date setting To print shutter speed ...

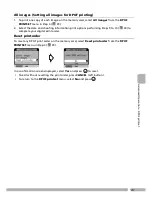
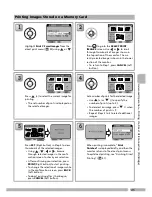
Page 51: ... shooting information print options performing Steps 9 to 10 40 to complete your digital print order Reset printorder To reset any DPOF print order on the memory card select Reset printorder from the DPOF PRINTSET menu in Step 4 39 In a confirmation screen displayed select Yes and press to reset To exit without resetting the print order press CANCEL Left button To return to the DPOF printset menu ...

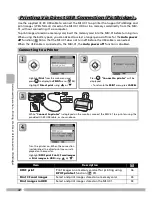
Page 52: ...connected to the MSV 01 the Auto power off function is disabled Connecting to a Printer Highlight Print from the main menu and press to display the PRINT menu 38 Highlight Direct print using or Press Connect to printer will be displayed To return to the PRINT menu press CANCEL While Connect to printer is displayed on the monitor connect the MSV 01 to a printer using the provided UC E9 USB cable as...

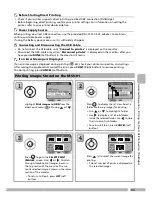
Page 53: ...menu If an Error Message is Displayed If an error message is displayed during printing 63 check your printer connection and settings After solving the problem that caused the error press CONT Right button to resume printing To abort printing press CANCEL Left button Printing Images Stored on the MSV 01 Highlight Print images in HDD from the direct print menu 42 using or Press to display the list v...

Page 54: ...mbnails of the selected images Using or browse through selected images in the confirmation screen to check your selection After confirming your selection press PRINT Right button to start printing To change the selection of images while in the confirmation screen press BACK Left button To abort printing after it has begun press CANCEL Left button When printing is complete Print finished is display...

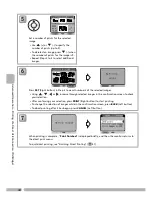
Page 55: ...nts for the selected image Use or to specify the number of prints up to 9 To deselect an image press when the number of prints is 1 Repeat Steps 2 to 4 to select additional images Press SET Right button in Step 4 to view thumbnails of the selected images Using or browse through selected images in the confir mation screen to check your selection After confirming your selection press PRINT Right but...

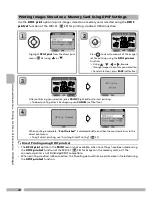
Page 56: ...B connection the Shooting data will not be printed even if selected using the DPOF printset function Printing Images Stored on a Memory Card Using DPOF Settings Highlight DPOF print from the direct print menu 42 using or Press to view thumbnails of the images set for printing using the DPOF printset function Using or browse through images to confirm your selection To return to Step 1 press BACK Le...

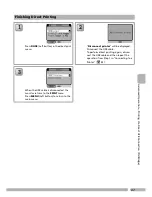
Page 57: ...print menu Disconnect printer will be displayed Disconnect the USB cable To perform direct printing again discon nect the USB cable and then repeat the operation from Step 1 in Connecting to a Printer 42 When the USB cable is disconnected the monitor returns to the PRINT menu Press MENU Left button to return to the main menu 1 2 3 ...

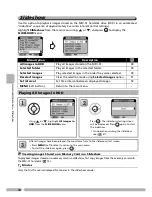
Page 58: ...scription All images in HDD Play all images stored on the MSV 01 48 Selected folder Play all images in the selected folder 49 Selected images Play selected images in the order they were selected 49 Deselect images Clear the selection made using Selected images option 51 Set interval Set time interval between displayed images 52 MENU Left button Return to the main menu Playing All Images in HDD Usi...

Page 59: ...een will be displayed Press again to start the slideshow On operations during the slideshow see 51 After all images have been played the monitor returns to the slideshow start screen Press MENU Left button to return to the main menu To start the slideshow again press Playing Selected Images Highlight Selected images from the SLIDESHOW menu using or Press A list of folders stored on the MSV 01 HDD ...

Page 60: ...Using or scroll through images The currently selected image is shown in the lower section of the monitor To select the currently displayed image for playing in the slideshow press ON To deselect the image press OFF is displayed for the selected images Repeat Steps 4 5 to select additional images Press SET Right button to complete selec tion The slideshow start screen will be dis played Press to st...

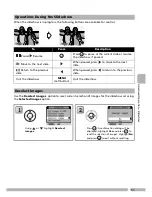
Page 61: ... Pause Resume Press to pause at the current slide or resume the slideshow if paused Move to the next slide When paused press to move to the next slide Return to the previous slide When paused press to return to the previous slide Quit the slideshow MENU Left button Quit the slideshow Deselect images Using or highlight Deselect images Press A confirmation dialog will be displayed Highlight Yes and ...

Page 62: ...een You can set the interval value in the range from 1 to 99 seconds By default the interval is set to 3 seconds Press to increase the interval by one second or to decrease the interval by one second Press to change the interval setting Press BACK Left button to abandon any change made Slideshow Interval The actual slideshow interval may differ from the selected value depending on the image file f...

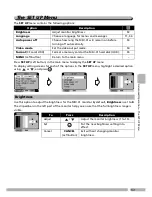
Page 63: ... the monitor help you ensure that the full brightness range is visible Option Description Brightness Adjust monitor brightness 53 Language Choose a language for menus and messages 11 54 Auto power off Choose how long the MSV 01 will remain on before turning off automatically 54 Video mode Set the video output mode 54 Format CF card HDD Format a memory card or the MSV 01 hard disk HDD 55 MENU Left ...

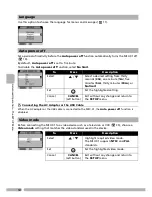
Page 64: ...ore connecting the MSV 01 to a video device such as a television or VCR 35 choose a Video mode setting that matches the video standard used in the device Language Auto power off To Press Description Select Select a desired setting from thirty seconds 30s one minute 1m five minutes 5m thirty minutes 30m or No limit Set Set the highlighted setting Cancel CANCEL Left button Exit without any change an...

Page 65: ...tures you would like to keep to a computer or other storage media During Formatting Do not remove the battery pack or memory card or unplug the AC adapter while formatting is in progress Format CF Card HDD Highlight CF Card or HDD using or and press To exit without formatting press CANCEL Left button In the displayed confirmation screen high light Format using or and press To return to Step 1 high...

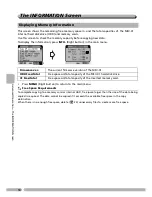
Page 66: ...urn to the main menu Free Space Requirements To complete copying to a memory card or internal HDD free space larger than the size of the data being copied is required The data cannot be copied if it exceeds the available free space in the copy destination When there is no enough free space delete 24 unnecessary files to create more free space Displaying Memory Information Firmware ver The current ...

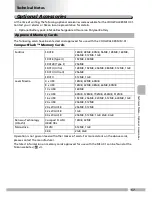
Page 67: ...lease contact the manufacturer The latest information on memory cards approved for use with the MSV 01 can be found at the Nikon websites vi Approved Memory Cards SanDisk SDCFB 16MB 48MB 80MB 96MB 128MB 160MB 256MB 512MB 1GB SDCFB Type II 192MB 300MB SDCF2B Type II 256MB SDCFH Ultra 128MB 192MB 256MB 384MB 512MB 1GB SDCFX Ultra II 256MB SDCFX 512MB 1GB Lexar Media 4 x USB 16MB 32MB 64MB 8 x USB 16...

Page 68: ...ic electricity or interference may cause damage to the device loss or corruption of the data stored on the hard disk Static electricity may be generated in your body or cloths Touch a metal doornob or another metal object to discharge static electricity from your body before handling the device Static electricity may cause damage to the device loss or corruption of the data stored on the hard disk...

Page 69: ...turned on Do not insert the unit in the soft case leave it unattended or carry it around while turned on Turn the device off before removing or disconnecting the power source Do not unplug the product or remove the battery pack while the product is on or while images are being recorded or deleted Forcibly cutting power in these circumstances could result in loss of data or in damage to the hard di...

Page 70: ... when using the device in locations where there is no AC power source available You may find it difficult to charge the battery or to purchase replacement battery packs at short notice Use only the specified Rechargeable Lithium ion Polymer Battery EN EL6 When removing or attaching the battery pack always observe the correct procedure described in this manual to avoid damaging the battery terminal...

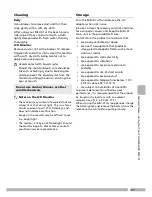
Page 71: ...light The monitor is lit by an LED backlight Should the monitor begin to dim or flicker contact your Nikon service representative Storage Turn the MSV 01 off and remove the AC adapter when not in use Be sure to close the memory card slot and inter face connector covers and keep the MSV 01 main unit in the provided soft case Do not store the products in locations that are poorly ventilated or damp ...

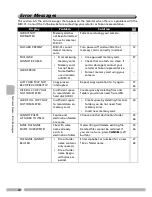
Page 72: ...amera 57 CARD ERROR LAST CARD MAY NOT BE COPIED CORRECTLY Copy process interrupted Repeat copy operation to try again 13 36 DISK FULL COPY HAS NOT COMPLETED Insufficient space to record data on hard disk HDD Create space by deleting files and folders you do not need from HDD 24 CARD FULL COPY HAS NOT COMPLETED Insufficient space to record data on memory card Create space by deleting files and fold...

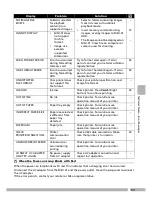
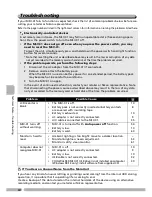
Page 73: ...or has occurred during formatting HDD Try to format hard disk again If error persists contact your retailer or Nikon representative 55 UNSUPPORTED FILE FORMAT Your printer does not support this file format Check your printer specification and image file format INK LOW Ink low Check printer Press Cont Right button to continue printing 43 OUT OF INK No ink Check printer For solutions see operation m...

Page 74: ...ard disk at the time the problem occurred If the problem persists perform the following steps 1 Disconnect the AC adapter from the MSV 01 if connected 2 Remove and re attach the battery pack When the MSV 01 is used on battery power for an extended period the battery pack may become hot Be careful to avoid burns 3 Turn the MSV 01 on again In the event of continued malfunction contact your retailer ...

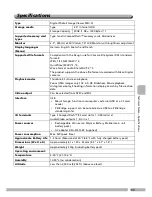
Page 75: ...X8 Slideshow Movie playback Histogram display Shooting information display Search by file creation date Video output Can be selected from NTSC and PAL Interface USB Mass Storage functions as computer s external HDD or a CF card reader PictBridge support can be connected via USB to a PictBridge standard printer I O terminals Type II CompactFlash CF card slot x 1 USB mini x 1 Audio Video output x 1 ...

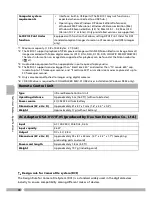
Page 76: ...ity among different makes of devices Computer system requirements Interface built in USB ports The MSV 01 may not function as expected when connected to a USB hub Operating system Windows XP Home Edition Professional Windows 2000 Professional Windows Millennium Edition Me Windows 98 Second Edition SE 6 Mac OS 9 1 9 2 Mac OS X Version 10 1 2 or later Only preinstalled versions are supported Set DPO...

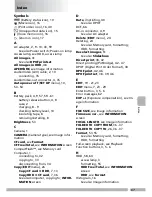
Page 77: ...cting from 34 Copy EDIT menu 26 Copy CF card HDD 7 13 Copy HDD CF card 7 36 See also Computer copying to INFOR MATION screen D Date imprinting 40 See also DPOF DCF 66 DC in connector 4 9 See also AC adapter Delete EDIT menu 24 Deleting 24 See also Memory card formatting HDD formatting Deselect images 51 See also Slideshow Direct print 38 42 Direct printing PictBridge 42 47 DPOF Digital Print Order...

Page 78: ...DIT menu 23 27 NEW SEARCH 29 See also Search NTSC see Video mode O Operating system OS 30 34 66 Optional accessories 57 P PAL see Video mode PictBridge 1 38 42 Play CF card images 7 17 20 22 Play HDD images 7 14 19 22 Playback full screen 14 15 17 18 21 movie 21 22 thumbnail 14 15 18 20 37 voice memo 21 zoom 16 17 Power switch 3 10 64 Power off button see Remote control unit Power on lamp 3 10 63 ...

Page 79: ... info Shooting info imprinting 40 See also DPOF SHUTTER Shutter speed see Image in formation Slideshow 7 48 SLIDESHOW INTERVAL 52 SLIDESHOW menu 48 52 Soft case 2 T Thumbnail playback see Playback TV Television 1 connecting to 35 U USB 1 32 38 42 46 cable 2 32 42 connector 4 driver software installation 30 31 See also Computer Printer V Video mode 35 53 54 Video output 1 View previous result 28 29...

Page 80: ...Printed in Japan BG4G01200201 11 6MAW1411 A ...

Reviews: