E
21
Re
feren
c
e
S
ect
io
n
1
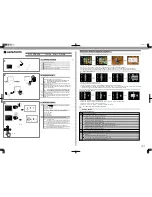
Turn off the camera and connect it to the TV.
•
Make sure that the plugs are properly oriented. Do not insert or remove the
plugs at an angle when connecting or disconnecting them.
2
Set the TV’s input to external input.
•
See the documentation provided with your TV for details.
3
Hold down the
c
button to turn
on the camera.
•
Images are displayed on the TV.
•
The camera monitor does not turn on.
C
Using a TV Remote Control (HDMI Device Control)
The remote control of an HDMI-CEC-compatible TV can be used to select images,
start and pause movie playback, switch between full-screen playback mode and
four-image thumbnail display, etc.
•
Set the
HDMI device control
setting (
E
74) of
TV settings
to
On
(default
setting) and then connect the camera and TV using an HDMI cable.
•
Aim the remote control at the TV when operating it.
Connecting the Camera to a TV (Viewing
Images on a TV)
HDMI micro
connector
(Type D)
To the HDMI input
connector
Summary of Contents for COOLPIX AW120
Page 47: ... ...
Page 50: ...En DIGITAL CAMERA Reference Manual En ...
Page 100: ...21 t ...
Page 177: ...98 t ...
Page 279: ...E102 t ...
Page 318: ...F39 t ...