background image

Intr

oduction—First Steps

11

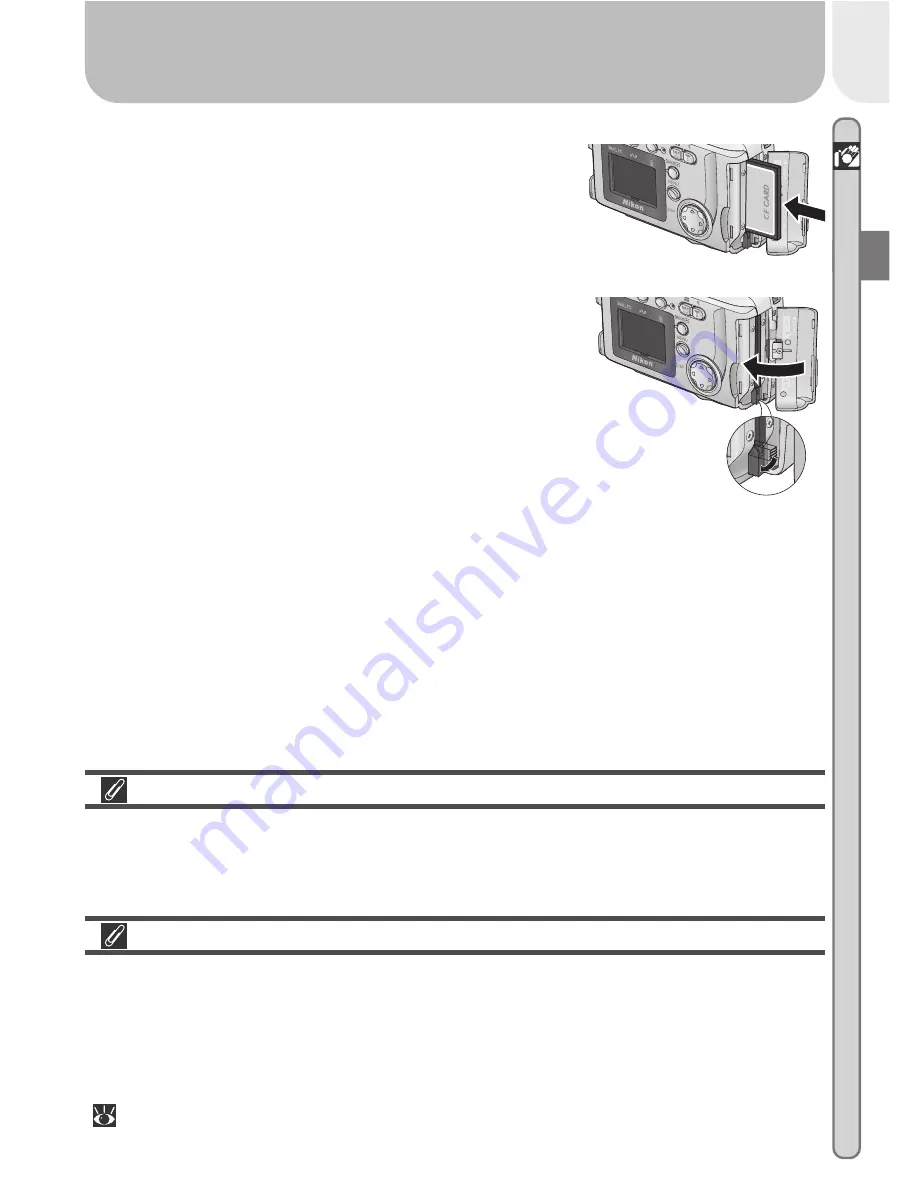
Closing the Memory Card Slot Cover

Fold the eject button over before closing the memory card slot cover.  If the
eject button is upright when the cover is closed, closing the cover may par-
tially eject the card, causing errors when the camera is turned on.

Formatting Memory Cards

“Formatting” is the term used to describe the action of permanently erasing
all data from a memory card to make room for more pictures.  The memory
card supplied with your camera is formatted at shipment.  Other memory
cards, however, must be formatted before first use.  For information on for-
matting memory cards, see “The Setup Menu: Formatting Memory Cards”
(

 75).

3

.3

Insert the memory card

Holding the camera with the monitor toward
you, slide the card in face up until it is firmly
seated in the contacts at the back of the
slot.

3

.4

Close the card-slot cover

Fold the eject button over and close the
memory card slot cover.

Summary of Contents for CoolPix 2000

Page 1: ...En En DIGITAL CAMERA The Guide to Digital Photography with the ...

Page 2: ...ot Custom shots 39 STEP 3 Play them back Tutorial Reviewing Pictures while shooting 22 Basic Playback after shooting 45 STEP 4 Install camera software Quick Start Guide provided Install software Nikon View 5 Reference Manual provided on CD Get to know Nikon View 5 Tutorial Reviewing Pictures while shooting 22 Basic Playback during playback 45 Deleting Pictures Delete multiple pictures 66 and delet...

Page 3: ...horoughly to get the most from your camera Quick Start Guide The Quick Start Guide takes you through the process of unpacking and setting up your Nikon digital camera taking your first pictures in stalling software and transferring pictures to your computer Guide to Digital Photography The Guide to Digital Photography this manual provides complete op erating instructions for your camera Nikon View...

Page 4: ...rangulation when wearing the camera strap around your neck Never place the strap around the neck of an infant or child Do not disassemble Touching the product s internal parts could result in injury In the event of a malfunction the product should be repaired only by a qualified technician Should the product break open as the result of a fall or other accident re move the batteries and AC adapter ...

Page 5: ...uld be taken to pre vent infants from putting the battery or other small parts into their mouths Removing memory cards Memory cards may become hot dur ing use Observe due caution when removing memory cards from the camera CD ROMs The CD ROMs on which the software and manuals are distributed should not be played back on audio CD equipment Playing CD ROMs on an audio CD player could cause hearing lo...

Page 6: ...n radiate radio frequency energy and if not installed and used in accordance with the instructions may cause harmful interfer ence to radio communications However there is no guarantee that interference will not occur in a particular installation If this equipment does cause harmful interfer ence to radio or television reception which can be determined by turning the equip ment off and on the user...

Page 7: ...checks gift certificates etc commuter passes or coupon tickets except when a minimum of necessary copies are to be provided for business use by a com pany Also do not copy or reproduce passports issued by the government li censes issued by public agencies and pri vate groups ID cards and tickets such as passes and meal coupons Comply with copyright notices The copying or reproduction of copy right...

Page 8: ...ures The Basics 16 Step 1 Ready the Camera 16 Step 2 Adjust Camera Settings Optional 18 Step 3 Frame the Picture 19 Step 4 Focus and Shoot 20 Step 5 Turn the Camera Off 21 Reviewing Pictures Quick Review 22 Quick Review 22 Thumbnail Review 24 Getting Creative Choosing a Mode 25 Connections Connecting to External Devices 29 Connecting to a Computer Nikon View 5 30 Before You Begin Installing Nikon ...

Page 9: ...justing Exposure Exp 63 Making Edges More Distinct Image Sharpening 64 The Playback Menu Managing Pictures 65 Deleting Pictures Delete 66 Automated Playback Slide Show 68 Safeguarding Valuable Pictures Protect 70 Ordering Prints Print Set 71 Marking All Pictures for Transfer Auto Transfer 73 The Setup Menu Camera Setup 74 Adjusting Monitor Brightness Brightness 75 Formatting Memory Cards CF Card F...

Page 10: ...viii ...

Page 11: ...ng to Know the COOLPIX 2000 Bookmark this section and refer to it as you read through the manual for information on the names and functions of camera parts First Steps This section details the steps you will take when using your camera for the first time Introduction Before You Begin 9 STEP 1 9 10 10 11 12 13 14 STEP 2 STEP 3 STEP 4 STEP 5 Attach the Camera Strap Insert the Battery Insert the Memo...

Page 12: ...is Manual Use Only Nikon Brand Electronic Accessories Your Nikon COOLPIX digital camera is designed to the highest standards and includes complex electronic circuitry Only Nikon brand electronic accessories including AC adapters certified by Nikon specifically for use with your Nikon digital camera are engineered and proven to operate within the operational and safety requirements of this electron...

Page 13: ...t these sites to keep up to date with the latest product information tips answers to frequently asked questions FAQs and general advice on digital imaging and photography Additional information may be available from the Nikon representative in your area See the URL below for contact information http www nikon image com eng This icon marks cautions infor mation that you should read be fore use to p...

Page 14: ...re information on the function of each part refer to the page numbers listed 1 Photocell 2 Self timer lamp 41 3 Built in Speedlight 19 4 Video out connector under cover 38 5 USB connector under cover 33 6 Lens 19 7 DC in connector under cover 8 Mode dial 16 25 46 9 Shutter release button 20 21 41 10 Eyelet for camera strap 9 11 Power switch 16 21 33 12 self timer SMALL PIC button 41 50 13 focus mo...

Page 15: ...8 15 Flash ready lamp 16 20 16 Zoom buttons 19 42 17 QUICK QUICK quick review button 22 66 70 72 18 MENU button 54 65 74 19 Memory card slot cover 10 11 20 Tripod socket 21 Battery chamber cover latch 9 22 Battery chamber cover 9 10 A 19 20 B 18 17 22 21 12 13 14 16 15 8 9 10 11 ...

Page 16: ...er indicator 41 8 Number of exposures remaining 17 9 Flash mode 25 43 10 Focus mode 40 11 Image quality 57 12 Image size 57 13 Exposure compensation 63 14 White balance 58 15 Metering mode 60 16 Best shot selector BSS 62 17 Image sharpening 64 18 Shooting scene mode 16 25 19 Continuous shooting mode6 61 1 Appears in same position as focus indicator 2 Displayed only when shutter release button is p...

Page 17: ...i selector to the left Press the multi selector to the left a second time to view indicators again Indicators hidden Indicators displayed 1 File number and type 47 2 Battery level indicator 17 3 Print order icon 71 4 Protect icon 67 70 5 Transfer icon 75 6 Current frame number total number of frames 7 Image quality 57 8 Image size 57 9 Time of recording 13 10 Date of recording 13 Appears only when...

Page 18: ...COOLPIX 2000 B The Multi Selector The multi selector is used to navigate through cam era menus to page through or select pictures during playback scroll images during playback zoom and to control the display of indicators in the monitor ...

Page 19: ...amera Before using your camera for the first time you will need to complete the following steps Step 1 Attach the Camera Strap Attach the strap as shown 2 2 Open the battery chamber cover Pressing the battery chamber cover latch slide the cover out 1 and flip it open 2 2 3 Insert the batteries Insert the batteries with the and contacts oriented as shown 1 2 The Battery Chamber Cover The cover can ...

Page 20: ...s out Failure to observe this precaution could result in damage to the camera or memory card or in loss of data or stored settings Alternative Power Sources To power your camera continuously for extended playback or while the cam era is connected to a computer we recommend the EH 53 AC adapter avail able separately 80 2 4 Close the battery chamber cover Flip the battery chamber cover up 1 and slid...

Page 21: ... permanently erasing all data from a memory card to make room for more pictures The memory card supplied with your camera is formatted at shipment Other memory cards however must be formatted before first use For information on for matting memory cards see The Setup Menu Formatting Memory Cards 75 3 3 Insert the memory card Holding the camera with the monitor toward you slide the card in face up u...

Page 22: ... MENU Shooting menu Setup menu Display SETUP menu 4 3 OFF Brightness CF card format Date Auto off Video mode Language BK Set SETUP MENU Highlight Language 4 4 OFF CF card format Date Auto off Video mode Language USB BK Set SETUP MENU Display options 4 5 OFF En De Fr Es Set LANGUAGE BK Choose language from Deutsch German English Français French Japanese or Español Spanish 4 6 OFF En De Fr Es Set LA...

Page 23: ...eo mode Language BK Set SETUP MENU Brightness Display DATE menu 5 2 OFF 2 0 0 2 0 1 0 0 0 0 0 1 Y M D Set DATE BK Edit Year 5 3 OFF 2 0 0 2 0 1 0 0 0 0 0 1 Y M D Set DATE BK Select Month Repeat steps 5 3 5 4 to edit remaining items 5 4 OFF 2 0 0 2 0 1 0 0 0 0 0 1 Y M D Set DATE BK Highlight Y M D 5 5 OFF 2 0 0 2 0 8 1 0 0 0 0 5 Y M D Set BK DATE Choose order in which Year Month and Day will be dis...

Page 24: ...he monitor when the camera is in shooting mode The Clock Battery The camera s internal clock calendar is powered by a separate rechargeable power source which is charged as necessary when the main battery is in stalled If the camera has been stored for an extended period with the main battery removed the clock may need to be reset The clock power source can provide roughly twenty four hours of bac...

Page 25: ...d this section for a step by step guide to the basics of taking pictures with the COOLPIX 2000 16 17 STEP 1 18 19 20 21 21 STEP 2 STEP 3 STEP 4 STEP 5 Ready the Camera Adjust Camera Settings Frame the Picture Focus and Shoot Turn the Camera Off Reviewing Pictures Learn how to view and delete pictures Getting Creative Explore the creative possibilities of scene and movie modes ...

Page 26: ...s automatic point and shoot mode the majority of camera settings are controlled by the camera in response to shooting conditions pro ducing the best possible results in most situations Step 1 Ready the Camera 1 1 Turn the mode dial to 1 2 Turn the camera on The lens cover will open the lens will ex tend and the flash ready lamp will light ...

Page 27: ...If the number of exposures remaining is zero a message will be dis played in the monitor In this case delete pictures 66 use a new memory card or choose a lower quality or image size 56 FINE AUTO 8 1632 A B Batteries fully charged Camera functions normally Display Meaning Camera status Low battery Ready a set of new batteries Warning Battery exhausted Batteries exhausted No pictures can be taken u...

Page 28: ...Flash fires automatically when lighting is poor 43 Image quality NORMAL Pictures compressed for balance between quality and file size that is ideal for snap shots 56 Image size 1632 Pictures are 1 632 1 224 pixels in size 57 Setting Default Description Focus mode Autofocus Camera focuses automatically at distanc es over 30 cm 1 40 Continuous Single One shot taken each time shutter release button i...

Page 29: ...round Don t Block the Shot To avoid dark or partially obscured pictures keep your fingers and other ob jects away from the lens and flash window Indicator in monitor shows amount of zoom while either button is pressed When the camera is zoomed in to maximum magnification holding the button down for about two seconds extends the zoom range digi tally digital zoom 42 The zoom indicator turns yellow ...

Page 30: ... with Autofocus Autofocus performs best when there is contrast between the subject and background and the subject is evenly lit It does not perform well if the sub ject is very dark or moving rapidly if there are objects of sharply differing brightness in the scene e g the sun is behind your subjects and their fea tures are in deep shadow or if the subject contains objects at different dis tances ...

Page 31: ...ss the shutter release button smoothly pausing slightly at the halfway point to give the camera a chance to set focus and exposure During Recording While pictures are being recorded to the memory card a icon will be dis played in the monitor In continuous 61 and movie 26 modes an hourglass icon will be displayed Do not turn the camera off remove the memory card or remove or disconnect the power so...

Page 32: ... you to view earlier pictures while shooting If you are not satisfied with the results you can take another picture immediately The following operations can be performed in quick review Shooting mode Press Quick review FINE AUTO 8 1632 FINE 1632 0001 0008 Press Description To Press the button to display four or nine pictures at a time as small thumbnail pre views 24 View multiple pictures Press th...

Page 33: ...No Yes Delete current picture Press Description To Pictures selected for transfer are marked with a icon Turn this marking on or off to select the pictures that will be transferred to a computer at a later date 73 Select current picture for transfer to a computer Shutter release QUICK QUICK To end review and return to shooting mode press the QUICK QUICK button or press the shutter release button h...

Page 34: ...ansfer are marked with a icon Turn this marking on or off to select the pictures that will be transferred to a comput er at a later date 73 Select high lighted picture for transfer to a computer A confirmation dialog will be displayed Press multi selector up or down to highlight option press to right to select Select No to exit with out deleting picture Select Yes to delete picture Delete highligh...

Page 35: ...e type When a scene is selected using the mode dial camera settings are automatically ad justed to produce optimal results for the selected composition sparing you the necessity of adjusting camera settings one by one A movie mode is also available for recording silent movies up to twenty seconds long Mode selection is made using the mode dial In addition to auto mode 15 the follow ing options are...

Page 36: ...uction 43 This mode is used to record NORMAL quality silent movies 320 240 pixels in size QVGA at a rate of about fifteen frames per second Recording begins when the shutter release button is pressed all the way down and ends when the shutter release button is fully pressed a second time In place of the number of exposures remaining the exposure count dis play in monitor shows the length of the mo...

Page 37: ...s automati cally on subjects 30 cm 1 or more from the camera The self timer is avail able in all modes except movie Noise Reduction A special feature called noise reduction is enabled in Night Portrait mode to help make pictures as clear as possible When noise reduction is in effect slightly more time is required to process pictures before they are saved to the memory card ...

Page 38: ...28 ...

Page 39: ... VCR 38 Connecting to a Computer 30 37 Printing Your Pictures Pictures taken with the COOLPIX 2000 can be printed in a variety of ways For example many photofinishers accept delivery of photographs on memory cards floppy disks or other removable media contact your photofinisher for information on the type of media and file formats supported Pictures that have been transferred to your computer usin...

Page 40: ...kon View 5 you must have a computer running one of the following operating systems Pre installed versions of Windows XP Home Edition Windows XP Professional Windows 2000 Professional Windows Millennium Edition Me or Windows 98 Second Edition SE Windows Mac OS 9 0 9 1 9 2 Mac OS X 10 1 2 or later Only models with built in USB ports supported Macintosh Nikon View 5 Reference Manual En De Fr Es Nl It...

Page 41: ... View 5 Once you have installed Adobe Acrobat Reader double click the INDEX pdf icon in the root directory of the reference CD to view a clickable index of the documentation available for Nikon View 5 If you have not already installed Nikon View 5 you can follow the links to view detailed installa tion instructions for your computer system If desired you can print the installation instructions usi...

Page 42: ...the camera to a computer select the USB option in the camera setup menu 77 and choose a USB protocol that matches that used by your computer s operating system If you are connecting the camera to a computer running Windows XP Home Edition Windows XP Professional or Mac OS X 10 1 2 or later choose PTP If you are connecting the camera to a computer running Windows 2000 Professional Windows Millenniu...

Page 43: ...s the button 3Turn the camera off Turn the camera off before connecting the USB cable 4Turn the computer on Turn the computer on and wait for the operating system to start up 5Connect the camera and computer Connect the UC E5 USB cable as shown below Use the flat connector for connection to the computer and connect the other end of the cable to the camera s USB connector Do not connect the camera ...

Page 44: ...l appear in the camera monitor 8Wait for the pictures to be transferred to the computer While pictures being copied to the computer the camera monitor will show TRANSFERRING IMAGE TO COMPUTER While transfer is in progress do not Disconnect the USB cable Turn the camera off Remove the memory card from the camera 9Disconnect the camera When all marked pictures have been trans ferred the message TRAN...

Page 45: ...Click the Unplug or Eject Hardware icon in the taskbar and select Stop USB Disk from the menu that appears Mac OS X Pictures can not be transferred using the button in Mac OS X 10 1 2 Use the button in Nikon View 5 to transfer pictures See the Nikon View 5 Reference Manual on CD for details The camera button can be used to transfer images in Mac OS X 10 1 3 or later Windows 98 Second Edition SE In...

Page 46: ... note below and then insert the adapter into the PC card slot If you are using a card reader insert the memory card directly into the card reader If installed Nikon View 5 will detect cards from Nikon digital cameras and start automatically See the Nikon View 5 Reference Manual on CD for informa tion on transferring pictures to your computer CompactFlash Card Readers Before using a card reader be ...

Page 47: ...Remove Hardware icon in the taskbar and remove the memory card from the system Windows 2000 Professional Windows Millennium Edition Me Click the Unplug or Eject Hardware icon in the taskbar and remove the memory card from the system Windows 98 Second Edition SE In My Computer right click on the removable disk corresponding to the memory card and select Eject from the menu that appears Mac OS X Dra...

Page 48: ...evice Connect the other end of the cable to the video in jack on the television or VCR Use an AC Adapter To prevent the display in the television from turning off whenever the camera enters sleep mode connect the camera to an EH 53 AC adapter available separately Choosing a Video Mode 76 The Video Mode item offers a choice of NTSC and PAL standards for video output Be sure that the standard select...

Page 49: ...ng Pictures you learned the basic order of operations for taking pictures in auto mode This chapter offers advice on focus and flash mode selection zoom and the self timer Beyond Point and Shoot Adjusting Camera Settings ...

Page 50: ... it NO ICON Autofocus Camera automatically adjusts focus according to distance to subject Use with subjects 30 cm 1 or more from lens Macro close up Camera can focus on objects as close as 4 cm 1 6 measured from lens Camera adjusts focus con tinuously continuous AF Use for close ups Infinity Focus is fixed at infinity Flash is disabled No focus indicator ap pears in monitor when shutter re lease b...

Page 51: ...e for a three sec ond delay Delaying Shutter Release Self Timer Mode 3Compose the picture Adjust camera settings and frame the picture 4Start the timer Press the shutter release button all the way down to lock focus on the subject in the center of the frame and activate the timer The self timer lamp next to the flash win dow will blink until one second be fore the photo is taken staying lit during...

Page 52: ...he zoom indicator turns white In digital zoom data from the camera s image sensor are processed digitally enlarging the center portion of the picture to fill the frame Unlike optical zoom digital zoom does not increase the amount of detail visible in the pic ture Instead details visible at maximum optical zoom are enlarged produc ing a slightly grainy image While digital zoom is in effect the came...

Page 53: ...sh fires before main flash This caus es subjects pupils to contract before photo is taken minimizing red eye effect caused by flash re flecting from retina Use for portraits works best when subjects are well within range of flash and looking at pre flash Note that red eye reduction pre flash delays shutter release choose an other mode when photographing moving subjects Anytime Flash fill flash Fla...

Page 54: ...lighting is poor and the flash is off or set to slow sync shutter speeds will slow and pictures may be blurred If the shutter speed required for exposure is very slow a camera shake icon will appear in the monitor Use of a tripod or support is recommended ...

Page 55: ...45 Basic Playback Playback Mode This section details the operations that can be per formed when the mode dial is set to playback mode ...

Page 56: ...be performed in playback mode A confirmation dialog will be displayed Press multi selector up or down to highlight option press to right to select Select No to exit without deleting picture Select Yes to delete picture Delete current picture OFF Erase 1 image Yes or No Set DELETE No Yes Press the multi selector down to view pictures in the order recorded up to go back Keep multi se lector pressed ...

Page 57: ...y deletes all data on the card including protected pictures before formatting be sure to copy to a computer any pictures you want to keep Pictures selected for transfer are marked with a icon Turn this marking on or off to select the pic tures that will be transferred to a computer at a later date 73 Select current picture for transfer to a computer SMALL PIC If the current picture is a photograph...

Page 58: ...hange number of pictures displayed Press Description To Pictures selected for transfer are marked with a icon Turn this marking on or off to select the pictures that will be transferred to a comput er at a later date 73 Select high lighted picture for transfer to a computer A confirmation dialog will be displayed Press multi selector up or down to highlight option press to right to select Select N...

Page 59: ... To Press Zoom increases each time button is pressed to a maximum of 16 While image is zoomed in icon and zoom ratio are displayed in up per left corner of monitor Zoom photo in X 2 0 ZOOM SCROLL Press the multi selector to scroll to areas of the image not visible in the monitor View other areas of image Press QUICK QUICK to cancel zoom Cancel zoom QUICK QUICK While image is zoomed in press but to...

Page 60: ...tly displayed in full frame play back Press SMALL PIC button to display confirmation dialog 1 SET Smal l P ic small picture file Creating No Yes Highlight Yes to exit without creat ing copy highlight No and press multi selector to right 2 SET Smal l P ic small picture file Creating No Yes Create small copy and return to playback mode with original picture displayed 3 FINE 1632 0001 0008 To view co...

Page 61: ...be viewed using playback zoom 49 Restrictions on Small Picture The small picture function described in this section can not be used in quick review or thumbnail playback Copies can not be created from movies Additional copies of an image can not be created from a small picture file pressing the SMALL PIC button when a copy is displayed will have no effect Pressing the SMALL PIC button will also ha...

Page 62: ...k Movie Playback Movies are indicated by a icon In full frame playback movies can be viewed using the multi selector Movies can not be played back when thumbnails are displayed 0010 0015 2002 2002 08 08 06 06 0010 0010 MOV MOV 15 00 00 START When movie is paused press multi selector up to rewind Rewind When movie is paused press multi selector down to advance through movie If the last frame of the...

Page 63: ...the shooting menu which is available when the mode dial is set to auto or scene modes The Playback Menu Read this section for a description of the options in the playback menu which is available when the mode dial is set to The Setup Menu This menu which is available in all modes except movie mode contains options for basic camera setup such as formatting memory cards Menu Guide Using Camera Menus...

Page 64: ...ooting menu Setup menu Display shooting menu 3 FINE 1632 OFF White balance Image quality Image size Continuous Metering Best shot selector BK SHOOTING MENU SHOOTING MENU Set Highlight menu item 4 FINE 1632 OFF White balance Image quality Image size Continuous Metering Best shot selector BK SHOOTING MENU SHOOTING MENU Set Display options 5 1632 1024 640 OFF 1632 1224 X 1024 768 X 640 480 X IMAGE SI...

Page 65: ... the multi selector up or down until the next page is displayed FINE 1632 OFF Image quality Image size BK SHOOTING MENU SHOOTING MENU Set Option Image quality 56 57 Image size 56 57 Scene mode FINE 1632 OFF White balance Image quality Image size Continuous Metering Best shot selector BK SHOOTING MENU SHOOTING MENU Set OFF Continuous White balance Metering Exp Best shot selector Image Sharpening BK...

Page 66: ... of subject The image quality menu allows you to choose the amount of compression performed Making Effective Use of Memory Image Quality and Size Together image quality and size determine how much space each picture occupies on the memory card which in turn determines the total number of pictures that can be stored The table below shows the approximate number of pictures that can be stored on eigh...

Page 67: ... SIZE IMAGE SIZE Set BK Image Size Image size refers to the physical dimensions of the image measured in pixels Choose an image size according to the space available on the memory card and the task at hand Print Size The size of pictures when printed depends on the resolution of the printer the higher the resolution the smaller the final print size The current image quality and size settings are d...

Page 68: ...matically adjusted to suit light ing conditions Best choice in most circumstances White bal preset White object used as reference to set white bal ance under unusual lighting conditions Fine White balance adjusted for direct sunlight Incandescent For use with incandescent lighting Fluorescent For use with most types of fluorescent lighting Cloudy Use for pictures taken under cloudy skies Speedligh...

Page 69: ... at right will be displayed in the monitor Option Description Cancel Recalls the most recent setting for preset white balance from memory and sets white balance to this value Measure To measure a new value for white balance place a neutral gray object under the lighting that will be used in the final photograph Frame this object so that it fills the square in the center of the menu shown above Hig...

Page 70: ... Ensures that subject in center of frame will be correctly exposed even if background is very bright or very dark Camera meters area at center of frame equiva lent to about 1 60 of total Metered area shown by square in monitor Center weighted Classic meter for por traits preserves back ground details while let ting lighting conditions at center of frame deter mine exposure Camera meters entire fra...

Page 71: ...ce and Digital Zoom At settings of Continuous and Multi shot 16 the flash turns off and focus distance exposure and auto white balance are determined by the first pic ture in each series Digital zoom can not be used Option Description Camera takes one picture each time the shutter re lease button is pressed all the way down Single Camera continues to take pictures as long as shutter release button...

Page 72: ...down to a maximum of ten These images are then com pared and the sharpest photo the image with the highest level of detail saved to the memory card The flash turns off and focus distance exposure and auto white balance are determined by the first photograph in the series Restrictions on BSS BSS is not available at CONTINUOUS settings other than Single Selecting Continuous or Multi Shot 16 automati...

Page 73: ...n sub ject Use negative values when large areas of the frame are very dark for example when photographing a forest of dark green leaves or when the background is much darker than the main subject This is because the cam era in order to avoid extreme over or under exposure tends to lower expo sure when the frame is very bright and raise exposure when the frame is very dark which can make naturally ...

Page 74: ... gives you control over the amount of sharpening performed Auto Camera sharpens edges for optimal results adjustment per formed differs from image to image High Image processed to increase sharpness making edges more distinct Normal Camera performs same standard level of sharpening on all images Low Amount of sharpening reduced below normal level Off No sharpening performed High Normal Low Off Aut...

Page 75: ...nsfer Print set BK PLAYBACK MENU Set Option Delete 66 67 Slide show 68 69 Protect 70 Print set 71 72 Highlight PLAYBACK MENU 2 OFF Set Playback menu MENU Setup menu Press MENU button 1 OFF Set Playback menu MENU Setup menu Display playback menu 3 OFF Protect Delete Slide show Auto transfer Print set BK PLAYBACK MENU Set To make a selection from the playback menu use the multi selector as de scribe...

Page 76: ...ighlight picture Press multi selector up or down to se lect picture for deletion Selected pic tures are marked by icon Repeat steps 1 and 2 to select additional pic tures for deletion To deselect picture highlight and press multi selector up or down To exit without deleting pic tures press MENU button 1 2 DELETE IMAGES Set Done QUICK DELETE IMAGES Set Done QUICK Press QUICK QUICK to display a conf...

Page 77: ... QUICK QUICK button Before Deletion Once deleted pictures can not be recovered Be sure that any pictures you would like to keep have been transferred to your computer Protected Pictures Pictures marked with a icon are protected and can not be selected for deletion Deleting All Photographs and Movies Selecting Erase all images from the Delete menu displays the confirmation dialog shown at right OFF...

Page 78: ...ht To start the show highlight Start and press the multi selector to the right Pictures will be played back one by one in the or der recorded with a pause to view each picture Movies will be played back as still images show ing the movie s first frame During the show you can OFF Start Frame intvl Pause QUICK SET BK SLIDE SHOW Press QUICK QUICK button to pause slide show Menu at right will be displ...

Page 79: ...ired option and then press the multi selector to the right to restart the slide show OFF Set S 10 S 5 3 S 2 S FRAME INTVL BK Selected Images The maximum number of images that can be selected for display in a slide show is 999 Frame Interval Owing to differences in file size and the speed at which pictures can be read from the memory card the actual frame interval may differ from the value selected...

Page 80: ...tected status of pictures press MENU but ton 3 Highlight picture 1 PROTECT Set Done QUICK Press multi selector up or down to se lect picture Selected pictures are marked by icon Repeat steps 1 and 2 to select additional pictures To deselect picture highlight and press multi selector up or down 2 PROTECT Set Done QUICK Selecting Pictures for Protection No more than fifty pictures can be selected at...

Page 81: ...ice be it your personal photo printer or a photofinisher s print system and pictures printed directly from the card OFF Set BK PRINT SET Print Delete print set PRINT Set Done QUICK Description Option Create or modify print order Print Cancel the current print order Delete print set Selecting Pictures for Printing To create a print order or to modify the existing print order highlight Print in the ...

Page 82: ...ess multi selector to right Check will ap pear in box next to item To deselect a checked item highlight and press multi selector to right To complete print order and return to playback highlight Done and press multi selector to right To exit without alter ing print order press MENU button OFF Set Done Info Date PRINT SET Cancelling the Current Print Order To cancel the current print order when it ...

Page 83: ...on the memory card See the Nikon View 5 Reference Manual on CD for details Marking Pictures for Transfer with Other Cameras Pictures selected for transfer with another model of Nikon digital camera can not be transferred when the memory card is inserted in the COOLPIX 2000 Use the COOLPIX 2000 to reselect the images Selecting Pictures for Slide Shows The Print Set Print option can be used to selec...

Page 84: ... contains options for basic camera setup To display the setup menu The Setup Menu Camera Setup Highlight SETUP 2 OFF OFF Set Set MENU Shooting menu Setup menu Press MENU button 1 OFF OFF MENU Set Set Shooting menu Setup menu Display SETUP menu 3 OFF Brightness CF card format Date Auto off Video mode Language BK Set SETUP MENU To make a selection from the setup menu use the multi selector as de scr...

Page 85: ...ay of deleting all pictures on the card Note that for matting permanently deletes all data including protected pictures Before formatting be sure to transfer to a computer any pictures you would like to keep Selecting CF card format displays the confirmation dialog shown above To format the memory card OFF Set BK WARNING All images will be deleted CF CARD FORMAT No Format Highlight Format to exit ...

Page 86: ...ault setting five minutes 5 m and thirty minutes 30 m Choosing a Video Standard Video Mode Use the Video mode option to select a standard for video output Choose a setting that matches the standard used in any video device to which you connect the camera Auto Off When powered by the EH 53 AC adapter available separately the camera will remain on for thirty minutes if no operations are performed re...

Page 87: ...ed using the button in Mac OS X 10 1 2 Use the button in Nikon View 5 to transfer pictures See the Nikon View 5 Reference Manual on CD for details The camera button can be used to transfer images in Mac OS X 10 1 3 or later Protocol Description PTP Choose this option when connecting the camera to a computer running Windows XP Home Edition Windows XP Professional or Mac OS X version 10 1 2 or later...

Page 88: ...ribed below Be sure to select Mass Storage in the USB menu before reconnecting the camera Windows 2000 Professional A dialog will be displayed welcoming you to the Found New Hardware Wiz ard Click Cancel to close the dialog and then disconnect the camera Windows Millennium Edition Me After displaying a message stating that the hardware information database is being updated the computer will start ...

Page 89: ...tions and Resources This chapter provides tips on cleaning and storing your camera a list of optional accessories available for the COOLPIX 2000 information on where to get help on line troubleshooting advice and cam era specifications ...

Page 90: ... hood Monitor hood Approved Memory Cards In addition to the card provided with your camera the following memory cards have been tested and approved for use in the COOLPIX 2000 Lexar Media Nikon EC CF series All capacities SanDisk SDCFB series 16 MB 32 MB 48 MB 64 MB 96 MB 128 MB 4 USB series 8 MB 16 MB 32 MB 48 MB 64 MB 80 MB 8 USB series 8 MB 16 MB 32 MB 48 MB 64 MB 80 MB 10 USB series 128 MB 160...

Page 91: ...s These parts are especially susceptible to damage Avoid sudden changes in temperature Sudden changes in temperature can cause condensation inside the device particularly in humid environments Turn the product off before removing or disconnecting the power source Before disconnecting the AC adapter available separately or removing the batteries turn the device off after ensuring that it has comple...

Page 92: ...emicals Avoid Contact with Liquid Crystal Should the monitor break care should be taken to avoid injury due to broken glass and to prevent the liquid crystal from the monitor touching the skin or entering the eyes or mouth Notes on the Monitor When you frame bright subjects vertical comet like streaks that whiten to ward either end may appear in the monitor This phenomenon known as smear does not ...

Page 93: ...ails to function as expected check the list of common prob lems below before consulting your retailer or Nikon representative Refer to the page numbers listed in the rightmost column for information on solving the problems listed here Monitor is blank Camera is off Battery is not correctly inserted Battery is exhausted EH 53 AC adapter available separately is not prop erly connected USB cable is c...

Page 94: ...ted Message Memory Card full appears in monitor not enough memory remaining to record further pic tures at current settings AF indicator flashes red camera unable to focus Flash ready lamp flickers flash is charging Message Memory Card is not formatted appears in monitor memory card is not formatted for use in COOLPIX 2000 Message No Memory Card appears in monitor no memory card in camera 46 17 17...

Page 95: ... is not prop erly connected or battery is dead USB cable not correctly connected or card not prop erly inserted in card reader card adapter or card slot Camera is not registered in Device Manager Windows only See Nikon View 5 Reference Manual on CD for fur ther information on troubleshooting Nikon View 5 16 33 No menu is displayed when MENU button is pressed Camera is in movie mode 26 Flash does n...

Page 96: ...ate and time Flashes 13 14 Battery exhausted Turn camera off and replace battery Warning Battery exhausted 17 Camera cannot focus Use focus lock to focus on an other subject at same distance then recompose photograph AF flashes red 20 Slow shutter speed Photos may be blurred Use the flash or steady the camera by mounting it on a tri pod placing it on a level sur face or holding it in both hands wi...

Page 97: ...Problem Solution Display Card contains no images 23 4 No pictures on memory card Camera in quick review mode half press shutter re lease button to return to shooting mode Camera in mode select another mode Error occurs when you try to transfer images to computer Not enough space on memory card to record information needed for transfer Disconnect camera delete un wanted photographs and try again 66...

Page 98: ...and turn camera on If error persists contact retailer or Ni kon representative Display Problem Solution A Note on Electronically Controlled Cameras In extremely rare instances unusual characters may appear in the monitor and the camera may stop functioning In most cases this phenomenon is caused by a strong external static charge Turn the camera off remove and replace the battery and turn the came...

Page 99: ...e 30 cm 1 4 cm 1 6 in macro close up mode Focus mode Single AF continuous AF in macro close up mode Storage Media Type I CompactFlash CF cards File system Compliant with Design rule for Camera File systems DCF Exif 2 2 and Digital Print Order Format DPOF Compression JPEG baseline compliant 1 5 110 000 dot low temperature polysilicon TFT LCD with brightness adjustment Monitor Frame coverage Approxi...

Page 100: ...roximately 60 minutes measured at room temper ature 20 C 68 F under standard Nikon test condi tions zoom adjusted with each shot flash used in ap proximately one third of photographs image size set to 1632 image quality set to NORMAL Dimensions W H D 108 69 38 mm 4 2 2 7 1 5 Weight Approximately 190 g 6 8 oz without battery or mem ory card Electronically controlled preset aperture Aperture Range T...

Page 101: ...or better with High Color True Color recommended Miscellaneous CD ROM drive required for installation Hard disk space 25 MB required for installation with additional free disk space of 10 MB plus double the capacity of camera memory card avail able on start up disk when Nikon View 5 is running System requirements Nikon View 5 Macintosh OS Mac OS 9 0 Mac OS 9 1 Mac OS 9 2 Mac OS X 10 1 2 or later M...

Page 102: ...ign rule for Cam era File systems Delete Deleting images from playback menu 66 67 in full frame playback 46 in quick review 23 in thumbnail playback 24 46 48 Design rule for Camera File sys tems 47 Digital Print Order Format 71 DPOF See digital Print Order Format E Error messages 86 88 Exp See exposure com pensation Exposure compensation 63 F FINE 56 Flash 43 Flash mode 43 Flash ready lamp 5 20 Fo...

Page 103: ...modes 25 27 Self portrait See monitor self timer Self timer 41 SETUP menu 74 78 Sharpening See Image sharp ening SHOOTING menu 54 64 Shooting mode 6 25 auto 16 Backlight 25 Beach Snow 26 movie 26 Night Portrait 26 Party Indoor 25 Portrait 26 Shutter release button 4 20 Shutter release delay See self timer Size See image size Slide show 68 69 SMALL PIC button 4 50 Small picture 50 51 Smear 82 Speci...

Page 104: ...En Printed in Japan S2G04000301 11 6MAA2611 03 ...

Reviews: