background image


6. 

$1'52Ζ'21/<

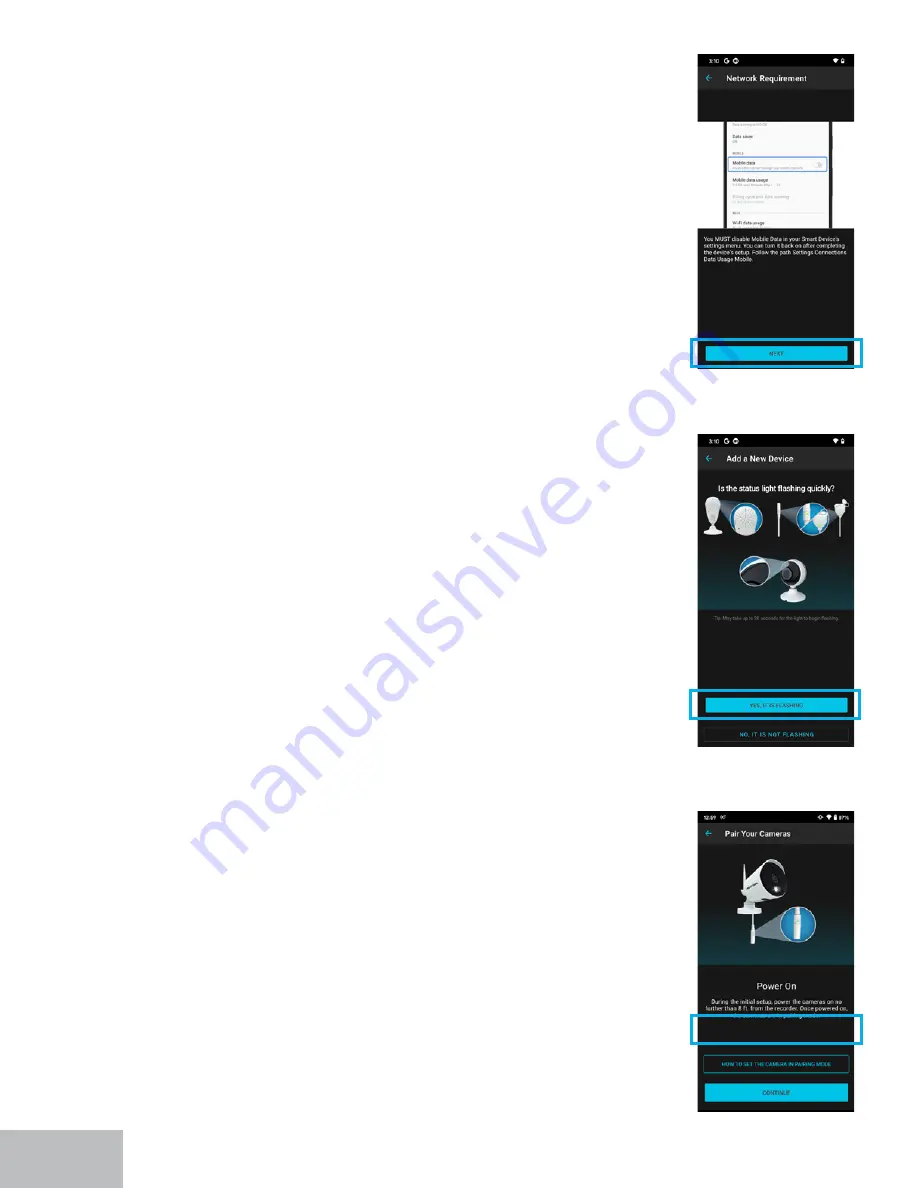
- You will be asked to disable 

your Smart Device’s mobile data while the app 

connects to the Wi-Fi device. Please exit the app 

and temporarily disable the data. You may turn 

it back on once the camera is connected. Once 

disabled, return to the app and tap on 

Ȋ1H[Wȋ


7. 

You will now be asked if your Wi-Fi device’s status 

OLJKWLVȵDVKLQJ$ȵDVKLQJVWDWXVOLJKWLQGLFDWHV

WKHFDPHUDLVLQSDLULQJPRGHΖIȵDVKLQJWDS


Ȋ<HVLWLVȵDVKLQJȋ

26


8. 

ΖIWKHVWDWXVOLJKWLVQRWȵDVKLQJWDSSLQJ

Ȋ1RΖWΖV

1RW)ODVKLQJȋ

 will take you to this screen. Simply 

tap 

Ȋ+RZWR6HWWKH&DPHUDLQ3DLULQJ0RGHȋ

Summary of Contents for BTD2 Series

Page 1: ...Bluetooth Recorder User s Manual Support NightOwlSP com Built In Bluetooth Wireless Setup Monitor not Required ...

Page 2: ...R BTD2 161 Camera Component Model CM DP2LSA B BTD8 Series DVR Component Model DVR BTD8 41 DVR BTD8 8 DVR BTD8 81 DVR BTD8 82 DVR BTD8 8 4POE 2 Camera Component Model CM DP8LSA B BTWN8 Series WNVR Component Model WNVR BTWN8 1 WNVR BTWN8 1 V2 Camera Component Model WNIP 8LTA BS U WNIP 8LTA BS V2 ...

Page 3: ...ecorder using our new Bluetooth Wireless Setup as well as your recorder s menu options With Bluetooth setup is now easier than ever A TV or monitor is no longer required Once your system s KDUGZDUH LV FRQQHFWHG DQG SRZHUHG RQ RX FDQ TXLFNO ȴQLVK WKH VHWXS ULJKW IURP WKH app on your Smart Device If you prefer you can still connect a TV or monitor and follow along it s just not required 6RPH SDUWV R...

Page 4: ...lease see the warranty section of this manual for exclusions and additional details Not all features and capabilities are shared across all models You may see features which are not applicable Additionally this manual contains screen images that may not exactly match those on your TV Monitor Smart Device System Requirements IRU UHPRWH YLHZLQJ Please be sure that your PC MAC FRPSOLHV ZLWK WKH IROOR...

Page 5: ...A Pairing a Replacement Add On Wi Fi IP Camera 29 B Adding Other Wi Fi Devices 32 Log In from a TV or Monitor 33 Log In with Night Owl Protect Account 33 Log In with Local Password 34 Log In Information Icon 35 LYH 9LHZ 1DYLJDWLRQ DU 36 Shut Down 37 View Layouts 38 Playback 39 Backing Up Exporting Recordings for Long Term Storage 41 RUPDWWLQJ D 86 ODVK ULYH RU WHUQDO DUG ULYH 41 Exporting Saving a...

Page 6: ...IXO LQWHUIHUHQFH WR UDGLR FRPPXQLFDWLRQ RZHYHU WKHUH is no guarantee that interference will not occur in television reception which can be GHWHUPLQHG E WXUQLQJ WKH HTXLSPHQW R DQG RQ 7KH XVHU LV HQFRXUDJHG WR WU DQG FRUUHFW WKH LQWHUIHUHQFH E RQH RU PRUH RI WKH IROORZLQJ PHDVXUHV Reorient or relocate the receiving antenna Increase the separation between the equipment and the receiver RQQHFW WKH HT...

Page 7: ...ing this device be sure to handle it with care Make sure there is good air circulation around the recorder This recorder uses an internal hard drive that generates heat during operation for video storage Do not block the vents on the recorder as these vents reduce the generated heat while the system is running Place this product in a well ventilated area Do not attempt to remove the top cover If y...

Page 8: ...W WKH DUH OLVWHG WR TXLFNO DQG HDVLO VHW XS RXU V VWHP Step 1 Verify Your Package Contents Step 2 Download the Night Owl Protect App and Create and Verify Your Account ȏ 6WHS RQQHFW RXU 6 VWHP DUGZDUH ȏ 6WHS RQȴJXUH RXU 6 VWHP Step 5 Install the Cameras Step 6 Additional Cameras BTD2 BTD8 Series Package Contents Verify Your Package Contents Before you begin to install your system ensure you can id...

Page 9: ... Mounting DUGZDUH 9DULHV E 0RGHO WNVR Accessories Camera Accessories 3 Compatible Devices This system includes Wi Fi IP cameras but is compatible with other Night Owl Wi Fi devices Please scan the QR Code for more information on other compatible Wi Fi devices that can be added RESET LAN1 LAN2 LAN3 LAN4 WAN Items Not Included NOTE ΖI FRQQHFWLQJ WR D 79 RU 0RQLWRU 1RW Required it must have a minimum...

Page 10: ...HFW D 86 ȵDVK GULYH WR D 86 SRUW IRU video backup NOTE 2 127 211 7 WZR 86 PLFH RU WZR 86 ȵDVK GULYHV WR WKH UHFRUGHU 4 LAN Strongly Recommended Connect your recorder to the Internet using an Ethernet cable Again while not required this is strongly encouraged to get the full use DQG EHQHȴW RI RXU QHZ V VWHP RX FDQ FRQQHFW WKH WKHUQHW FDEOH WR DQ ZRUNLQJ network access point or router 5 Power Input ...

Page 11: ...DQ FRQQHFW WKH WKHUQHW FDEOH WR DQ ZRUNLQJ network access point 3 USB Ports Connect a USB mouse to a USB port to navigate the recorder s settings ZKHQ FRQQHFWHG WR D 79 RU PRQLWRU 2U FRQQHFW D 86 ȵDVK GULYH WR D 86 SRUW IRU video backup NOTE 2 127 211 7 WZR 86 PLFH RU WZR 86 ȵDVK GULYHV WR WKH UHFRUGHU 4 Power Input Connect the recorder power adapter to this port to power the recorder NOTE RQQHFW ...

Page 12: ...t you download the Night Owl Protect App and create an account This will allow you to use this system s Bluetooth LUHOHVV 6HWXS SUHIHUUHG VHWXS PHWKRG which makes setting up the system much quicker and easier A TV RU PRQLWRU LV QR ORQJHU UHTXLUHG ZLWK WKLV VWDUW WR ȴQLVK DSS EDVHG VHFXULW 2QFH WKH V VWHP KDV EHHQ FRQȴJXUHG RX FDQ XVH WKH app to remotely access and view your system right from your ...

Page 13: ...r upon each login to the app 4 Ensure you verify your email address This will register you in our technical support database streamlining the support SURFHVV WR HQVXUH ZH FDQ TXLFNO DQG HɝFLHQWO DVVLVW RX should you need help It will also generate an email to you with your product s support links To verify tap Account your name Email and then follow the on screen prompts 6 KHQ ȴQLVKHG SURFHHG WR 6...

Page 14: ...WHPV DUH WKH VDPH 1 Visit Support NightOwlSP com A 3OXJ RQH HQG RI WKH LQFOXGHG 0Ζ FDEOH LQWR WKH 0Ζ SRUW RQ WKH EDFN RI WKH 95 Plug the other end of the cable into your TV or Monitor B Plug the USB mouse into the USB port on the back of the DVR 3 Click Ȋ RZ WR 6HWXS RXU 6 VWHPȋ 2 QWHU RXU 6HULHV ORFDWHG RQ WKH VXSSRUW VWLFNHU RQ WKH WRS RI RXU recorder into the search bar IMPORTANT If you will be...

Page 15: ... product manual for more details 4 Connect the video power cable labeled TO DVR ONLY to an open video input on the DVR NOTE Make sure you twist and lock BNC connectors 5 Connect the red female power leads of the video power cables to the male power splitter ends Make sure you twist and lock BNC connectors 3 Connect the end of the camera s cable to the end of a video power cable labeled TO CAMERA O...

Page 16: ... camera s power cable Make sure the UPS or surge protector is switched ON DPHUD 3RZHU Adapter 3RZHU Splitter 6XUJH 3URWHFWRU 1RW ΖQFOXGHG 6XUJH 3URWHFWRU 1RW ΖQFOXGHG Additional Steps For BTD8 Series Model DVR BTD 8 4POE 2 One of our BTD8 Series Bluetooth systems includes both wired BNC and wired IP cameras If you have this model please view the additional steps below for connecting your wired IP ...

Page 17: ...u will be using a TV or monitor for setup or viewing your cameras 237Ζ21 RX ZLOO QHHG WR SHUIRUP WKH WZR VWHSV EHORZ A 3OXJ RQH HQG RI WKH LQFOXGHG 0Ζ FDEOH LQWR WKH 0Ζ SRUW RQ WKH EDFN RI WKH 195 3OXJ the other end of the cable into your TV or Monitor NOTE To view cameras TV or Monitor must be tuned to the same input WKH 0Ζ LV SOXJJHG LQWR B Plug the USB mouse into the USB port on the back of the...

Page 18: ...ernet for the best user experience 3 Plug the other end of the Ethernet cable into a port on the back of your router network access point NOTE As long as your WNVR is hardwired using Ethernet cabling you can connect to any working network access point See your product manual for RESET LAN1 LAN2 LAN3 LAN4 WAN 5RXWHU 1HWZRUN FFHVV 3RLQW 1RW ΖQFOXGHG 5 Plug the WNVR power adapter into a surge protect...

Page 19: ...TA BS U WNIP 2LTAW BS U WNIP 8LTA BS WNIP 8LTA BS WNIP 8LTA BS U RQȴJXUH RXU 6 VWHP Now that you have the Night Owl Protect App downloaded have created an account DQG KDYH RXU V VWHPȇV KDUGZDUH FRQQHFWHG LWȇV WLPH WR FRQȴJXUH RXU V VWHP Again we STRONGLY RECOMMEND using the preferred Option 1 Easy Bluetooth Wireless Setup This method is quick and easy and does not require you to connect a TV or mo...

Page 20: ...ment to name your new recorder For instance if this system is for your home RX FRXOG QDPH LW RPH 6HFXULW KDWHYHU you name it is how it will appear in the app 2 ΖI RXU 6PDUW HYLFHȇV VPDUWSKRQH WDEOHW Bluetooth is not enabled you will be asked to allow access NOTE The screens in these steps may vary slightly based on whether you are using an iOS or Android device If a step is substantially GL HUHQW ...

Page 21: ... process is simple Just follow the prompts in the app and you will be GRQH LQ QR WLPH HUH DUH MXVW D IHZ VFUHHQV RX ZLOO VHH IMPORTANT If you have not connected your recorder to the Internet you ZLOO QRW EH DEOH WR DFFHVV PDQ IHDWXUHV RU XSGDWH WKH ȴUPZDUH from the app We STRONGLY RECOMMEND connecting your recorder to the Internet during the initial setup 15 ...

Page 22: ...the additional features of your new system NOTE If you have not connected your recorder to the Internet you will not be able to live view or access your system remotely GGLWLRQDOO RXU UHFRUGHUȇV ȴUPZDUH ZLOO QHHG WR EH PDQXDOO XSGDWHG VHH LUPZDUH 9HUVLRQ section of this manual If RXU ȴUPZDUH LV QRW FXUUHQW RXU WHFKQLFDO support agents cannot assist you ...

Page 23: ...startup wizard will appear on screen and is easy to follow Pay close attention to the following screens When you see this screen click Ȋ0DQXDO 6HWXS QRW UHFRPPHQGHG ȋ to proceed We STRONGLY RECOMMEND connecting your recorder to the Internet Even if you ZLOO QRW EH UHPRWHO YLHZLQJ RXU V VWHP XVLQJ RXU DSS WKH ȴUPZDUH VWLOO QHHGV WR EH XSGDWHG 7KH ȴUPZDUH QRW RQO HQVXUHV V VWHP KHDOWK EXW DOVR XSGDW...

Page 24: ...ing to the Internet for initial setup If you are connected please click Ȋ7U JDLQ ȋ If not click Ȋ6NLS ȋ If you continue to proceed through the startup wizard without connecting to the Internet you will need to create a local password This is the password you will use to log in to the recorder from a TV or monitor ...

Page 25: ... startup wizard Simply follow the on screen prompts until you get to this screen ΖI RX GLG QRW FRQQHFW WR WKH ΖQWHUQHW RU FRQȴJXUH WKH UHFRUGHU XVLQJ 1LJKW 2ZO 3URWHFW UHFRPPHQGHG RX PD VWLOO GR VR DW D ODWHU WLPH 7R EHJLQ OLYH YLHZLQJ click Ȋ R WR LYH 9LHZ ȋ ...

Page 26: ...ry close in proximity you could still notice high signal interference if the signal passes through certain obstacles For instance if the signal passes through a concrete wall it will be severely weakened Please reference WKH FKDUW EHORZ WR VHH ZKLFK REVWDFOHV KLJKO D HFW RXU VLJQDO DQG ZKLFK GR QRW Electrical Interference Do NOT place the cameras near high voltage wires or other sources of electri...

Page 27: ...nstallation basics 1 Use the holes in the base of each camera as a template to mark the screw positions on the surface where you plan to mount the camera 2 Using a drill bit slightly smaller than the included screw anchors drill into the mounting surface using the guide marks 3 Insert the screw anchors Line up the camera base holes with the screw anchors insert the screws through the base and tigh...

Page 28: ...ur recorder Simply follow the instructions from Step 3 Connect RXU 6 VWHP DUGZDUH 2XU 7 6HULHV 0RGHO 95 7 32 can hold up to 4 total wired IP cameras These wired IP cameras are ONLY compatible with this model Simply follow the instructions from 6WHS RQQHFW RXU 6 VWHP DUGZDUH a Adding Additional Wired BNC Cameras b Adding Additional Wired IP Cameras For BTD2 Recorder Model s Compatible Wired BNC Cam...

Page 29: ...also compatible with your wired recorder and can help round out your coverage c Wi Fi Expandability 23 For BTD2 Recorder Model s Compatible Wi Fi Devices 95 7 1Ζ3 68 S RRUEHOO WNIP 2LTA BS WNIP 2LTA BS U WNIP 2LTAW BS U 95 7 95 7 Compatibility See the chart below for compatible Wi Fi devices for your Bluetooth wired recorder For BTD8 Recorder Model s Compatible Wi Fi Devices 95 7 1Ζ3 68 S RRUEHOO ...

Page 30: ...LFNHU RQ WKH WRS RI RXU recorder into the search bar IMPORTANT Ensure your Bluetooth wired recorder has been added to your Night Owl Protect account and is connected to the Internet During the setup process your Wi Fi IP camera or Smart Video Doorbell will notify you regarding the device status using the device s built in audio prompts NOTE The screens in these steps may vary slightly based on whe...

Page 31: ...FHVȋ icon within the App 4 Next tap on the Ȋ ȋ icon 25 5 The app will search for the Wi Fi device Once it is discovered tap on the Wi Fi device NOTE As previously mentioned please ensure both your Wi Fi IP device and recorder are FRQQHFWHG WR WKH VDPH ΖQWHUQHW RFDO UHD Network ...

Page 32: ...ce the camera is connected Once disabled return to the app and tap on Ȋ1H W ȋ 7 You will now be asked if your Wi Fi device s status OLJKW LV ȵDVKLQJ ȵDVKLQJ VWDWXV OLJKW LQGLFDWHV WKH FDPHUD LV LQ SDLULQJ PRGH ΖI ȵDVKLQJ WDS Ȋ HV LW LV ȵDVKLQJ ȋ 26 8 ΖI WKH VWDWXV OLJKW LV QRW ȵDVKLQJ WDSSLQJ Ȋ1R ΖW ΖV 1RW ODVKLQJȋ will take you to this screen Simply tap Ȋ RZ WR 6HW WKH DPHUD LQ 3DLULQJ 0RGH ȋ ...

Page 33: ...P network then connect it to your Internet RFDO UHD 1HWZRUN NOTE The Wi Fi IP device must be connected to WKH VDPH ΖQWHUQHW RFDO UHD 1HWZRUN RXU recorder is connected to in order to add the Wi Fi device to the recorder 10 Your Wi Fi device will now connect ...

Page 34: ...add your new Wi Fi device to your recorder Tap Ȋ GG DPHUD WR 0 5HFRUGHU ȋ 12 Once added please take a moment to name your new Wi Fi device Then tap on Ȋ LYH 9LHZ ȋ 13 You can now begin viewing your new Wi Fi device On the Device page for your recorder you will see this new device as an added camera 28 ...

Page 35: ... Recorder Model s Compatible Wi Fi IP Cameras up to 8 total 195 7 1 195 7 1 9 WNIP 8LTA BS WNIP 8LTA BS V2 WNIP 8LTA BS U WNIP 2LTA BS WNIP 2LTA BS U WNIP 2LTAW BS U a Pairing a Replacement Add On Wi Fi IP Camera 1 Power on your new Wi Fi IP device using the provided power adapter During this pairing process keep the device within 8 ft of the recorder Once paired you can install the device in the ...

Page 36: ...rder will now search for the Wi Fi IP device 3 Tap on your Bluetooth recorder from the Devices page 5 Ensure your Wi Fi IP device is in pairing mode and tap Continue 4 Tap on the Ȋ ȋ icon NOTE If the Wi Fi IP device is not in pairing mode just tap Ȋ RZ WR 6HW WKH DPHUD LQ 3DLULQJ 0RGH ȋ ...

Page 37: ...paired you will hear Ȋ RR RR 6HWXS LV FRPSOHWH ȋ DQG WKH QHZ GHYLFH will now show in the list of cameras 8 You can now tap on the newly added device to begin live viewing and accessing all of your product s additional features 31 ...

Page 38: ...i devices please view below 1 Visit Support NightOwlSP com 1 Visit Support NightOwlSP com RU VWHS E VWHS LQVWUXFWLRQV RQ DGGLQJ D LUH UHH DPHUD 1Ζ3 6HULHV RU VWHS E VWHS LQVWUXFWLRQV RQ DGGLQJ D 6PDUW 9LGHR RRUEHOO 1Ζ3 6HULHV 3 Click Ȋ GG 2WKHU L L HYLFHVȋ 3 Click Ȋ GG 2WKHU L L HYLFHVȋ 4 Click Ȋ GGLQJ D LUH UHH DPHUDȋ 4 Click Ȋ GGLQJ D 6PDUW 9LGHR RRUEHOOȋ 2 QWHU RXU 6HULHV ORFDWHG RQ WKH VXSSRUW...

Page 39: ...O XVLQJ 0Ζ DQG RXU ZLUHG 86 PRXVH WR navigate the screens Once adjusted feel free to disconnect the system from your TV or monitor and continue viewing and accessing your system right from your Smart Device or computer IMPORTANT LWK RXU UHFRUGHU FRQQHFWHG XVLQJ 0Ζ PDNH VXUH RXU 79 RU PRQLWRU LV VZLWFKHG WR WKH FRUUHFW 0Ζ LQSXW 2QFH WKHUH RX should see your camera s live view Using the USB mouse lo...

Page 40: ...me E Forgot Password Click here if you have forgotten your login password See Resetting Forgot Your Password section for more information F Device Logout Time Choose how when you are logged out of the system You can VHOHFW 0DQXDO RJRXW RX PDQXDOO ORJ RXW ZKHQ UHDG 0LQXWHV DXWR ORJ RXW DIWHU PLQXWHV RU RXU DXWR ORJ RXW DIWHU KRXU G Server Status Shows the status of your recorder s Internet connecti...

Page 41: ...n of the recorder as ZHOO DV WKH VWDWXV 8S WR DWH RU LUPZDUH 1RW 8S WR DWH HHSLQJ RXU XS to date is important for the overall health of your system as well as eligibility for technical support If your system is not up to date our technicians cannot provide live assistance B Device Component Model Displays the component model number of your recorder This information is helpful when technical suppor...

Page 42: ...uickly access the playback menu to see your recordings D System Info Click here to access your system s main menus Will be covered in detail in System Info section of this manual E Panic Will play a siren and will turn on the spotlight from all connected cameras for 30 seconds May not apply to all models F Lock Unlock Shows whether the system is locked or unlocked If you have your Smart Device pai...

Page 43: ...If the icon is grayed out no device is paired See Appendix I Date Time Displays the current date and time J Firmware Version LVSOD V RXU UHFRUGHUȇV FXUUHQW ȴUPZDUH YHUVLRQ Additional Information Right Side of Navigation Bar 37 J G H I Click here to manually reboot or power down your recorder For instance you may want to power down the recorder if you plan on moving it The recorder has a hard drive...

Page 44: ...ing the preset options or customize it to suit your viewing needs Double click on any camera screen to make it full screen Then double click again to return to your set view layout IMPORTANT With select models you can even click and drag the cameras to rearrange them on screen This feature does not apply to all recorder models View Layouts ...

Page 45: ... D 86 ȵDVK GULYH RU H WHUQDO KDUG GULYH VHH Backing Up SRUWLQJ 5HFRUGLQJV RU RQJ 7HUP 6WRUDJH 4HERE ARE MULTIPLE MEANS OF lLTERING THE RECORDINGS TO lND THE EVENT YOU ARE LOOKING FOR Read the options below for how to navigate the playback screen A Search Detected Events by Date 8VH WKH FDOHQGDU WR VHOHFW WKH GDWH V WKDW KDYH YLGHR IRRWDJH IURP WKH VHOHFWHG FKDQQHO V DWHV PDUNHG LQ EOXH KDYH UHFRUG...

Page 46: ...line K Time Options ZLOO GLVSOD KRXUV LQ WKH WLPHOLQH ZLOO GLVSOD KRXU segments starting from where the time indicator is currently located 30M will display 30 minute segments starting from where the time indicator is currently located L Scroll Bar Click and drag one end to zoom in out of the timeline to further home in on where in the timeline you want to be based on the time of the recording you...

Page 47: ...ExFat as detailed in the section below 7KLV VHFWLRQ SURYLGHV IRUPDWWLQJ LQVWUXFWLRQV IRU Windows OS Mac Format for Windows OS WARNING ORMATTING ERASES DATA ON THE 53 mASH DRIVE OR EXTERNAL IMPORTANT DO NOT connect the recorder s hard disk drive to your PC or Mac 1 ΖQVHUW DQ HPSW 86 ȵDVK GULYH RU FRQQHFW DQ H WHUQDO LQWR D 86 SRUW RQ RXU PC 2 Press and hold the LQGRZ NH and release when File Explor...

Page 48: ...QWR RXU 0DF 2 Select Applications Utilities and launch LVN 8WLOLW 3 6HOHFW WKH 86 ȵDVK GULYH RU H WHUQDO LQ WKH VLGHEDU LQ LVN 8WLOLW DQG FOLFN Erase in the Disk Utility Bar 4 Create a name click on the Format dropdown menu and choose either MS DOS 7 RU 7 7KHQ FOLFN UDVH ...

Page 49: ... ORFDWHG D VSHFLȴF UHFRUGLQJ WKDW RX ZDQW WR VDYH ORQJ WHUP VLPSO click on Ȋ SRUW YHQW ȋ A A Export Event When the time indicator is on an event this tab will appear Clicking here lets you export the selected event to a connected storage device for long term storage Exporting Saving a Recording ...

Page 50: ...on the connected storage device F Space Required Shows the size of the recording you are exporting i e how much space you will need on the connected storage device G Destination Folder Allows you to choose which folder on the connected storage device you want to save the recording to H Export Will begin exporting the recording You will see a message appear on screen when the recording has been suc...

Page 51: ...e view screen About Menu The About menu will provide general information about your new system From WKLV VFUHHQ RX FDQ PDQXDOO XSJUDGH RXU ȴUPZDUH LI QRW FRQQHFWHG WR WKH Internet change the language of your system adjust the resolution or even add the recorder to the Night Owl Protect App if you are ready to start remotely viewing your system from a smartphone or tablet Your system s Series Compo...

Page 52: ...R GDWH 8SGDWHG ȴUPZDUH LV IUHTXHQWO released to provide your recorder with the latest and greatest features and to HQKDQFH WKH RYHUDOO XVH DQG IXQFWLRQ RI RXU V VWHP GGLWLRQDOO LI RXU ȴUPZDUH is not current our technical support team will be unable to provide live support A B C A OLFN WR FKHFN IRU QHZ ȴUPZDUH 7KH WLWOH VD V LW DOO OLFN KHUH WR SHUIRUP D ȴUPZDUH check Your recorder MUST be connecte...

Page 53: ...XQG QHZ ȴUPZDUH DYDLODEOH RU GLG D manual upgrade click Ȋ RQWLQXHȋ WR SURFHHG ZLWK WKH ȴUPZDUH XSGDWH RXU UHFRUGHU ZLOO QRZ XSGDWH WKH ȴUPZDUH DQG UHERRW R 127 SRZHU R RU GLVFRQQHFW DQ WKLQJ IURP RXU UHFRUGHU DV WKH ȴUPZDUH LV EHLQJ XSGDWHG ...

Page 54: ... RXU UHFRUGHU MXVW OLNH ZLWK WKH ȴUPZDUH XSGDWH ZLOO UHERRW WR display the new language RXU 79 RU PRQLWRU PXVW KDYH D PLQLPXP UHVROXWLRQ RI S RZHYHU RX FDQ VZLWFK EHWZHHQ S DQG EDVHG RQ ZKDW W SH RI V VWHP RX KDYH DQG ZKDW type of monitor you have it connected to Make sure you save your changes as SURPSWHG ZKHQ ȴQLVKHG ...

Page 55: ...DYH WKHP WDNH H HFW IMPORTANT Your recordings are date and time stamped so ensuring the date and time are current is important Date Time Menu From this menu you can automatically sync the date and time for your system or manually set it Your recordings are date and time stamped so ensuring the date and time are current is important ...

Page 56: ...F DWH DQG 7LPH LV VHW WR Ȋ2 ȋ RX FDQ XVH WKLV RSWLRQ WR manually set the time zone for your recorder C Date Lets you manually set the date for your recorder when Sync Date and Time is set WR Ȋ2 ȋ D Daylight Savings Time Lets you enable or disable Daylight Savings Time when Sync DWH DQG 7LPH LV VHW WR Ȋ2 ȋ E Time 0DQXDOO VHW WKH WLPH IRU RXU UHFRUGHU ZKHQ 6 QF DWH DQG 7LPH ȴHOG LV VHW WR Ȋ2 ȋ A B C...

Page 57: ...e easily identify the camera connected to it For instance if this channel has a camera in your driveway you could rename it Driveway Cam B Recording Settings Adjust the recording settings of the selected channel C Spotlight Control Enable the spotlight to turn on when human face or vehicular motion is detected and choose whether the light is constant or strobing Only applies to select models D Voi...

Page 58: ... which can be used to tell someone near the selected camera you are not currently available Smile is a preset voice alert used to tell someone to smile they are being recorded Siren will emit a loud siren from the camera to startle trespassers B Volume Choose the volume level for the selected preset voice alert or siren Voice Alerts Siren When enabled you can easily adjust the type of message and ...

Page 59: ... settings from the current channel and copy them to another Ensure you save your changes You can remove one of your paired Wi Fi devices from the Camera menu All you need to do is click on the trash can icon on the left side of the Camera menu for the channel containing the Wi Fi device you want removed IMPORTANT Clicking Ȋ5HPRYHȋ means the device in question will no longer record any activity You...

Page 60: ...with the username email and phone number linked to your account ΖI RX KDYH QRW GRZQORDGHG DQG FRQȴJXUHG WKH 1LJKW 2ZO 3URWHFW SS RX ZLOO see the screen below We STRONGLY RECOMMEND you do so for added security EHQHȴWV OLNH SDVVZRUG SURWHFWLRQ DQG WR JHW WKH PRVW RXW RI RXU V VWHP VXFK as remote viewing with real time alerts preset voice alerts and siren capability VHOHFW PRGHOV ...

Page 61: ...s set to auto overwrite by default meaning older recordings will be recorded over to make way for new recordings when the hard drive becomes full RZHYHU LI RX ZDQW WR GHOHWH UHFRUGLQJV IRU ZKDWHYHU UHDVRQ RX ZLOO QHHG WR perform a disk reformat IMPORTANT Before reformatting your disk ensure you have saved backed up all recordings you do not want to lose as they will be permanently erased during th...

Page 62: ... SHUPDQHQWO UHPRYHG DQG QRWLȴHG regarding the status of the reformat DO NOT disconnect or power down your recorder during this process Diagnostics Menu HUH RX FDQ UXQ D GHYLFH KHDOWK FKHFN DQG VHH WKH VWDWXV RI RXU FRQQHFWHG cameras and recorder ...

Page 63: ...B C D E F A B C D E F G H A Status Will display a checkmark if a camera is successfully connected to this channel B Signal Will display the signal strength of that channel C Spotlight Will display a checkmark if the camera connected to this channel has a spotlight D MIC Will display a checkmark if the camera connected to this channel has a built in microphone E Speaker Will display a checkmark if ...

Page 64: ... channel G Series Will show the Series of the connected camera Series is good to know for support purposes and compatibility H Firmware Version LOO GLVSOD WKH FXUUHQW ȴUPZDUH YHUVLRQ RI WKH FRQQHFWHG FDPHUD OLFN WKH LFRQ QH W WR WKH ȴUPZDUH YHUVLRQ QXPEHU WR FKHFN IRU DQ XSGDWH IMPORTANT If the diagnostic shows Not Working and you are within the warranty period for your product you may need to con...

Page 65: ... 3 QDPLF RVW RQȴJXUDWLRQ 3URWRFRO LV WKH GHIDXOW VHWWLQJ EXW Static is an option B IP Change the IP address for your device C Gateway Change the Gateway for your device D Netmask Change the Netmask for your device E Primary DNS KDQJH WKH 3ULPDU 16 RPDLQ 1DPH 6 VWHP IRU RXU GHYLFH F Secondary DNS KDQJH WKH 6HFRQGDU 16 RPDLQ 1DPH 6 VWHP IRU RXU GHYLFH A B C D E F ...

Page 66: ...h your system don t worry we ve got your covered For a wide range of troubleshooting material such as your product manual FAQ s how to video tutorials and more simply visit Support NightOwlSP com and enter the Series listed on the top of your recorder ...

Page 67: ...dings so please back up any recordings you want saved before continuing See DFNLQJ 8S SRUWLQJ 5HFRUGLQJV RU RQJ 7HUP 6WRUDJH section of this manual Restoring your settings means the recorder will restore its default settings values Any adjustments you have made to the settings will be reversed and all recordings will be permanently deleted Simply click Ȋ RQWLQXH ȋ ...

Page 68: ...2ZO 3URWHFW SS LI RX KDYH FRQȴJXUHG WKH UHFRUGHU ZLWK RXU 1LJKW 2ZO Protect Account Simply click Ȋ RQWLQXH ȋ IMPORTANT If you perform a Factory Reset you will need to log in to the Night Owl Protect App remove the recorder and then re add the recorder to restore remote viewing capabilities ...

Page 69: ...XPEHU ȴHOG DW WKH WRS RI WKH VFUHHQ 7KHQ HQWHU RXU SDVVZRUG LQ WKH 3DVVZRUG ȴHOG DW WKH WRS RI WKH VFUHHQ OLFN Ȋ RJ ΖQ ȋ 3 From the top right of the screen click the dropdown next to your account name and select Ȋ0DQDJH P FFRXQW ȋ 4 Click Ȋ KDQJH 3DVVZRUG ȋ 5 QWHU RXU FXUUHQW SDVVZRUG LQ WKH XUUHQW 3DVVZRUG ȴHOG HQWHU RXU QHZ SDVVZRUG LQ WKH 1HZ 3DVVZRUG ȴHOG WKHQ UH HQWHU RXU QHZ SDVVZRUG LQ WKH ...

Page 70: ...2ɞLQH EXW KDV DOUHDG EHHQ UHJLVWHUHG SURFHHG WR VWHS If the device has not been registered click Ȋ5HJLVWHU 1HZ HYLFHȋ and follow the prompts 5 Once the device has been added to your My Devices page click on Ȋ9LHZ HWDLOVȋ followed by Ȋ5HVHW RGH ȋ 6 QWHU WKH GDWH IURP WKH 5HVHW 3DVVZRUG VFUHHQ 79 RU PRQLWRU DQG WKHQ FOLFN Get RGH ȋ 7 RX ZLOO EH SURYLGHG D WHPSRUDU DFFHVV FRGH 21 JRRG IRU KRXUV 5HWXU...

Page 71: ...is NOT connected RQOLQH V QFHG Panic Will turn on siren and spotlight for all cameras Will take you to pairing screen LI FRPSDWLEOH KDQQHO 6WDWXV ΖFRQ HȴQLWLRQV Click to turn spotlight on FRPSDWLEOH FDPHUDV RQO Will display for cameras with built in microphone Will play voice alert siren FRPSDWLEOH FDPHUDV RQO Will display when motion is detected by a camera Indicates human motion FRPSDWLEOH FDPHU...

Page 72: ...n on a given name server DHCP QDPLF RVW RQȴJXUDWLRQ 3URWRFRO QHWZRUN SURWRFRO WKDW DOORZV D VHUYHU to automatically assign a device and IP address DVR Digital Video Recorder Smart Detection Technology 6 VWHP FDQ XVH XPDQ HWHFWLRQ DFLDO DSWXUH DQG Vehicular Detection to reduce false alerts and record actual or meaningful events thereby saving hard drive space HD LJK HȴQLWLRQ UHVROXWLRQ HDD DUG LVN ...

Page 73: ...GUHVV BBBBBBBBBBBBBBBBBBBBBBBBBBBBBBBBBBBBBBBBBBBBBBBBBBBBBBBBBBBBBBBBBBBBBBBBBBBBBBBBBBB 3KRQH 1XPEHU BBBBBBBBBBBBBBBBBBBBBBBBBBBBBBBBBBBBBBBBBBBBBBBBBBBBBBBBBBBBBBBBBBBBBBBBBBBBBBBBBB 3DVVZRUG BBBBBBBBBBBBBBBBBBBBBBBBBBBBBBBBBBBBBBBBBBBBBBBBBBBBBBBBBBBBBBBBBBBBBBBBBBBBBBBBBBBBBBBB 3Ζ1 SS 2QO BBBBBBBBBBBBBBBBBBBBBBBBBBBBBBBBBBBBBBBBBBBBBBBBBBBBBBBBBBBBBBBBBBBBBBBBBBBBBBBBBBBB this is the informat...

Page 74: ...used or installed in the manner described in the installation instructions 3 Negligent use of the Product or misuse or abuse of the Product 4 Electrical short circuits or power surges 5 Use of replacement parts not supplied by Night Owl 6 3URGXFW LV HLWKHU WDPSHUHG ZLWK PRGLȴHG RU UHSDLUHG E DQRWKHU VHUYLFH provider 7 Product has not been maintained in accordance 8 FFLGHQW ȴUH ȵRRG RU RWKHU DFWV R...

Page 75: ...ributors to the contrary are QRW DXWKRUL HG E 1LJKW 2ZO DQG GR QRW D HFW WKLV SURYLVLRQ RI WKLV ZDUUDQW Disclaimer Certain uses publication and or distribution of video audio recordings from security cameras and or audio devices are prohibited or restricted by federal state and local laws When enabling and or using audio recording features with your hidden security camera be sure to comply with th...

Page 76: ... 2 3 Need More Help RU V VWHP PDQXDOV WURXEOHVKRRWLQJ JXLGHV 4V YLGHR WXWRULDOV DQG PRUH Rev 210924 iPhone iPad Mac and Mac OS X are registered trademarks of Apple Inc Windows Windows XP Windows Vista Windows 7 Windows 8 and Windows 10 are registered trademarks of Microsoft Corporation in the United States and or other countries www NightOwlSP com ...

Reviews: