background image

4

Installation 


      Wall Mounting

Installing Batteries In The Telephone


        Warning

The telephone can be operated with or without AC adapter. The full 

range of telephone functions can only be utilized if batteries or the 

power adapter (optional) are used.

The battery compartment is located on the base of the telephone. Open 

the battery compartment and insert 4 x AA batteries (not included). Pay 

attention to correct polarity. Close the battery compartment cover.

When the batteries are weak, the icon          appears in the display. 

Replace the batteries.

1.  Use a flat-blade screwdriver or the tip of a pen to lift and remove the

  battery compartment door.

2.  Insert four AA batteries into the compartment as indicated by the 

polarity symbols.

3.  Snap the battery compartment door back into place.

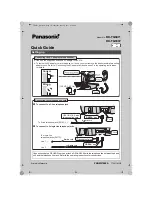
Connecting The Telephone

1.  Connect the AC adapter (optional, not supplied) to the DC 9V 200mA 

jack at the top end of the telephone and a standard AC outlet.

2.  Plug one end of the telephone cable supplied into the 

TEL  LINE

 jack 

at the back of the telephone base.

3.  Plug the other end of the telephone cable into the wall outlet.

4.  Plug one end of the curly cord into the socket on the handset.

5.  Plug the other end of the curly cord into the left side of the telephone.

Method A

To fit to an existing telephone wall plate with modular connector simply:

1.  Lift out the handset tab holder on the base of the unit. Rotate it 180°, 

and snap it into place (fig. A) so it will hold the handset in place when 

the phone is mounted on the wall.

2.  Insert the mounting bracket’s two tabs into the matching slots on the 

phone’s base (fig. B).

3.  Then press down and slide the bracket upward until the tabs snap 

into place.

4.  Plug the short telephone line cord (supplied) into the base of the 

phone and plug the other end into the telephone wall plate socket.

5.  Position the mounting holes on the base of the phone over the two 

protruding screws on the wall plate. Gently push the phone flush 

against the wall plate then slide the phone downwards locking it into 

place.


fig. A   


   fig. B

Method B

Attach directly to a wall:
1.  Drill two holes vertically, one above the other, 83mm apart, and leave 

the screws protruding from the wall by 5mm. 

2.  Follow steps 1 and 2 above. 

3.  Then press down and slide the bracket upward until the tabs snap 

into place. 

4.  Plug one end of the telephone cable into the 

TEL  LINE

 jack at the 

back of the base. 

5.  Plug the other end of the telephone cable into the telephone socket, 

then align the base’s keyhole slots with the screws and slide the 

phone downward to secure it.

Summary of Contents for CALLER ID

Page 1: ...4313449 CALLER ID EASY DIAL SPEAKERPHONE USER GUIDE Requires subscription to additional features provided by your local telephone service provider...

Page 2: ...Volume Control 6 Receiver Volume Control 6 Tone Receiving Adjustment 6 Message Waiting Indicator 6 Hearing Aid Compatibility 7 The Phone Book 7 8 Letters 7 Storing Names Numbers 7 Dialing From The Pho...

Page 3: ...owl kitchen sink or laundry tub in a wet basement or near a swimming pool 2 Avoid using a telephone other than a cordless type during an electrical storm There may be a remote risk of electric shock f...

Page 4: ...11 Volume Booster 12 Power Jack 13 New Call LED 14 Display With Backlight 15 Buttons 16 Ringer HI MID LO Switch 17 MEM Memory Button 18 CID Caller ID Button 19 Button Phonebook 20 Tone HI LO Switch 2...

Page 5: ...ug the other end of the curly cord into the left side of the telephone Method A To fit to an existing telephone wall plate with modular connector simply 1 Lift out the handset tab holder on the base o...

Page 6: ...he handset or press button the LED will light and wait for a dial tone 2 Dial the number you wish to call The display will show the number that you are dialing If you dial a number over 14 digits long...

Page 7: ...ed slide the RINGER switch to the OFF position The bright Red LED on the base will flash with all incoming calls Speaker Volume Control You can adjust the speaker volume level that suits you by slidin...

Page 8: ...ally If you subscribe to a Caller ID service the name number of the caller will be shown when you receive an incoming call only for those numbers stored in the Phone Book or M1 M2 memories Letters Eac...

Page 9: ...d The telephone has 2 one touch memories M1 and M2 and 10 two touch memories MEM for the most frequently dialed telephone numbers When a number is stored into Memory you will press one or two buttons...

Page 10: ...number will now be dialed If you do nothing the phone will return to standby mode Note If the Caller ID number is 10 digits press CALL BACK button once the unit will insert 1 before the Caller ID numb...

Page 11: ...N The REN Number of this unit is indicated on the bottom of your an swering machine The FCC Wants You To Know This equipment has been tested and found to comply with the limits for a Class B digital d...

Page 12: ...nty is only applicable to a product purchased through The Source company owned stores and dealers and to a product that is presented for repair in a country where The Source offers the product for sal...

Reviews: