


Connections
Cautions before connecting
Carefully check the terminals for position and type before making any connections.
The illustration of the external equipment may be different depending on your model.
Loose connectors can result in image or color problems. Make sure that all connectors are securely inserted into their terminals.
Refer to the user manual of the external device as well.
When connecting an external device, turn the power off on the panel to avoid any issues.
12
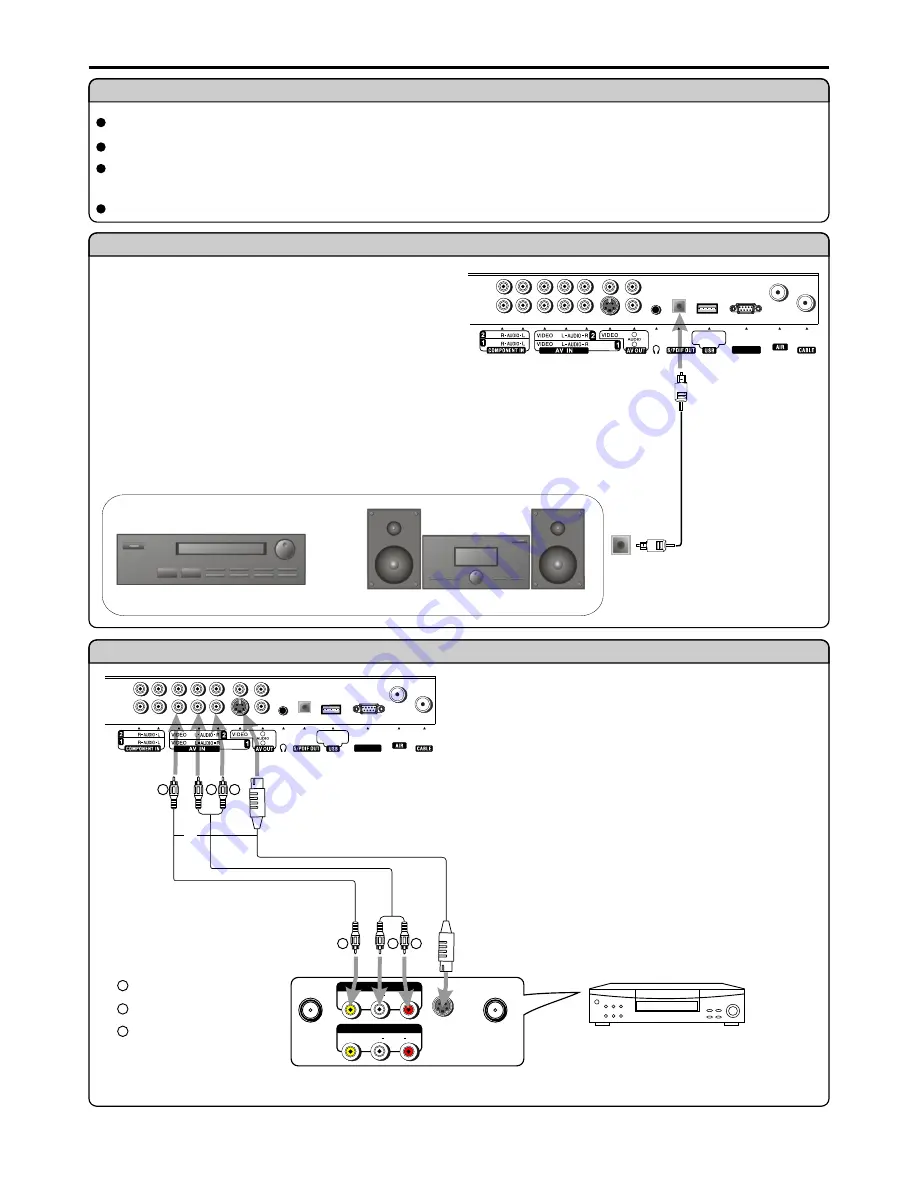
Connect a VCR
W
W
Y
Y
R
R
W
W
Y
Y
R
R
Yellow (VIDEO)
White (AUDIO L)
Red (AUDIO R )
W
W
Y
Y
R
R
AV OUT
R
L
VIDEO
AUDIO
-
S VIDEO
ANT IN
ANT OUT
AV IN
Rear of the VCR
S-video
cable
or
Audio
cable
VCR
Video
cable
R
L
VIDEO
AUDIO
Connect
an
Audio
Processor
or
Hi-Fi
(Digital
Audio)
Connect the Audio/Video cables between the Audio (L/R)/Video
jacks on the unit and VCR.
Note:
For better video, you can use the S-VIDEO terminal if
your source supports it. S-VIDEO input uses the same circuit
as Video1. S-VIDEO has priority if both connectors are
inserted. Use one or the other.
How to connect:
1. Turn on your TV, press
INPUT
button on the remote control to
display
INPUT SELECT
menu, use
5
/
6
to select
AV1/SVideo
and then press
OK
to confirm.
2. Turn on your VCR , insert a videotape and press the Play button.
To play VCR
S-VIDEO
for software
update only
L
R
RS-232
For a full Home Theater sound experience,
you must connect your Hi-Fi or Audio
processor to the S/PDIF OUT(Optical) terminal
on the TV rear.
Note:
The S/PDIF OUT terminal only can output
digital TV program’s audio.
Audio
Processor
HIFi
System
OR
S
/
PDIF IN
(Optical)
Optical
cable
S-VIDEO
for software
update only
L
R
RS-232
Summary of Contents for NX4202
Page 1: ......
Page 54: ...5944030460 Ver 1 0...