background image

THANKS FOR CHOOSING NEXIGO!

CONTACT INFORMATION

Welcome to the NexiGo Family!

Thank you for choosing the NexiGo N970P 4K AI-Powered Webcam! 
You are now part of an exclusive club: the NexiGo family! It's our job 
to make sure you enjoy your membership. If you have any problems 
please contact us at 

[email protected]

 at any time for further 

assistance. This product is covered by our industry leading 1-year 
manufacturers warranty. Make sure to register your purchase at 

nexigo.com/warranty

 within 14 days of the delivery date to extend 

your warranty coverage to TWO Years!

From all of us here at NexiGo, we want to thank you for your trust in 
us. We look forward to serving you again in the near future.

Yours Sincerely,

The NexiGo Team

Website: www.nexigo.com


Manufacturer: Nexight INC

E-mail: [email protected]


Tel: +1(458) 215-6088 

Address: 11075 SW 11th St, Beaverton, OR, 97005, US

US 01

US 01

US 01

US 01

Summary of Contents for N970P

Page 1: ...4K AI Powered Webcam N970P User Manual Scan the QR code or visit our link to download the latest manual here nexigo com manuals ...

Page 2: ......

Page 3: ...TRANSLATIONS US 01 19 JP 37 DE 48 FR 58 ES 68 IT ...

Page 4: ...e This product is covered by our industry leading 1 year manufacturers warranty Make sure to register your purchase at nexigo com warranty within 14 days of the delivery date to extend your warranty coverage to TWO Years From all of us here at NexiGo we want to thank you for your trust in us We look forward to serving you again in the near future Yours Sincerely The NexiGo Team Website www nexigo ...

Page 5: ...emperature and in a controlled environment Do not exceed the power requirements of this product Clean the camera lens with a dry soft microfiber cloth only Use only a mild detergent if necessary Avoid any strong or corrosive detergents to avoid damaging the lens Do not attempt to repair disassemble or modify the camera under any circumstance Only use the remote to move the camera head Attempting t...

Page 6: ...most every setting for your webcam From brightness to focus from saturation to hue find the look that highlights the best you nexigo com software PRODUCT INSTALLATION PRODUCT DIAGRAM 1 UHD Lens 2 Activity Indicator 3 Noise Reduction Microphones INSTALLING YOUR WEBCAM Option 1 Place on a flat surface Option 2 Mount on a laptop or monitor Option 3 Install with a 1 4 thread tripod 4 1 4 Tripod Screw ...

Page 7: ...e selected the NexiGo N970P 4K Webcam as the active camera and microphone from the list of available options macOS 1 Go to the Apple menu System Preferences Security Privacy select the Privacy tab Select Camera from the list of options on the left side of the page 2 Locate the apps you want to enable camera access for Click the box next to the app s name to enable camera access for that applicatio...

Page 8: ...patible with 1080P and 720P Auto Framing Employs superior detection algorithms to intelligently capture and frame speakers in the center of the image ePTZ Electronic Pan Tilt Zoom with up to 10X zooming allows for easy adjustments from a distance Built in Mics Two built in omni directional microphones equipped with noise suppression technology to reduce background noise but remain highly effective...

Page 9: ...0 0 25m 2 28m Focus range Application support 4K UHD 3840 x 2160 MJPG 3840 x 2160 30fps 1920 x 1080 30fps etc H 264 3840 x 2160 30fps 1920 x 1080 30fps etc YUY2 1920 x 1080 30fps 1280 x 720 30fps etc NV12 1920 x 1080 30fps 1280 x 720 30fps etc Note 1080P 60FPS in MJPG H 264 format is available please visit nexigo com n970pfw to update 1 2 8 Sony STARVIS back illuminated sensor Up to 10X digital zo...

Page 10: ... it is zoomed in Hold to increase the speed of the pan tilt 4 OK Button Resets the video capture view to the default position In the OSD menu press to select options and enter the next menu 5 Numbered Buttons See details on page 18 Assign recall or delete presets for the numbered buttons 1 2 3 Recall Preset Press one of the numbered buttons once to recall the preset on that button Set Preset Press...

Page 11: ...nge the battery MAIN MENU Press menu button to display the OSD menu Use the arrows on your remote to navigate the menu Your selection will be displayed with an arrow Use the OK button to select the highlighted item MENU Setup Exposure Color Image Noise Reduction Version Restore Default Select Change Value 1 System Setting Move the pointer to the Setup in the Main menu click the OK button and enter...

Page 12: ...rror unmirror the OSD menu USB Mode Switch to BULK and ISOC modes Setup Auto Framing Image Style OSD Flip H Default OFF USB Mode BULK Select Change Value EXPOSURE Mode EV BLC OFF Auto OFF Flicker 50Hz Gain Limit 4 DRC Close Select Change Value 2 Exposure Setting Move the pointer to Exposure in the Main menu click the OK button and enter the Exposure menu as shown below US 01 US 09 ...

Page 13: ...in Auto SAE Bright modes Gain Limit Adjust from 0 15 only available in Auto Bright modes DRC Adjust the Dynamic Range Control between 1 8 or disable it only available in Auto Bright modes Again Switch to 0 15 only available in Manual SAE modes Bright Switch the brightness from 0 23 only available in Bright mode COLOR WB Mode RG Turning BG Turning 0 Auto 0 Saturation 36 Hue 4 AWB Sensitivity High S...

Page 14: ...t from 0 8 AWB Sensitivity Switch among High Middle and Low only available when in Auto mode Color Temp Switch from 2400K 7100K only available when in VAR mode IMAGE Contrast 50 Brightness 50 Sharpness 5 Flip H OFF Flip V OFF B W Mode Color Gamma Default Low Light Mode Close Select Change Value 4 Image Move the pointer to the Image in the Main menu click the OK button and enter into the Image menu...

Page 15: ... Switch to Color B W Black and White mode Gamma Switch to Default 0 34 0 39 0 47 0 5 Low Light Mode Switch to On Off NR 2D Toggle the 2D Noise Reduction On Off or adjust it between 1 7 NR 3D Toggle the 3D Noise Reduction On Off or adjust it between 1 8 NOISE REDUCTION NR 2D NR 3D 4 OFF Select Change Value 5 Noise Reduction Move the pointer to the Noise Reduction in the Main menu click the OK butto...

Page 16: ...lt factory settings RESTORE DEFAULT Restore Default Select Change Value NO 6 Version Move the pointer to the Version in the Main menu click the OK button and enter the Version menu as shown below to check the current firmware version 7 Restore Default Move the pointer to the Restore Default in the Main menu click the OK button and enter the Restore Default menu as shown below US 01 US 13 ...

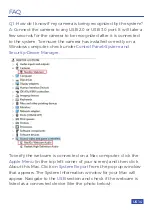
Page 17: ...tly on a Windows computer check under Control Panel System and Security Device Manager To verify the webcam is connected on a Mac computer click the Apple Menu in the top left corner of your screen and then click About this Mac Click on System Report from the pop up window that appears The System Information window for your Mac will appear Navigate to the USB section and check if the webcam is lis...

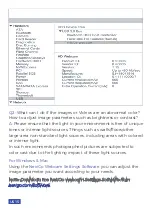
Page 18: ...r environment is free of unique tones or intense light sources Things such as walls floors other large area non standard light sources including areas with colored or intense light In such environments photographed pictures are subjected to color cast due to the lighting impact of these light sources For Windows Mac Using the NexiGo Webcam Settings Software you can adjust the image parameter you w...

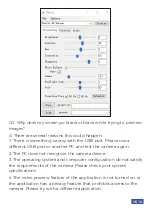
Page 19: ...r PC and test the camera again 2 The PC does not recognize the camera device 3 The operating system and computer configuration do not satisfy the requirements of the camera Please check your system specifications 4 The video preview feature of the application is not turned on or the application has a privacy feature that prohibits access to the camera Please try with a different application US 01 ...

Page 20: ...s might be due to lighting inconsistencies in your room To resolve this download the NexiGo Webcam Setting Software from nexigo com software In the software select your NexiGo webcam in the device selection bar then change the powerline frequency to either 50Hz or 60Hz depending on your needs For example if your screen flicks at 50Hz you can switch to 60Hz to solve it US 01 US 17 ...

Page 21: ...viously saved preset Call Preset Press one of the numbered buttons once to recall the preset on that button If the button has been preset a Call preset will be shown in the upper left corner of the image with the number of the pressed button Any changes or modifications not expressly approved by the party responsible for compliance could void the user s authority to operate the equipment This devi...

Page 22: ...絡ください 本製品は当 業界をリードしている一年間のメーカー保証を提供しています 保証期間 を2年間に延長するには 納品日から14日以内にnexigo com warrantyでご 注文を登録してください お客様が私たちNexigoのファミリーに加わることを再び歓迎の意を表した いです 私たちはお客様のご信頼とご愛顧に深く感謝します 近い将来に お客様にサービスを提供することを期待しています これからもよろしくお願い申し上げます NexiGoチームより Webサイト www nexigo com メーカー Nexight INC Eメール cs nexigo com Tel 1 458 215 6088 住所 11075 SW 11th St Beaverton OR 97005 US US 01 JP 19 ...

Page 23: ...電力規格を超えた状態で本製品をご使用にな らない でください カメラレンズのお手入れには 柔らかく 乾いた布をお使いください 必要な場合は 中性洗剤でやさしく拭いてください 強い洗剤や腐食 性の洗剤をお使いになると レンズに傷が付き画像が正しく表示され なくなる場合があります お客様自身で分解したり 修理 改造したりしないでください カメラを移動する場合には リモコンを使用してください カメラを 激しく移動すると 損傷や機械的な故障につながる可能性があります 本製品は安定した机の上 または平らな場所に設置してください 製 品を斜めに設置すると 画像が斜めに表示される場合があります カメラの回転範囲で障害物がないことを確認してください 設置が完全に完了するまでは 電源を入れないでください 重要なお知らせ 本書にはカメラの機能 設置方法 操作方法について詳しく記載されてい ます 設置およびご使...

Page 24: ...ウンロードすればいいです 本ソフトではほとんどのウェブ カメラ設定 明るさから焦点 彩度から色調 を変更できて あなたが 一番際立つルックを見つけてあげます NexiGoウェブカメラ設定ソフトをダウンロードします nexigo com software 設置について 製品図 1 UHDレンズ 2 インジケーターLED 3 ノイズキャンセリングマイクロフォン オプション1 平らなところに置きます オプション2 ラップトップまたはモニターに設置します オプション3 1 4 三脚を使用して取り付けます あなたのウェブカメラをインストールする 4 1 4インチ三脚架ネジ穴 5 すばしこいクリップ ベース 6 USB B 3 0 ポート 2 1 3 5 6 3 4 US 01 JP 21 ...

Page 25: ...リを開いたら 使用可能なオプションのリストから使用されたカメラとマイクとして NexiGo N970P 4K Webcamを選択していることを確認します macOSセットアップ 1 Appleメニュー システム環境設定 セキュリティとプライ バシー に移動し プライバシー タブを選択します ページの左側 にあるオプションのリストから カメラ を選択します 2 カメラアクセスを有効にする必要のアプリを見つける アプリケーシ ョンの横のチェックボックスを選択すると カメラの使用が許可されま す 製品概要 寸法 17 5 cm 4 19 cm 2 79 cm 7 01 cm 4 5 cm US 01 JP 22 ...

Page 26: ...明な画像を実現する ために 最新の ISP プロセッシングアルゴリズムを採用しています 機能 4K UHD 4K に対応し 最大で 4K 30fps MJPGビデオ解像度または 30fps H 264 を実現します また 1080p および 720p 解像度と互換 性があります EPTZ EPTZ および 10X デジタルズーム 全方位マイク内蔵 2 台のノイズ低減マイクが搭載されています 音 声がよりクリアになります 全方位マイクロの有効距離は 10メート ル以内です オートフレーミング 優れた顔検出アルゴリズムにより 会議出席者 の数に応じてズームを自動調整します すべての出席者をフレーム内 に収めます 様々な設置方法 ラップトップ コンピューターなどで使用するため の標準のマウントクランプが装備されています 三脚にも取り付け可 能です 簡単に使える ドライバをダウンロードする必要はあ...

Page 27: ...囲 アプリケーシ ョンサポート 4K UHD 3840 x 2160 MJPG 3840 x 2160 30fps 1920 x 1080 30fps etc H 264 3840 x 2160 30fps 1920 x 1080 30fps etc YUY2 1920 x 1080 30fps 1280 x 720 30fps etc NV12 1920 x 1080 30fps 1280 x 720 30fps etc 注 MJPG H 264形式の1080P 60FPSは 新しいファー ムウェアで利用できます nexigo com n970pfwよりフ ァームウェアを更新してください 1 2 8インチSonySTARVIS裏面照射型撮像素子 10Xデジタルズーム4K 30fps 対応された システム フォーカスタイプ Windows 7 8 10 11以降 macOS 10 6以降 ...

Page 28: ... 矢印ボタンを押して カメラのビューをパン チルトします 長押しす ると パン チルトの速度が上がります 4 OKボタン ビデオキャプチャビューをデフォルトの位置にリセットします OSDメ ニューで ボタンを押してオプションを選択し 次のメニューに入ります 5 番号付きボタン 36ページの詳細を参照 番号付きボタン 1 2 3 のプリセットを割り当て 呼び出し または 削除します プリセットを呼び出す 番号の付いたボタンの1つを1回押すと そのボ タンのプリセットがリコールされます プリセットの設定 3秒間押し続けると 現在の設定が番号付きのボタン に保存され 以前に保存されたプリセットが上書きされます 6 ズーム 押すと ズームインします 押し続けると 調整が速くなります 1 2 3 4 5 8 7 6 9 US 01 JP 25 ...

Page 29: ... 矢印で表示さ れます OKボタンを使用して ハイライトされた項目を選択します 1 セットアップ メインメニューの セットアップ にポインタを移動し OKボタンをク リックして 以下に示すように セットアップメニュー に入ります 8 自動フレーミングトグル 押すと 自動フレーミング機能を有効または無効にします 9 インジケーターライト リモコン使用中はインジケーターランプが点滅します ボタンを押して もインジケーターライトが表示されない場合は バッテリーの確認また は交換が必要になる場合があります 注 ズーム機能を使用する前に 自動フレーミング機能を無効にし OSDメニューを閉じていることを確認してください 7 ズーム 押すと ビデオをズームアウトします 押し続けると 調整が速くなり ます US 01 JP 26 ...

Page 30: ... 50Hz Gain Limit 4 DRC Close Select Change Value オートフレーミング オートフレーミング機能を有効 無効にします オ ートフレーミングの感度を調整することもできます 画像スタイル 選択肢はデフォルト 会議 鮮明さ 輝度 ソフトです ボタンを押して スタイルを選択します OSD フリップ H OSDメニューをミラーリング ミラーリング解除します USBモード BULKモードとISOCモードに切り替えます モード 自動 手動 シャッター優先 輝度優先 2 露出設定 メインメニューの 露出設定 にポインタを移動し OKボタンをクリッ クして 以下に示すように 露出設定メニュー に入ります US 01 JP 27 ...

Page 31: ...to 0 Saturation 36 Hue 4 AWB Sensitivity High Select Change Value EV オン オフ 自動モードでのみ有効 BLC オプションでオン オフ 自動モードでのみ有効 ちらつき防止 オフ 50Hz 60Hz オプション 自動 シャッター優先 輝度優先モードでのみ有効 ゲイン限界 0 15 自動 輝度優先モードでのみ有効 DRC ダイナミックレンジコントロールを1 8の間で調整するか 無効に します 自動 明るいモードでのみ使用可能 繰り返し 0 15 手動 シャッター優先モードでのみ有効 輝度 0 15 輝度モードでのみ有効 3 色設定 メインメニューの 色設定 にポインタを移動し OKボタンをクリック して 以下に示すように 色設定メニュー に入ります US 01 JP 28 ...

Page 32: ... Default Low Light Mode Close Select Change Value モノクロモード 自動 手動 ワンプッシュ VAR RG 調整 10 10 自動 手動モードでのみ有効 BG 調整 10 10 自動 手動モードでのみ有効 彩度 0 50 色相 0 8 AWB 感度 高 中 低 自動モードでのみ有効 色温度 2400K 7100K 100K 単位で調整可能 VARモードでのみ有効 4 画像設定 メインメニューの 画像設定 にポインタを移動し OKボタンをクリッ クして 以下に示すように 画像設定メニュー に入ります US 01 JP 29 ...

Page 33: ...lue 輝度 0 100 コントラスト 0 100 シャープネス 0 15 フリップ H オン オフ フリップ V オン オフ モノクロ モード カラー 白黒 ガンマ デフォルト 0 45 0 50 0 55 0 63 低 ライトモード 閉じる 開く 2D ノイズ軽減 自動 閉じる 1 7 3D ノイズ軽減 閉じる 1 8 5 ノイズ低減設定 メインメニューの ノイズ低減設定 にポインタを移動し OKボタンをク リックして 以下に示すように ノイズ低減設定メニュー に入ります US 01 JP 30 ...

Page 34: ... DEFAULT Restore Default Select Change Value NO 注意 動画の種類と色スタイルは復元できません デフォルトに戻す カメラをデフォルトの工場出荷時の設定に戻します 6 バージョン メインメニューの バージョン にポインタを移動し OKボタンをクリ ックして 以下に示すように バージョンメニュー に入ります 7 デフォルトに戻す メインメニューの デフォルトに戻す にポインタを移動し OKボタン をクリックして 以下に示すように デフォルトに戻すメニュー に入 ります US 01 JP 31 ...

Page 35: ...クしてください システム情報ウィンドウがMac に表示されます USBセクションで ウェブカメラが既に接続されていた デバイスに含まれているかチェックします 下の図のように A カメラをUSB2 0 3 0ポートのいずれかに接続します カメラをラップ トップに接続すると 認識されるまでに数秒かかります カメラが正確に インストールされていることを確認するために コントロールパネル シ ステムとセキュリティ デバイスマネージャーをチェックしてください Q1 カメラがOSに認識されているかどうかについてどうすればわかりま すか よくある質問 US 01 JP 32 ...

Page 36: ...ーをどのように調整し ますか A 環境には独特な色や強い光がないことを確認してください 壁 床 彩色の光または強いの光を含むその他の広い非標準光源の環境で撮影さ れた写真は これらの光源による影響を受け 画像の色ぶれをもたらし ます WindowsとMacに対して NexiGoウェブカメラ設定ソフトウェアを使用することで 必要に応じて画 像のパラメータを調整することができます 注意 nexigo com softwareからNexiGoウェブカメラ設定ソフトウェアを ダウンロードします US 01 JP 33 ...

Page 37: ... んか A ビデオソフトウェアのビデオ出力設定を確認してください 出力設定 では解像度の低いバージョンに設定されている可能性があります シス テムには様々な制約がありますので 最大解像度のビデオ通話を実現す ることを阻む可能性もあります これは処理能力 すなわちCPU速度 及 び利用可能なネットワーク帯域幅を中心として 全ての場合はビデオ通 話アプリの要件をチェックしなければなりません これは必要なシステ ム性能及び必要な帯域幅を指示します US 01 JP 34 ...

Page 38: ...ラを使用すると ビデオフィードにちらつきやバンディン グが発生する時に どのように調整しますか A これは部屋の明るさが原因である可能性があります この問題を解決するには nexigo com softwareからNexiGoのWebカメラ 設定ソフトウェアをダウンロードします ソフトウェアで デバイス選択欄でNexiGo Webカメラを選択し 電力線周 波数を50Hzまたは60Hzに変更します たとえば 50Hzで画面がフリックす る場合 60Hzに切り替えて問題が解決できます US 01 JP 35 ...

Page 39: ...ームアウトするか 矢印ボタンを使用してカメラを パンおよびチルトできます 手順2 番号付きボタン 1 3 を3秒間押し続けて 現在の設定を番号 付きボタンに保存します 設定が完了すると 画像の左上隅に プリセ ットの設定 が表示され 選択したプリセットの番号が表示され 以前に保存したプリセットが上書きされます プリセットの呼び出し 番号の付いたボタンの1つを1回押すと そのボタンのプリセットが呼び出 されます ボタンがプリセットされている場合は 画像の左上隅に押され たボタンの番号とともに プリセットを呼び出す が表示されます US 01 JP 36 ...

Page 40: ...ilt unsere großzügige 1 Jahres Herstellergarantie Bitte besuchen Sie www nexigo com für weitere Garantieinformationen und registrieren Sie sich auf nexigo com warranty für eine EXTRA EIN JAHRES Garantie Von uns allen hier bei NexiGo möchten wir Sie wieder in der Familie willkommen heißen Wir danken Ihnen herzlich für Ihr Vertrauen und für Ihr Geschäft und wir wissen dass es Ihnen hier gefallen wir...

Page 41: ... sind zu vermeiden Nicht mit Flüssigkeiten Gasen oder Feststoffen in Berührung kommen die das Gehäuse angreifen könnten Das Produkt darf nicht Regen Feuchtigkeit hoher Luftfeuchtigkeit oder anderen ungünstigen Wetterbedingungen ausgesetzt werden Dieses Produkt ist für die Verwendung bei Raumtemperatur und in einer kontrollierten Umgebung vorgesehen Die Leistungsaufnahme dieses Produkts darf nicht ...

Page 42: ...der zu modifizieren Die Fernbedienung darf nur zum Bewegen des Kamerakopfes verwendet werden Der Versuch die Kamera physisch zu bewegen kann zu Schäden und mechanischem Versagen führen Stellen Sie sicher dass keine Gegenstände den Drehbereich der Kamera blockieren oder behindern Die Kamera darf nicht eingeschaltet werden bevor die Installation abgeschlossen ist Dies kann zu unbeabsichtigten Schäde...

Page 43: ... ausgewählt haben MacOS Einstellung 1 Wählen Sie im Apple Menü Systempräferenzen Sicherheit Datenschutz wählen Sie die Registerkarte Datenschutz Wählen Sie Kamera aus der Liste der Optionen auf der linken Seite der Seite 2 Lokalisieren Sie die Apps für die Sie den Kamerazugriff aktivieren möchten Klicken Sie auf das Kästchen neben dem Namen der Anwendung um den Kamerazugriff für diese Anwendung zu...

Page 44: ... 4K ePTZ Kameras mit KI Intelligenz Sie rahmt intelligent und automatisch Personen in der Mitte des Bildes ein Die N970P verwendet fortschrittliche ISP Verarbeitungsalgorithmen um lebendige Bilder mit klarer gleichmäßiger Helligkeit hoher Auflösung und kräftigen Farben zu erzeugen HAUPTMERKMALE UHD 4K Auflösung Anzeige von Auflösungen bis zu 4K bei 30fps MJPG oder 30fps H 264 Kompatibel mit 1080P ...

Page 45: ...chkeiten Es gibt Zahlreiche Installationsmöglichkeiten Wird mit einer Standardhalterung für die Verwendung an Laptops Computern und größeren Leicht zu verwenden einstecken und abspielen keine zusätzlichen Treiber oder Installationen erforderlich Bildschirmen geliefert Kann auch auf Stativen installiert werden ANLEITUNG ZUR FERNBEDIENUNG TASTEN EINFÜHRUNG 1 Power Taste Drücken Sie diese Taste um di...

Page 46: ...tandardposition zurück Während Sie sich im OSD Menü dient diese Taste als OK Taste 5 Zahlen Tasten Siehe Details auf Seite 46 Weisen Sie den nummerierten Tasten 1 2 3 Voreinstellungen zu rufen Sie sie auf oder löschen Sie sie Voreinstellung abrufen Drücken Sie eine der nummerierten Tasten einmal um die Voreinstellung auf dieser Taste abzurufen Voreinstellung festlegen Drei Sekunden lang gedrückt h...

Page 47: ...nachdem sie an den Laptop angeschlossen wurde Um sicherzustellen dass die Kamera korrekt installiert wurde prüfen Sie unter Control Panel System and Security Device Manager 9 Kontrollleuchte Die Kontrollleuchte blinkt wenn die Fernbedienung verwendet wird Wenn Sie die Kontrollleuchte beim Drücken einer Taste nicht sehen müssen Sie möglicherweise die Batterie einstellen oder wechseln US 01 DE 44 ...

Page 48: ...nes Gerät aufgeführt ist wie das Foto unten Q2 Was kann ich tun wenn das Bild eine anormale Farbe zeigt Wie kann ich meine Bildparameter wie Helligkeit oder Kontrast einstellen A Bitte stellen Sie sicher dass das Licht in Ihrer Umgebung frei von einzigartigen Tönen oder intensivem Licht ist wie z B Wänden Böden andere großflächige nicht standardmäßige Lichtumgebungen einschließlich Bereichen mit g...

Page 49: ...etet den Zugriff auf die Kamera Q4 Wie kann ich die Voreinstellungsfunktion verwenden A Voreingestellte Einstellungen Schritt 1 Richten Sie die Kameraansicht nach Ihren Bedürfnissen ein Sie können mit den Zoomtasten vergrößern verkleinern oder die Kamera mit den Pfeiltasten schwenken und neigen Schritt 2 Halten Sie eine beliebige nummerierte Taste 1 bis 3 drei Sekunden lang gedrückt um Ihre Vorein...

Page 50: ...Bildes ein Call preset mit der Nummer der gedrückten Taste angezeigt überschreibt alle zuvor gespeicherten Voreinstellungen Nachdem die Einstellung abgeschlossen ist wird in der linken oberen Ecke die Meldung Set preset in der oberen linken Ecke des Bildes mit der Nummer der ausgewählten Voreinstellung angezeigt und wird alle zuvor gespeicherten Voreinstellungen überschreiben US 01 DE 47 ...

Page 51: ... pour obtenir une aide supplémentaire Ce produit est couvert par notre généreuse garantie fabricant d un an Veuillez consulter le site www nexigo com pour plus d informations sur la garantie et enregistrez vous sur nexigo com warranty pour bénéficier d une garantie supplémentaire d un an De la part de nous tous ici à NexiGo nous voulons vous souhaiter à nouveau la bienvenue dans la famille Nous vo...

Page 52: ...et l installation Ne l exposez à aucun liquide gaz ou solide pouvant corroder son boîtier N exposez pas ce produit à la pluie à la place mouillée à la l humidité élevée ou à des conditions météorologiques défavorables On doit l utilise à température ambiante et dans un environnement contrôlable Ne dépassez pas les exigences d alimentation de ce produit Utilisez uniquement un chiffon en microfibre ...

Page 53: ...uchez pas l appareil l adaptateur ou le câble USB avec les mains mouillées Gardez ce produit au sec N essayez pas de réparer démonter ou modifier la lampe en tout cas On ne peut déplacer physiquement la caméra que avec la télécommande Actions de déplacer physiquement la caméra peuvent entraîner des dommages et une défaillance mécanique Assurez vous qu il n y a pas d obstacles qui bloquent ou obstr...

Page 54: ...am N970P dans la liste des options disponibles comme caméra et microphone actifs l installation de MacOS 1 Allez dans menu Apple Préférences système Sécurité Confidentialité puis sélectionnez Confidentialité Sélectionnez Caméra dans la liste d options sur le côté gauche de la page 2 Recherchez l app pour laquelle vous souhaitez activer l accès à la caméra Cliquez sur le coin à côté du nom de l app...

Page 55: ...omatique Il utilise des algorithmes de détection supérieurs pour capturer et cadrer intelligemment les gens qui parlent au centre de l image ePTZ Zoom électronique pan tilt zoom jusqu à 10x réglage facile à longue distance Microphones intégrés Les deux micros omnidirectionnels intégrés sont équipés d une technologie de réduction du bruit pour baisser le bruit de fond maintenant une efficacité élev...

Page 56: ...lle est en zoom avant Maintenez les enfoncés pour augmenter la vitesse du panoramique inclinaison 4 Bouton OK Réinitialisez la vue de capture vidéo à la position par défaut Dans le menu OSD cela sert de Bouton OK 5 Boutons numériques Voir les détails à la page 57 Attribuez rappelez ou supprimez des préréglages pour les touches numérotées 1 2 3 Recall Preset Appuyez une fois sur l un des boutons nu...

Page 57: ... automatique Appuyez pour activer ou désactiver la fonction de cadrage automa tique 9 Voyant lumineux Le voyant lumineux clignotera lorsque la télécommande est utilisée Si vous ne voyez pas le voyant lorsque vous appuyez sur un bouton vous devrez peut être régler ou changer la pile Remarque Veuillez vous assurer que vous avez désactivé la fonction de cadrage automatique et fermé le menu d affichage...

Page 58: ...votre écran puis cliquez sur About this Mac Cliquez sur System Report dans la fenêtre qui s affiche La fenêtre d information sur le système pour votre Mac apparaîtra Accédez à la section USB et vérifiez si la webcam est répertoriée comme un dispositif connecté comme la photo ci dessous US 01 FR 55 ...

Page 59: ...graphiées sont soumises à une fonte des couleurs en raison de l impact de la lumière Pour Windows et Mac À l aide du logiciel NexiGo Webcam Setting vous pouvez ajuster le paramètre d image en fonction de vos besoins Q3 Pourquoi mon écran devient il blanc ou noir lorsque j essaie de prévisualiser des images A Il y a plusieurs raisons à cel 1 Il y a un problème avec le port USB Veuillez changer de p...

Page 60: ...rois secondes pour enregistrer votre préréglage Il sera enregistré dans cet emplacement et écrasera tous les préréglages précédemment enregistrés Une fois le réglage terminé un Set preset s affichera dans le coin supérieur gauche de l image avec le numéro du préréglage qui a été sélectionné et remplacera tout préréglage précédemment enregistré Préréglage d appel Appuyez une fois sur l un des bouto...

Page 61: ...un año del fabricante por favor visite www nexigo com para más información sobre la garantía y regístrese en nexigo com warranty para obtener una garantía EXTRA DE UN AÑO De parte de todos nosotros aquí en NexiGo queremos darle la bienvenida de nuevo a la familia Le agradecemos profundamente su confianza y su negocio y sabemos que le encantará estar aquí Esperando poder servirle de nuevo en el pró...

Page 62: ...nta y detenidamente antes de realizar la instalación y su uso por favor Evite los daños causados por demasiada presión vibración e inmersión en los líquidos durante su transporte almacenamiento e instalación No exponga el producto a cualquier líquido gas o cuerpo sólido que pueda corroer su cáscara No exponga este producto a lluvia o humedad ni a cualquier condición climática adversa Este artículo...

Page 63: ...SB con manos mojadas Mantenga el producto siempre seco No intente raparar desmontar o modificar la lámpara bajo ninguna circunstancia Solo mueva el cabezal de la cámara con el mando a distancia El tratar de mover la cámara físicamente puede conducir al daño y al fallo mecánico Asegúrese de que no hay obstáculos que bloqueen o dificulten el rango de rotación de la cámara No cargue la cámara antes d...

Page 64: ... abierta asegúrese de haber seleccionado la Cámara Web NexiGo N970P 4K como cámara y micrófono actuales de la lista de opciones Ajuste de MacOS 1 Pase a Apple menu Menú de Apple System Preferences Preferencias del sistema Security Privacy Seguridad y privacidad seleccione Privacy Privacidad Seleccione Cámara de la lista de opciones que está en la parte izquierda de la página 2 Localice las aplicac...

Page 65: ...avanzados de detección para capturar y encuadrar de forma inteligente los oradores en el centro de la imagen ePTZ El Pan Tilt Zoom electrónico con un zoom de hasta 10X permite realizar ajustes fácilmente aun a distancia Micrófonos incorporados Dos micrófonos omnidireccionales incorporados equipados con tecnología de supresión de ruido para reducir el ruido de fondo mientras siguen siendo muy efica...

Page 66: ...la panorámica inclinación INSTRUCCIÓN DE CONTROL POR EL MANDO A DISTANCIA PRESENTACIÓN SOBRE LAS TECLAS 4 Tecla OK Restablecer la vista de captura de vídeo al estado por defecto En el menú OSD esto sirve como la tecla OK 5 Teclas de números Ver detalles en la página 67 Asigne recupere o elimine preajustes para los botones numerados 1 2 3 Recuperar preajuste presione uno de los botones numerados un...

Page 67: ...ico Presione para habilitar o deshabilitar la función de encuadre automático 9 Luz indicadora La luz indicadora parpadeará cuando se esté usando el control remoto Si no ve la luz indicadora cuando presiona un botón es posible que deba ajustar o cambiar la batería Nota Antes de usar la función de zoom hace falta asegurarse de haber borrado la función de macro automático y haber cancelado la menú de...

Page 68: ...a y luego haz clic en Acerca de About this Mac Haga clic en Informe del System Report en la ventana emergente que aparece Aparecerá la ventana de información del sistema para tu Mac Navegue a la sección de USB y compruebe si la cámara web aparece como un dispositivo conectado como la foto de abajo US 01 ES 65 ...

Page 69: ...o al impacto de la luz Q3 Por qué mi pantalla se pone en blanco o negra mientras intento ver las imágenes A Hay varias razones por las que esto podría suceder 1 Hay algo malo con el puerto USB Por favor cambie a un puerto USB diferente o a otro PC y pruebe la cámara de nuevo 2 El PC no reconoce el dispositivo de la cámara 3 El sistema operativo y la configuración del ordenador no satisfacen los re...

Page 70: ... en esta posición y anulará cualquier preajuste guardado anteriormente Una vez completado el ajuste aparecerá el mensaje Set preset en la esquina superior izquierda de la imagen con el número del preajuste que se ha seleccionado y anulará cualquier ajuste preestablecido previamente guardado Preestablecido de llamada Presione uno de los botones numerados una vez para recuperar el preajuste en ese b...

Page 71: ...tra generosa garanzia del produttore di 1 anno si prega di visitare il sito www nexigo com per ulteriori informazioni sulla garanzia e di registrarsi su nexigo com warranty per una garanzia EXTRA ONE YEAR Da parte di tutti noi qui a NexiGo vogliamo darvi di nuovo il benvenuto in famiglia Vi ringraziamo profondamente per la vostra fiducia e per la vostra attività e sappiamo che qui vi piacerà Non v...

Page 72: ...esporlo a nessun liquido gas o solido che possa corrodere il guscio Non esporre questo prodotto alla pioggia all umidità all alta umidità o a qualsiasi condizione atmosferica avversa Questo articolo è destinato ad essere utilizzato a temperatura ambiente e in un ambiente controllato Non superare i requisiti di potenza di questo prodotto Pulire l obiettivo della fotocamera solo con un panno in micr...

Page 73: ...a luce in nessuna circostanza Usare solo il telecomando per spostare la testa della videocamera Il tentativo di spostare fisicamente la videocamera può portare a danni e guasti meccanici Assicurarsi che non ci siano ostacoli che blocchino o ostacolino il raggio di rotazione della telecamera Non alimentare la videocamera prima di aver completato l installazione Ciò potrebbe causare danni involontar...

Page 74: ...ra e microfono attivi dall elenco delle opzioni disponibili Impostazione di MacOS 1 Andare al menu Apple Preferenze di Sistema Sicurezza Privacy selezionare la scheda Privacy Seleziona Fotocamera dall elenco di opzioni sul lato sinistro della pagina 2 Individuare le applicazioni per le quali vuoi abilitare l accesso alla fotocamera Cliccare sulla casella accanto al nome dell app per abilitare l ac...

Page 75: ... 30fps H 264 Compatibile a 1080P e 720P Incorniciatura Automatica Impiega algoritmi di rilevamento superiori per catturare e inquadrare in modo intelligente gli altoparlanti al centro dell immagine ePTZ Pan Tilt Zoom elettronico con zoom fino a 10X permette facili regolazioni a distanza Microfoni Incorporati Due microfoni omnidirezionali integrati dotati di tecnologia di soppressione del rumore pe...

Page 76: ...locità della panoramca inclinazione ISTRUZIONI PER IL TELECOMANDO INTRODUZIONE AI PULSANTI 4 Pulsante OK Ripristinare la cattura video alla posizione predefinita Mentre si è nel nel menu OSD questo serve come pulsante OK 5 Pulsanti di Numero Vedi dettagli a pagina 77 Assegna richiama o elimina le preimpostazioni per i pulsanti numerati 1 2 3 Recall Preset premere una volta uno dei pulsanti numerat...

Page 77: ...uadratura automatica Premere per abilitare o disabilitare la funzione di inquadratura automatica 9 Indicatore luminoso L indicatore luminoso lampeggerà quando si utilizza il telecomando Se non vedi l indicatore luminoso quando premi un pulsante potrebbe essere necessario regolare o sostituire la batteria Nota Assicurarsi di aver disabilitato la funzione di inquadratura automatica e chiuso il menu ...

Page 78: ...llo schermo e poi fare clic su About this Mac Cliccare su System Report dalla finestra pop up che appare Apparirà la finestra Informazioni di sistema per il vostro Mac Navigare fino alla sezione USB e controllare se la webcam è elencata come dispositivo collegato come la foto qui sotto US 01 IT 75 ...

Page 79: ...atto della luce Q3 Perché il mio schermo diventa vuoto o nero mentre cerco di visualizzare le immagini in anteprim A Ci sono diverse ragioni per cui questo potrebbe accadere 1 C è qualcosa che non va con la porta USB Passare ad un altra porta USB o ad un altro PC e testare nuovamente la fotocamera 2 Il PC non riconosce il dispositivo della telecamera 3 Il sistema operativo e la configurazione del ...

Page 80: ...esto slot e sovrascriverà qualsiasi preset salvato in precedenza Dopo che l impostazione è stata completata un Set preset verrà mostrato nell angolo superiore sinistro dell immagine con il numero della preimpostazione che è stato selezionato e sovrascriverà qualsiasi preset salvato in precedenza Preimpostazione di chiamata Premere una volta uno dei pulsanti numerati per richiamare il preset su que...

Page 81: ...Register to get EXTRA ONE YEAR warranty Only valid in registering within 14 days of product delivery Get in touch with FREE online services facebook com letsnexigo nexigo com warranty ...

Reviews: