background image

FORM NO. L-21261-B-0214

6

+24 VDC

SHIELD WIRE

BROWN

WHITE

GREEN

SIGNAL

DANCER

POSITION

CONTROLLER

COM

EARTH GROUND

Figure 6

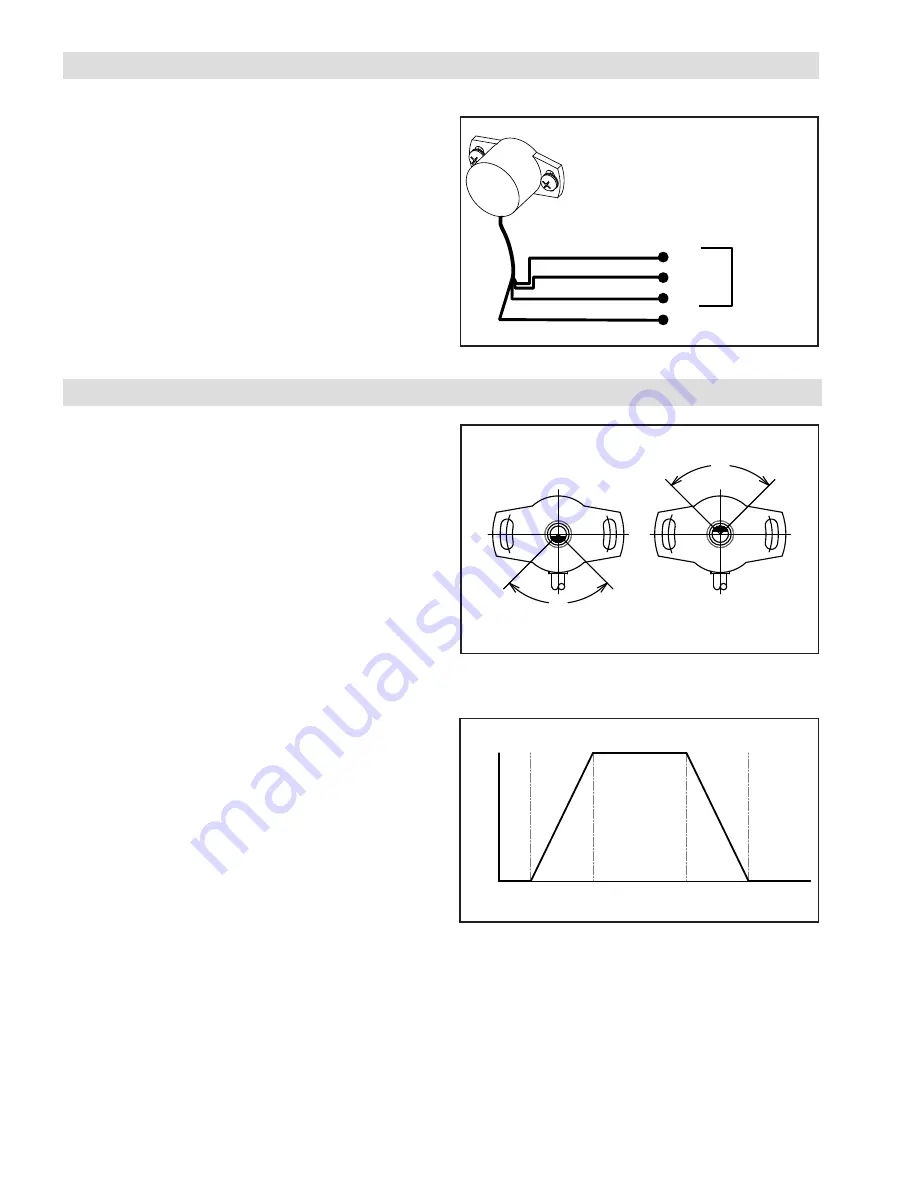
1.  Route the Dancer Position Sensor signal cable through 

the machine.

2.  Connect the signal cable to a controller (See Figure 

6).

NOTE:  The shield wire from the signal cable should 

be earth grounded at the controller.

If noise is still present on the position signal, ensure 

the sensor shaft has a low impedance connection to 

earth ground through the machine frame.

  ELECTRICAL CONNECTIONS

ADJUSTMENT

1.  Apply power to the Dancer Position Sensor.

2.  Refer to Installation for the proper alignment of the 

sensor.

3.  Using a voltmeter, measure the voltage across the 

green (+) and brown (-) wires (See figure 6).  The 
voltage reading must match the supply voltage for 
proper operation (See Specifications).

4.  Measure the sensor output voltage across the white 

(+) and brown (-) wires. With the dancer arm held in 
its mid travel position, the sensor output should be 
approxi5 VDC. If it is not, then slightly loosen 
the sensor’s fasteners and rotate the sensor until the 
voltage reading is +5 VDC.  Refer to Figure 7 and 8 
for mid travel position and sensor voltage output.  

5.  Tighten the fasteners securely to prevent the sensor 

from moving.

6.  Move the dancer arm through its full range of motion 

and check that the voltage changes between 0 and 
10 VDC.  If the output voltage stops changing as the 
dancer arm is moving, slightly loosen the sensor’s 
fasteners and rotate the sensor.  If this persists, 
the angular movement of the dancer arm might 
exceed the measurement range for the sensor (See 
Specifications).

7.  Trim back any unused wires to prevent electrical 

shorting problems.

8.  At this time the installation and adjustment of the 

dancer position sensor is complete.  Refer to the 
controller manual for any further setup and calibration 
procedures.

Figure 7   Dual Output Range

Figure 8   Sensor Output

60°

10V

0V

10V

0V

60°

30°

330°

150°

210°

180°

0V

10V

5V

330°

30°

150°

180°

210°

330°

Note: Sensor viewed from front. 

Summary of Contents for 964518

Page 1: ...1 FORM NO L 21261 B 0214 Dancer Position Sensor DPS60A Dual WEB CONTROL PRODUCTS User Manual...

Page 2: ...ce until the machinery into which it is to be incorporated has been declared in conformity with the applicable provisions of the Directive Read this manual carefully before installation and operation...

Page 3: ...BLE OF CONTENTS Introduction 4 Installation 4 Direct Connection 4 Coupling Connection 5 Electrical Connections 6 Adjustment 6 Troubleshooting 7 Mounting Dimensions 8 Parts List 9 Replacement Parts 9 S...

Page 4: ...lowing for flexibility in the mounting position See Figure 7 4 Attach Dancer Position Sensor Item 1 to one of the three hole configurations on the Bracket Item 3 with two shorter Pan Head Screws Item...

Page 5: ...g See figure 4 7 Measure the distance from the bottom of the Bracket Item 3 to the machine s side frame Fabricate a spacer block to make up the distance between the Bracket and the machine s side fram...

Page 6: ...d in its mid travel position the sensor output should be approximately 5 VDC If it is not then slightly loosen the sensor s fasteners and rotate the sensor until the voltage reading is 5 VDC Refer to...

Page 7: ...the Dancer Position Sensor accord ing to Figure 2 for Mid Point of Output and according to the instructions in the INSTALLATION and ADJUSTMENT sec tions Dancer arm exceeds the capacity of the sensor S...

Page 8: ...FORM NO L 21261 B 0214 8 MOUNTING DIMENSIONS DANCER POSITION SENSOR Figure 9 9 9 390 48 6 1 91...

Page 9: ...ts through your local Nexen Distributor DPS60A DUAL Product Number 964518 Supply Voltage 24 6 VDC Output Voltage 0 10VDC max angular rotation Reverse Polarity Protection 30VDC maximum Temperature 40o...

Page 10: ...OTHER BREACH OF CONTRACT NEGLIGENCE OR OTHER TORT OR OTHERWISE EVEN IF NEXEN SHALL HAVE BEEN ADVISED OF THE POSSIBILITY OR LIKELIHOOD OF SUCH POTENTIAL LOSS OR DAMAGE For all of the purposes hereof t...

Reviews: