14
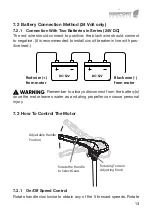
handle counter
-
clockwise for any of the 3 reverse speeds. To stop
the motor from running, position the handle
matching
the arrow marker
on level 0.
7.3.2 Adjust Handle Position
To adjust the position of the handle, l
oose
n
the rotating tension
adjusting kn
ob, adjust to desired position, and then re-
tigh
t
en
. Tighten
the rotating tension adjusting knob
to preferred level
of
resistance
,
or
all the way to
lock the handle.
7.3.3 Battery Level Indicator
There are
ten
LED lights on the top cover. When seven LED’s are out,
the meter is indicating that the input voltage is less than 9.5V (normal
voltage draw
is
12V).
At this point i
t is advised to disconnect the
motor from the battery to prevent damage to the battery and recharge.
7.3.4 Adjusting Motor Depth
Position the depth adjustment collar so the propeller blades are
sub-merged 6inches - 12inches
(15cm - 30cm)
below the
surface of
the
water.
7.3.5 Adjusting Steering Tension
Tighten or loose
n
the steering tension adjusting handle to increase
or decrease the steering tension. You can also lock the motor direction
by tightening the steering tension adjusting handle firmly.
Remember to wash the motor
with
fresh water
after being used in salt water
,
as it can greatly reduce the possibility
of corrosio
n.


