background image

11

Loose

n

  the  steering  tension  adjusting  handle  to  open  the  latch  and 

door,

  and

  replace  the  motor  assembly 

inside  as  shown

  below,


making

 sure the motor depth adjusting collar is above the mounting 

bracket.

Close the latch and door and tighten the steering tension adjusting han-

dle, mak

ing

 sure the motor assembly is in place properly.

Latch and 

Door Opened

Motor Shaft

Motor Depth

Adjusting Collar

Steering Tension 

Adjusting Handle

Deck of Pontoon

Deck of Pontoon

Latch and 

Door Closed

Motor Shaft

Motor Depth

Adjusting Collar

Steering Tension 

Adjusting Handle

Summary of Contents for Pontoon Series

Page 1: ...Electric Trolling Motor Pontoon Series User s Manual Please read and retain this manual before using product REACH RoHS ...

Page 2: ...ket Installation 8 7 Motor Operation 12 7 1 Battery Connection Method 12 Volt only 12 7 1 1 Connection With One Battery 12V DC 12 7 1 2 Connection With Two Batteries in Parallel 12V DC 12 7 2 Battery Connection Method 24 Volt only 13 7 2 1 Connection With Two Batteries in Series 24V DC 13 7 3 How To Control The Motor 13 7 3 1 On Off Speed Control 13 7 3 2 Adjust Handle Position 14 7 3 3 Battery Le...

Page 3: ...tenance 16 10 Trouble Shooting 17 10 1 Loss of Power 17 10 2 Motor Makes Excessive Noise or Vibration 17 10 3 Motor Fails to Run 17 10 4 Motor Loses One or More Speeds 18 11 About Circuit breaker 18 11 1 Function of the circuit breaker 19 12 Declaration of Conformity for Recreational Craft 20 13 Customer Support 20 ...

Page 4: ...s manual before using this electric motor This manual contains information that describes the procedure for safe operation and daily maintenance of your electric motor Safe operation will prevent personal injury and damage to the product 2 Specifications Item No Thrust in LBS Thrust in KG Input Input Power Pontoon 55 55 25 0 12V 52A 624W Pontoon 86 86 37 2 24V 48A 1152W Since speed depends on many...

Page 5: ... with the product Newport Vessels recommends the use of 8 gauge wire 13mm2 wire Be sure all switches are in the OFF position before connecting to battery or batteries Electrical arcing near the battery could cause an explosion The battery produces hydrogen and oxygen gases while charging This potentially explosive mixture escapes through the fill vent cell caps and may form an explosive atmosphere...

Page 6: ...ubmersed disconnect battery and leave to dry To prevent accidental damage to the fiberglass shaft do not over tighten the mounting bracket Only use this product between the temperatures 4Fº to 113Fº 20ºC to 45ºC User s should always wear approved life jackets Always disconnect power from the motor when replacing propeller removing debris around the prop charging batteries transporting boat or when...

Page 7: ...en you are satisfied that the motor is at a safe depth and isn t too close or in danger of hitting the bottom of the water way you may proceed to tighten the Transom Mounting Screws 6 Once this is done it should be safe to connect the battery to the motor Ensure that the twist grip is in the neutral position and that the nuts are tight on the terminals to prevent a poor connection 7 Select the des...

Page 8: ...n remove the motor assembly first and place the mounting bracket at the desired position Before installing the mounting bracket make sure the motor is disconnected to the battery or other power source Deck of Pontoon Boat Keel D Deck of Pontoon Latch and Door Closed Motor Shaft Motor Depth Adjusting Collar Steering Tension Adjusting Handle ...

Page 9: ...se the latch and door on the mounting bracket and loosely tighten the steering tension adjusting handle Place the motor aside Mounting Bracket Deck of Pontoon Mounting Holes Latch and Door Steering Tension Adjusting Handle Latch and Door Opened Motor Shaft Motor Depth Adjusting Collar Steering Tension Adjusting Handle Deck of Pontoon ...

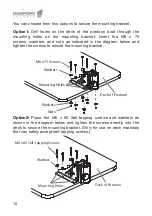
Page 10: ...gram below and tighten the screws to secure the mounting bracket Option2 Place the M6 x 60 Self tapping screws and washers as shown in the diagram below and tighten the screws directly into the deck to secure the mounting bracket Only for use on deck materials that can safely accept self tapping screws M6 x 60 Self tapping Screws Washers Mounting Holes Deck of Pontoon Deck of Pontoon M6 x 75 Screw...

Page 11: ...bove the mounting bracket Close the latch and door and tighten the steering tension adjusting han dle making sure the motor assembly is in place properly Latch and Door Opened Motor Shaft Motor Depth Adjusting Collar Steering Tension Adjusting Handle Deck of Pontoon Deck of Pontoon Latch and Door Closed Motor Shaft Motor Depth Adjusting Collar Steering Tension Adjusting Handle ...
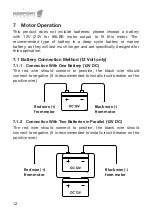
Page 12: ... designed for this application 7 1 Battery Connection Method 12 Volt only 7 1 1 Connection With One Battery 12V DC The red wire should connect to positive the black wire should connect to negative It is recommended to install circuit breaker on the positive wire 7 1 2 Connection With Two Batteries in Parallel 12V DC The red wire should connect to positive the black wire should connect to negative ...

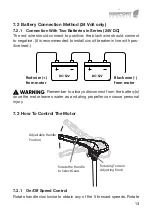
Page 13: ...atteries in Series 24V DC The red wire should connect to positive the black wire should connect to negative It is recommended to install circuit breaker in line with pos itive lead Remember to always disconnect from the battery s once the motor leaves water as a rotating propeller can cause personal injury Adjustable Handle Position Rotate the Handle to Select Gears Rotating Tension Adjusting Knob...

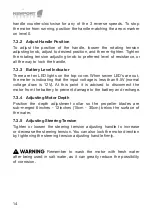
Page 14: ...er is indicating that the input voltage is less than 9 5V normal voltage draw is 12V At this point it is advised to disconnect the motor from the battery to prevent damage to the battery and recharge 7 3 4 Adjusting Motor Depth Position the depth adjustment collar so the propeller blades are sub merged 6inches 12inches 15cm 30cm below the surface of the water 7 3 5 Adjusting Steering Tension Tight...

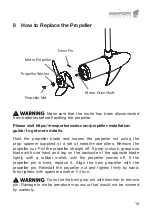
Page 15: ...e propeller straight off If prop is stuck grasp one blade with one hand and tap on the backside of the opposite blade lightly with a rubber mallet until the propeller comes off If the propeller pin is bent replace it Align the new propeller with the propeller pin Reinstall the propeller nut and tighten firmly by hand then tighten with spanner another 1 4 turn Do not strike bent prop pin with hamme...

Page 16: ... or corroded wiring connections 6 Always thoroughly rinse your electric outboard motor with fresh water after every use in salt water Only rinse the areas that have been in contact with salt water avoid getting the top cover wet as this may damage the circuitry inside 7 Inspect tightness of all nuts bolts and screws 8 Recharge batteries after each use Follow the battery manufactur er s recommendat...

Page 17: ...hipped Motor will whine or grind 10 2 Motor Makes Excessive Noise or Vibration Propeller may be damaged or unbalanced Check to see if propeller is secured Bent armature Remove propeller set at medium speed turn unit on and check for armature wobble Turn propeller by hand It should turn freely with a slight magnetic drag Bearing bushes may be worn out 10 3 Motor Fails to Run Check fuse circuit brea...

Page 18: ... characteristics between the electric outboard motor and gasoline outboard motor are different If the propeller of the motor gets stuck the gasoline outboard motor will shut down to not cause any permanent damage to the motor itself However the electric outboard will draw extremely large current due to the motor stall and can generate large amounts of heat that can damage important components in t...

Page 19: ... electric outboard motor when the propeller is stuck by the weeds small stones fishing lines etc the circuit breaker will cut off the power automatically to prevent the damage of the motor s electrical parts If the circuit breaker cuts off the power please disconnect the battery first then check and clear any obstacles Finally press the reset button on the circuit breaker and reconnect the battery...

Page 20: ...r s is are in conformity with the type s for which above mentioned EC EMC and ROHC type examination or type approval certificate s has have been issued and it will meet the requirements of Directive 89 392 EEC 89 336 EEC as amended when installed in a recreational craft in accordance with the manufacturer s supplied instructions 13 Customer Support If you have questions that are not answered in th...

Reviews: