4
ハードドライブのインストール
作業される前に、静電
気に関する安全上の注
意をお守りください。
電子部品を保護用静電気防止
バッグから取り出す前に、余分
な静電気を安全に取り除いて
ください。
これを簡単に行うに
は、
コンピュータの電源サプラ
イの金属カバーまたは水道管
など、接地した金属に触れてく
ださい。
Newer Technology miniStack v2.5
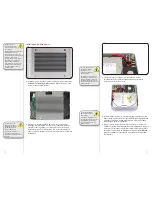
1.
エンクロージャの裏に
ある 4 つのプラスのネジを外します。ドライブ キャリヤ
をエンクロージャ内部から取り外します。
図にあるように、お手元の 3.5 インチ SATA ハードドライ
2.
ブをマウント ブラケットに置きます。接続コネクタが左
側に、そしてドライブ ブラケットの開口部が上側に来る
ように配置します。ハードドライブが正常にブラケット
に挿入されたら、同梱されている 4 つのネジを差し込ん
でしっかりと固定します。
ジ
裏
ハードドライブが図
と同じようにヒート
シンクに取り付けら
れていることを確認
してください。
間違って取り付けると、ハー
ドドライブがエンクロージャ
の中に正常に収まらなくなる
原因となります。
5
Place the drive and bracket inside the enclosure, routing the
3.
power and data cables to avoid pinching them.
Take the black and white wire at the upper right of the enclosure
4.
in this picture and tape the thermal probe (the blue portion of
the wire) onto the center of the hard drive using the enclosed
piece of yellow Kapton tape as shown.
Once the hard drive is inserted, replace the four Phillips
5.
screws on the bottom of the enclosure to fully secure the
drive carrier. Make sure that all wires are as fl at as possible
and place the plastic top back onto the
miniStack
enclosure.
Before continuing, make sure that there are no bulges in the
top cover.
Make sure the hard
drive and heat sink are
fully inserted into the
enclosure.
Otherwise, you will not be able
to put the top panel on prop-
erly, nor secure the heat sink
with the four Phillips screws
you removed in Step 1.
The thermal probe
helps to regulate the
fan speed.
Failure to attach the thermal
probe can result in drive
overheating, leading to possible
data corruption and loss!


