background image

IMPORTANT INFORMATION 


Read prior to activation 


You have just purchased a sophisticated electro-optical device 
that emits invisible laser radiation.


To operate it properly, please 

read this manual carefully.


NEVER 

direct laser beam at the eyes of people or animals 


NEVER 

aim the unit at the Sun or bright sources of light 


NEVER 

subject the unit to impacts 


NEVER 

transport the unit without its case 


NEVER 

disassemble the unit. This may be hazardous for 

you due to high voltage currents in the system 


ALWAYS

 keep the unit out of children’s reach 


ALWAYS 

remove the battery when the device is not in use 

for a long period 


ALWAYS

 store in a dry place 


Caution

 - use of controls or adjustments, or performance of 

procedures other than those specified herein may result in 
hazardous radiation exposure 


Caution

 - use of optical instruments such as monocular, 

loupes, mirrors, lenses, etc. with this product increases eye 
hazard 


Note

: Avoid eye exposure to direct laser beam or its close 

reflection 

Summary of Contents for LRM 2500

Page 1: ...Operation Manual LRM 2500 LRM 2500CI LASER RANGE FINDER MONOCULAR 105 Sparks Ave Toronto ON M2H 2S5 Canada...

Page 2: ......

Page 3: ...ts case NEVER disassemble the unit This may be hazardous for you due to high voltage currents in the system ALWAYS keep the unit out of children s reach ALWAYS remove the battery when the device is no...

Page 4: ...the eyepieces Never aim the unit at highly reflective objects like mirrors and retroreflective surfaces which are in close proximity to the laser rangefinder This can lead to the permanent damage of t...

Page 5: ...Operation and service modes 14 Accuracy correction 16 Compass calibration CI model only 18 Setting interface format CI model only 18 Gating mode 19 Data Recall mode 20 Computer interconnectivity 21 G...

Page 6: ...lear image under any observation conditions The unit utilises time of flight method of distance and speed measurement The System sends invisible eye safe laser pulses to the target The returned pulses...

Page 7: ...r the most reflective target acquisition Meters Yards Mils Degrees KMH MPH display Last 10 measurements recall Selectable reticle shape or Gating capability Speed detector Accurate digital compass CI...

Page 8: ...4 2 3 4 5 6 7 1 2 DEVICE APPEARANCE 1 Eyepieces 2 Objective lens 3 Laser emitter lens 4 Receiver lens 5 M Mode button 6 A Action button 7 Body of the device 8 Rubber grip Fig 1 1 Front view...

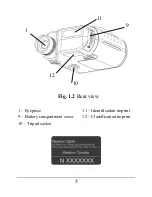
Page 9: ...5 1 Eyepiece 11 Identification imprint 9 Battery compartment cover 12 Classification imprint 10 Tripod socket Fig 1 2 Rear view 9 1 12 10 11...

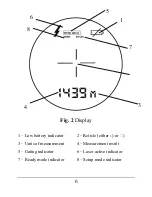
Page 10: ...g 2 Display 1 Low battery indicator 2 Reticle either or 3 Units of measurement 4 Measurement result 5 Gating indicator 6 Laser active indicator 7 Ready mode indicator 8 Setup mode indicator 4 6 5 1 3...

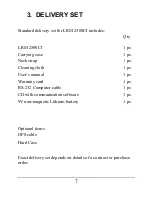
Page 11: ...e Neck strap Cleaning cloth User s manual Warranty card RS 232 Computer cable CD with communication software 9V non magnetic Lithium battery 1 pc 1 pc 1 pc 1 pc 1 pc 1 pc 1 pc 1 pc 1 pc Optional items...

Page 12: ...ptics Dioptre adjustment range 4 Range Finder Laser Class 1 eye safe 905 nm Measuring range 10 2 500 m Accuracy and display resolution 1 m First last and auto target selection Yes Meters Yards display...

Page 13: ...ing Yes Meters or Yards Power Battery 9V Lithium non magnetic Battery capacity Min 5 000 measurements Scanning regime Low Battery indicator Yes Environmental Operational temperature range 25 50o C 13...

Page 14: ...er polarity was reversed or the battery contacts are jammed To take a battery out Slide the battery compartment cover down 9 Fig 1 2 Shake the rangefinder gently towards the open end of the battery co...

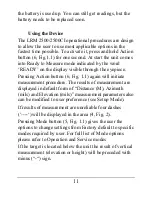
Page 15: ...6 Fig 1 1 again will initiate measurement procedure The results of measurement are displayed in default form of Distance M Azimuth mils and Elevation mils measurement parameters also can be modified t...

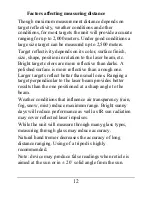
Page 16: ...ive than a rough one Larger targets reflect better than small ones Ranging a target perpendicular to the laser beam provides better results than the one positioned at a sharp angle to the beam Weather...

Page 17: ...ehind the bushes wires through the falling snow or in similar conditions Furthermore it enables ranging a target in front of a bigger object such as a wire in front of the wall Note Even with target s...

Page 18: ...heless all data is transferred to the PC and recorded in internal memory and may be recalled see Data Recall mode for details Operation and service modes Pressing Mode button 5 Fig 1 1 in Ready mode s...

Page 19: ...o Degrees o Speed from KMH to MPH note this option is only available if Std Speed is selected rEc allows data recall of the last 10 measurement results o CLr Clears all Measurement SEt allows the user...

Page 20: ...specification it may be an indication that unit requires calibration similar to one conducted at production level To do accuracy correction please select Corr from CAL menu Perform correction accordin...

Page 21: ...ing all future measurements 2 Target should not have high reflective surface white color is not considered high reflective in this case 3 Unit shall be well levelled with deviation from 0 not more tha...

Page 22: ...during half a minute If one rotation does not restore calibration perform two rotations The normal compass functioning will be restored Setting interface format CI model only In this mode data commun...

Page 23: ...sing Action button OVER 100M indicates that gating is active To deactivate gating choose gating value zero Note The gating distance can only be increased To exit the gating selection cycle without set...

Page 24: ...t number display name rEc 1 will start flashing Pressing M button moves the unit along the list of measurement set numbers and measurement results rEc 1 distance 1 azimuth 1 elevation 1 rEc 2 distance...

Page 25: ...warranty To attach the cable to the rangefinder match the key on the plug 1 with the corresponding key on the socket and then push gently the plug holding it by its casing 3 until click To detach the...

Page 26: ...is not set initially to dFLt mode the GPS will not operate properly Note GPS unit automatically adjusts coordinates to reflect actual magnetic declination Therefore coordinates displayed on the GPS ma...

Page 27: ...will be the reflection 3 The unit deploys sophisticated software that tries to understand which target you are aiming at However due to beam divergence several objects may produce a strong reflection...

Page 28: ...n Gating provides better results than the last target selection but it requires preliminary rough distance estimation to cut off all objects closer than the chosen one Note Gating setting is remembere...

Page 29: ...rature Do not use the device at temperatures higher than 50o C 122o F Do not touch optical surfaces Doing so may damage the anti reflection coating Clean optical surfaces only with professional camera...

Page 30: ...play may have small black dots scratches and other blemishes inherited from the manufacturing process These flaws are strictly regulated by number area and location and do not degrade the product s me...

Page 31: ...model the product or part thereof which on inspection by Newcon is found to be defective in materials or workmanship What This Warranty Does Not Cover NEWCON is not responsible for warranty service sh...

Page 32: ...ern Standard Time At no time should equipment be sent back to Newcon without following the instructions of our technical support department NEWCON OPTIK accepts no responsibility for unauthorized retu...

Page 33: ...29 11 QUALITY CERTIFICATE Serial number _____________________________ The unit indicated above has passed the quality inspection Production date Quality Inspector Purchase date...

Page 34: ......

Page 35: ......

Page 36: ...NEWCON OPTIK Printed in Canada R1 2 11...

Reviews: