background image

Setting Up The Unit

17

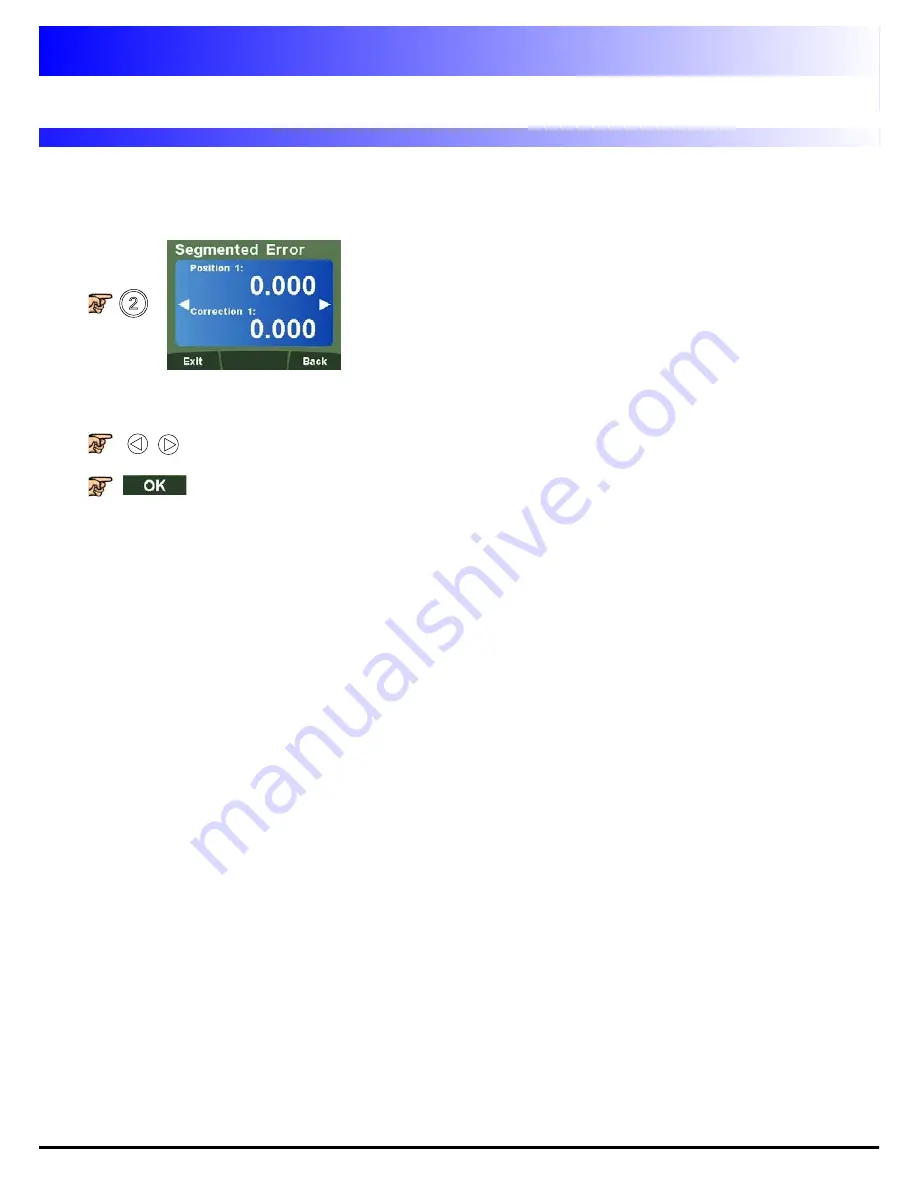
Program Mode

Position 1:

Enter a value using the numeric key-

pad for the 1st correction point (I.E 5.000)

Correction 1:

Enter a value using the numeric 

keypad for the correction value (I.E -0.010)

Note:

The correction value is limited to a 

minimum of 0.005mm (0.0002”)

to navigate between points. A maximum of 200 points are available. 

to accept the compensation at the point reached.

The program mode enables the user to define the correction points manually and then enter them into
the DP1200. The position is where the correction point occurs, and the correction point is the value to
be corrected at that point. 

Summary of Contents for dp1200

Page 1: ...User Manual DP1200 Digital Readout...

Page 2: ......

Page 3: ...play Resolution Setup Page 18 Direction Setup Page 19 Radius Diameter Measure Setup Page 19 Signal Checking Setup Page 19 Zero Approach Setup Page 19 Error Compensation Setup Page 19 Setup Axis 4 Digi...

Page 4: ...le to electrical goods Do not burn The casework is suitable for recycling Please consult local regulations on disposal of electrical equipment Encoder inputs 1 2 3 can be used with Spherosyn 2G and Mi...

Page 5: ...his section details the various mounting options for the DP1200 both the standard version and the panel mount version Mill Mount Non Adjustable 4 297 0 202 0 Cutout Corners R5 Min R15 Max 300 00 Fixin...

Page 6: ...ed to prevent them from being caught on moving parts Before the machine power is turned on the DP1200 is grounded to the machine using the braided grounding lead provided The power has been disconnect...

Page 7: ...tal modes Soft Keys left middle right Navigation Keys Switches between Inch and mm display Sleep Key Axis 1 Axis 2 Axis 3 Axis 4 Power LED Message Display LCD Invalid Key Warning The DP1200 is equippe...

Page 8: ...DP1200 supports a quick navigation feature using the LCD screen and numeric keys enabling the user to navigate to specific areas without scrolling through each and every menu This is particularly usef...

Page 9: ...eference Source Setup 4 Resolution Setup 7 Display Resolution Setup 8 Direction Setup 9 More Options Press Key 9 for the options below 1 Radius Diameter Setup 2 Signal Checking Setup 3 Zero Approach S...

Page 10: ...tup 3 Reference Source Setup 4 Resolution Setup 5 Angular Display Setup 6 Angular Mode Setup 8 Direction Setup 9 More Options Press Key 9 for the options below 2 Signal Checking Setup 3 Zero Approach...

Page 11: ...3 Reference Source Setup 4 Resolution Setup 7 Display Resolution Setup 8 Direction Setup 9 More Options Press Key 9 for the options below 1 Radius Diameter Setup 2 Signal Checking Setup 3 Zero Approac...

Page 12: ...cation Setup 3 Plane Setup 4 Mill Summing Setup 5 Functions Setup 6 Probe Diameter Setup 7 Beep Setup 8 LCD Brightness Setup 9 More Options Press Key 9 for the options below 1 Sleep Setup 2 Unlock Axi...

Page 13: ...ncoder in use or the DP1200 will not display correctly Navigate to Spherosyn 2G Microsyn 2G 10 m To select 5 m 0 0002 To select 10 m 0 0005 To select 20 m 0 001 To select 50 m 0 002 Microsyn 2G 5 m To...

Page 14: ...e best results if a dial indicator must be used be sure it is the highest available accuracy Instructions Check the accuracy of the DRO system 1 Place the target of the laser or the needle of the dial...

Page 15: ...ts per million ppm In this mode a single constant correction factor for each axis is applied to all displayed measurements As you follow the procedure ensure that you approach each edge from opposite...

Page 16: ...In the example the standard distance is 500 000mm and the measured distance is 500 200mm Correction factor error actual x 1 000 000 Correction factor 500 500 200 500 000 x 1 000 000 Correction factor...

Page 17: ...ed to coincide with either the absolute datum or any of the correction points However it may be convenient to make the absolute datum and the reference point the same Always approach the Starting Poin...

Page 18: ...0 Note The correction value is limited to a minimum of 0 005mm 0 0002 to navigate between points A maximum of 200 points are available to accept the compensation at the point reached The program mode...

Page 19: ...gate to Note Inch mm function must be set to reflect entered resolution Encoder Resolution Enter the resolution of the encoder for the 4th digital axis using the numerical keys It is important the res...

Page 20: ...Page 10 Radius Diameter Measure Setup Mode of Operation The detection mechanism monitors the incoming signals from the encoder to look for an illegal combination of input levels If the encoder becomes...

Page 21: ...Teach Resolution Setup This setting allows the user to program the DP1200 with a rotary encoder resolution Rotary encoder resolutions are usually expressed as Pulses Per Turn This is the number of pul...

Page 22: ...e refer to Page 10 Direction Setup Default is 0 000 Navigate to This setting provides a visual indication that one or more axes are approaching zero It does this by using the far left LED segment on e...

Page 23: ...er the linear resolution via the numeric keypad Example 10mm linear movement required from 1 revolution of an 1800 pulse rotary encoder 10 1800 4 0 0013888 Move the rotary encoder to a known start poi...

Page 24: ...planation Page 12 Type of Machine Error Page 12 Linear Error Compensation Explanation Page 13 Linear Compensation Setup Please refer to Page 16 Signal Checking Setup Radius Diameter Measure Setup Plea...

Page 25: ...ple Axis 1 has a legend of X Axis 2 has a legend of Y and Axis 3 has a legend of Z To select X and Y axes To select X and Z axes To select Y and Z axes Axis Coupling Setup This feature enables the per...

Page 26: ...Beep On Beep Off LCD Brightness Setup The DP1200 allows the user to adjust the brightness of the LCD screen for user preference To select 20 brightness To select 40 brightness To select 60 brightness...

Page 27: ...up Allows the user to reset the unit back to factory defaults There are three factory default settings according to the application Example The unit is being reset as a Lathe To default as Mill To def...

Page 28: ...150 300 50 0 0 Y X Example of Absolute and Incremental use Set absolute zero at lower left corner of the part 0 000 0 000 Move to first position in ABS Hole A 30 000 30 000 Move to second position in...

Page 29: ...e on the right 0 000 Press the axis select key relevant to the axis 0 Input the required numeric value 145 230 Zeroing an Axis in Set Mode With Set Mode selected it is possible to zero the axis conve...

Page 30: ...1000 2 5mm for Microsyn Digifind allows a quick means to find the datum if lost Follow the steps below Setting the reference The reference point is now set Finding the reference The position to the ab...

Page 31: ...tive sequence of co ordinates is entered into SDM the co ordinates can be recalled at any time The positions remain in memory until altered by the operator Simply assign any SDM num ber 1 200 to each...

Page 32: ...ically Once setup See Page 24 Sleep Setup apply no movement or any key presses for the period of time set and the DP1200 will turn off all displays apart from the power LED Any key presses or move men...

Page 33: ...the display The required connection details are shown below The RS232 port allows position data from the DRO to be sent to a computer Applications Quality Control Save dimensional data from finished...

Page 34: ...supported at the PC To select None disable Parity To select Even Parity To selects Odd Parity Enter using the numeric keypad the number of seconds between each communication If off is selected to ret...

Page 35: ...s defined as follows The Axis ID is the representation of the axis at the time of printing This will be shown by the legend set for the axis at that time Please see example below Example A 0 0 0 0 0 0...

Page 36: ...ly operates in the axes that have been setup in the plane See Page 24 Plane Setup To select PCD Bolt Hole Circle Example Enter 1st centre coordinate Enter 2nd centre coordinate Enter the diameter dime...

Page 37: ...e keys to navigate back and forth through the menus To start the PCD Bolt Hole Circle Routine Circle centre 150mm diameter X axis Starting hole Y axis 99 7mm Datum 125 25mm 18 starting angle 196 580 1...

Page 38: ...2 Note This function only operates in the axes that have been setup in the plane See Page 24 Plane Setup To select Line Hole Example Enter 1st start coordinate Enter 2nd start coordinate Enter the lin...

Page 39: ...ed Mill Functions To start the line hole circle routine 180 500 200 000 Navigate through the sequence of holes by using keys 180 5mm 200mm Y axis X axis Datum Starting point 350mm line length 9 holes...

Page 40: ...ws the co ordinates which are point to point positions along the arc The operator works to zero for each hole location See example below The arc feature is dependant on the Plane setting for the axes...

Page 41: ...the appropriate arc type For this example we will select internal Enter the maximum cut required To start the arc feature Y axis Starting Point Ending Point Datum X axis Arc Centre Radius 0 5 Tool Dia...

Page 42: ...ates radius length angle The two axes used for polar coordinates are defined in the parameter setting for plane See Page 24 Plane Setup The fourth axis cannot be used for polar coordinates The example...

Page 43: ...Skew function Note Use the keys to navigate through the parameters Note that positions 1 and 2 are points on the first plane Angle 1 Positions 3 and 4 are points along the second plane Angle 2 Touch t...

Page 44: ...Continued 43 Touch the probe to a second point along the Y second plane Or Touch the tool to a second point along the second plane The angle for X plane 1 and Y plane 2 are shown on the DRO Mill Funct...

Page 45: ...set is used For convenience it is highly recommended that tools are physically marked with their corresponding tool number There are two ways to set Tool Offsets Teach Mode and Program Mode The DP1200...

Page 46: ...nd enter this value Repeat this process for all tools required Note Use the keys to navigate through the tools Enter the tool dimensions one axis at a time Repeat this process for all tools required O...

Page 47: ...the summing function should be used To select Vector Enter the desired vector angle Combined X movement X Z Sin a Combined Z movement Z Z Cos a X a Z vectoring angle Example To start Note Changing of...

Page 48: ...tion The taper function ignores the parameter setting for the plane The example below demonstrates its operation until the display shows Touch the tool to one end of the taper and zero both axes then...

Page 49: ...ot used with this function See Axis Coupling Setup Page 24 for details on using Axis 4 until the display shows Select the required plane The un summed position data will be shown in the axis window Th...

Page 50: ...sure it is correct Check the Radius Diameter setting The Diameter setting causes the axis to read double Check the Error Compensation factors If using the Segmented Error Compensation verify the datum...

Page 51: ...wall co uk Web www newall co uk Newall Electronics Inc 1778 Dividend Drive Columbus Ohio 43228 USA Tel 1 614 771 0213 Fax 1 614 771 0219 E mail sales newall com Web www newall com Beijing Newall Techn...

Reviews: