8
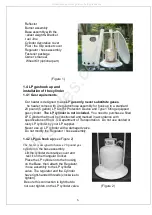
Step 3.
If you prefer the heater
comes with the wheel kit, you
need to purchase them from your
selling dealer. You can attach
the wheel kit with the
fasteners provided now.
See Figure 5.
Step 4.
Place the cylinder
decorative cover over the
base assembly / brackets.
(
(
(Figure 5)
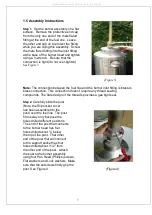
Step 5.
Please carefully insert the
Post/Slip Socket Cover assembly
with the fuel line into the post support
socket assembly. Be sure that the lower
end of the fuel line passes through the
hole in the post support plate. Using
four Pan Head (Phillips) screws, Flat
washers secure the post / the slip socket
cover into the post support socket. (Do
not use lock washers at this connection).
Make sure the setscrews through the
Post and the slip socket cover firmly
grip the post. See Figure 6
(
(Figure 6)
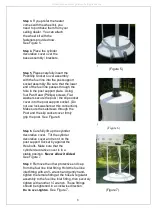
Step 6.
Carefully lift up the cylinder
decorative cover. Tilt the cylinder
decorative cover and rest it on the
post support Socket by against the
Hex-bolts. Make sure that the
cylinder decorative cover is in a
stable position.
Never allow it slides!
See Figure 7
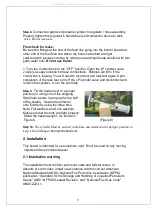
Step 7.
Remove the other protective end cap
from the fuel line inlet fitting. Hold the fuel line
inlet fitting with an ¾ wrench and gently hand-
tighten the female fitting at the hose & regulator
assembly to the fuel line inlet fitting, then securely
tighten with another ¾” wrench. These fittings
should be tightened in a clockwise direction.
Do no over-tighten.
See Figure 7
.
(Figure 7)
All manuals and user guides at all-guides.com


