


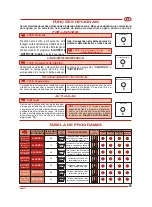


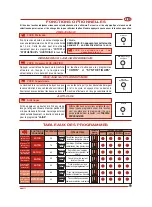


USING THE WASHING MACHINE
MONITORING THE WASH:
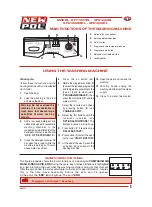
The figure alongside shows the 5 main functions of a wash cycle: PREWASH-MAIN
WASH, RINSES, SPIN, END. During the cycle, each of these functions is highlighted
by a led informing the user what the washing machine is doing at that moment.
After the spin phase, the corresponding led will stay lit for approximately 2 minutes;
this is the time lapse necessar y before the door can be opened.
At this point, the “END” led will light-up. The word “END”
A
Optional function buttons
B
Spin speed indicator leds
G
On/off button
P
Programme and temperature knob
S
Programme status led
C
Delayed start indicator led
V
Loud Speaker
GB
MAIN FUNCTIONS OF THE WASHING MACHINE
MODEL: XF71007EL - XF61200EL -
XF61002IXEL - XF61000EL
SM1777
5
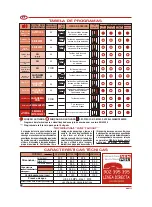
“El programa ha finalizado” + beep beep
500
800
1200
8
4
2
1
fin
1
Inicio diferido
2
Centrifugado
3
Prelavado
4
Lavado enérgico
5
Superaclarado
6
Antiarrugas
7
Inicio
Lana - delicado
Sintético
Algodón
30º
40º
60º
75º
90º
30º
40º
60º
40º
30º
40º
30º
e perience
X
A mano
Rápido
Cotidiano
En frío
Aclarado
Centrifugado
30
°
90
°
40
°
30
°
40
°
60
°
40
°
30
°
30
°
40
°
60
°
75
°
30
°
35
°
40
°
stop
la
na
-deli
cado
sin
té
tic
o
algo
dó
n
on-off
1
2
3
4
5
6
7
S
C
A
G
P
B
V
Wash cycle:
(follow these instructions and the
washing machine will run the selected
wash cycle)
1.
Open the door
2. Load the washing in the drum
and close the door.
Warning: Do not overload the
machine. It is not advisable to
wash items that absorb large
quantities of water such as
carpets.
3. Add a low-suds detergent and
softener designed for automatic
washing machines in the
respective compartments of the
detergent drawer (see chapter
“USE OF DETERGENTS”).
4. Close the detergent drawer. Do
not open the drawer while the
machine is working as this may
cause water to spill out.
5. Press the on button (G).
6.
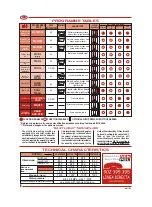
Rotate the programmer knob (P)
to select the required programme
and temperature according to the
type of fabric to wash (see:
“PROGRAMME TABLES”) then
press the start button (7) and the
cycle will start.
7.
Select the required spin speed
by pressing button (2) (see
“VARIABLE SPIN”).
8.
Select the (A) buttons with the
f u n c t i o n s r e q u i r e d ( s e e
“OPTIONAL FUNCTIONS”). The
buttons pressed will light-up.
9.
Press button (1) if required (see
“DELAYED START”)
10. Press button (7) to start the wash
cycle (see “START BUTTON”)
11. At the end of the wash, press the
on button (G) to switch off the
washing machine.
12. Open the door and remove the
washing.
13. With dry hands, unplug the
washing machine from the mains
supply.
14. Close the water feed valve.
fin


