background image

Engine - Engine and crankcase

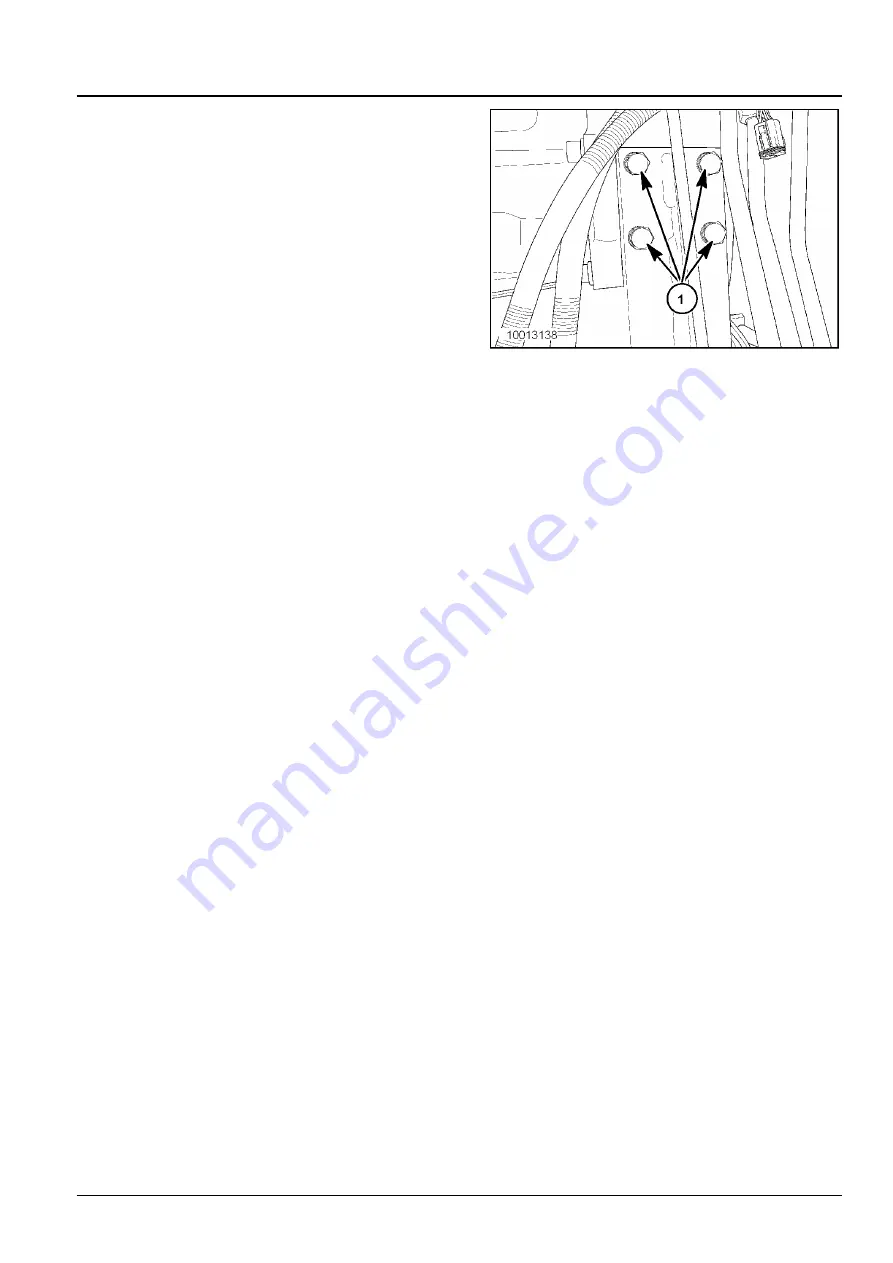
35. Loosen the four rear, engine mounting bolts

(1)

on

each side of the engine. Do not remove the mounting
bolts at this time.
With the engine securely supported by the lifting de-
vice, remove all of the engine mounting bolts loosened
in the previous steps.
Carefully lift the engine from the frame and remove
from the combine.

10013138

28

47956065 17/05/2016

10.1 [10.001] / 11

Summary of Contents for CR10.90

Page 1: ...IN 1947 and above CX8 90 PIN 1962 and above CR10 90 CX8 80 Tier 4B final CR10 90 PIN 1947 and above CX8 80 PIN 1957 and above Combine Printed in U S A 2016 CNH Industrial Belgium N V All Rights Reserved New Holland is a trademark registered in the United States and many other countries owned by or licensed to CNH Industrial N V its subsidiaries or affiliates ...

Page 2: ...SERVICE MANUAL CR10 90 TIER 4B 1947 CR8 90 TIER4A 1946 CR9 90 TIER 4A 1947 CX8 80 TIER 4B 1957 CX8 90 TIER 4A 1962 47956065 17 05 2016 EN Find manuals at https best manuals com ...

Page 3: ...orth America F2CFE613C B043 CX8 90 TIER 4A 1962 North America F3AFE613A A CR10 90 TIER 4B 1947 North America F3JFE613A B003 CR8 90 TIER4A 1946 North America F3AFE613A A CR9 90 TIER 4A 1947 North America F3BFE613D A 47956065 17 05 2016 Find manuals at https best manuals com ...

Page 4: ...14 Mechanical transmission 21 1 21 130 Mechanical transmission external controls 21 2 21 145 Gearbox internal components 21 3 21 182 Differential 21 4 Front axle system 25 25 108 Final drive hub steering knuckles and shafts 25 1 25 310 Final drives 25 2 Rear axle system 27 27 124 Final drive hub steering knuckles and shafts 27 1 Hydrostatic drive 29 29 100 Transmission and steering hydrostatic con...

Page 5: ... 35 410 Header or attachment height system 35 8 35 602 Header or attachment leveling system 35 9 35 760 Header reverser drive 35 10 35 992 Stone trapping system 35 11 35 994 Positive Straw Discharge PSD 35 12 35 796 Chaff spreader control 35 13 35 440 Grain tank unload system 35 14 35 450 Variator system 35 15 Steering 41 41 101 Steering control 41 1 41 200 Hydraulic control components 41 2 41 432...

Page 6: ...ontrols 55 9 55 051 Cab Heating Ventilation and Air Conditioning HVAC controls 55 10 55 050 Heating Ventilation and Air Conditioning HVAC control system 55 11 55 662 Header height control 55 12 55 628 Threshing electrical control 55 13 55 427 Straw walker variator 55 14 55 426 Harvest material flow control system 55 15 55 624 Residue handling control 55 16 55 785 Precision farming system 55 17 55 ...

Page 7: ...ystem 60 5 60 260 Rotor 60 6 Threshing 66 66 000 Threshing 66 1 66 260 Threshing mechanism drive system 66 2 66 331 Rotor 66 3 66 330 Drum 66 4 66 360 Drum Rotor housing 66 5 66 321 Drum Rotor variator with electrical control 66 6 66 105 Concave 66 7 66 101 Concave conveyor plate 66 8 66 110 Concave control system 66 9 Separation 72 72 220 Discharge beater 72 1 72 350 Beater 72 2 72 420 Rotary sep...

Page 8: ...18 Lower shaker shoe 74 5 74 125 Clean grain and return cross auger housing 74 6 74 130 Fan housing 74 7 74 136 Fan drive system 74 8 74 140 Tailings return system 74 9 Crop storage Unloading 80 80 101 Clean grain elevator 80 1 80 150 Grain tank 80 2 80 175 Grain tank unload drive system 80 3 80 180 Grain tank unload 80 4 Platform cab bodywork and decals 90 90 154 Cab doors and hatches 90 1 90 110...

Page 9: ... 90 105 Machine shields and guards 90 5 47956065 17 05 2016 Find manuals at https best manuals com ...

Page 10: ...INTRODUCTION 47956065 17 05 2016 1 Find manuals at https best manuals com ...

Page 11: ... rules 5 Safety rules 8 Basic instructions 9 Torque 12 Torque Standard torque data for hydraulic connections 15 Basic instructions Chain Wear Tables Roller Chains 22 Basic instructions Shop and assembly 24 Conversion factors 26 Product identification 27 See content for specific models 47956065 17 05 2016 2 ...

Page 12: ...reject any responsibility for damages caused by parts and or components not approved by the manu facturer including those used for the servicing or repair of the product manufactured or marketed by the manufacturer In any case no warranty is given or attributed on the product manufactured or marketed by the manufacturer in case of damages caused by parts and or components not approved by the manuf...

Page 13: ...our vehicle Fault Code Resolution FCR information The FCR information is not contained within the paper version of the manual For FCR information please refer to the Electronic Service Tool EST or the electronic version of this manual Electronic Service Tool EST information The EST information and how to handle Control Modules CM e g resetting of the CM etc is not contained within this manual For ...

Page 14: ... moderate injury C0038A SAFETY REQUIREMENTS FOR FLUID POWER SYSTEMS AND COMPONENTS HY DRAULICS Flexible hose assemblies must not be constructed from hoses which have been previously used as part of a hose assembly Do not weld hydraulic pipes when flexible hoses or piping are damaged replace them immediately It is forbidden to modify a hydraulic accumulator by machining welding or any other way Bef...

Page 15: ... similar equipment must only be powered by auxiliary power supplies with efficient ground insulation to avoid electrical shock hazards Always use suitable hoisting or lifting devices when raising or moving heavy parts Keep bystanders away Never use gasoline diesel oil or other inflammable liquids as cleaning agents Use non inflammable non toxic commercially available solvents Wear safety goggles w...

Page 16: ...cause damage to the wheel Never cut or weld a rim mounted with an inflated tire Deflate the tire before removing any objects that may be jammed in the tire tread Never inflate tires using inflammable gases as this may result in explosions and injury to bystanders Removal and installation Lift and handle all heavy parts using suitable hoisting equipment Make sure that parts are sustained by appropr...

Page 17: ...olor associated with WARNING is ORANGE CAUTION used with the safety alert symbol indicates a hazardous situation which if not avoided could result in minor or moderate injury The color associated with CAUTION is YELLOW FAILURE TO FOLLOW DANGER WARNING AND CAUTION MESSAGES COULD RESULT IN DEATH OR SERIOUS INJURY Machine safety NOTICE Notice indicates a situation which if not avoided could result in...

Page 18: ...lip seals with grease insert the seal in its seat and press down using a flat punch do not tap the seal with a hammer or mallet whilst inserting the seal check that it is perpendicular to the seat once settled make sure that it makes contact with the thrust element if required to prevent damaging the seal lip on the shaft position a protective guard during installation operations O RING SEALS Lubr...

Page 19: ...n progress 4 WARNING Battery acid causes burns Batteries contain sulfuric acid Avoid contact with skin eyes or clothing Antidote external Flush with water Antidote eyes flush with water for 15 minutes and seek medical attention immediately Antidote internal Drink large quantities of water or milk Do not induce vomiting Seek medical attention immediately Failure to comply could result in death or s...

Page 20: ...The tools that NEW HOLLAND suggests and illustrate in this manual have been specifically researched and designed for use with NEW HOLLAND machines essential for reliable repair operations accurately built and rigorously tested so as to offer efficient and long lasting operation By using these tools repair personnel will benefit from operating in optimal technical conditions obtaining the best resu...

Page 21: ... 9 1 N m 80 5 lb in 14 5 N m 10 7 lb ft 7 9 N m 69 9 lb in 13 N m 9 6 lb ft M8 24 5 N m 18 1 lb ft 13 5 N m 10 0 lb ft 22 N m 16 2 lb ft 35 1 N m 25 9 lb ft 19 3 N m 14 2 lb ft 31 5 N m 23 2 lb ft M10 48 7 N m 35 9 lb ft 26 8 N m 19 8 lb ft 43 8 N m 32 3 lb ft 69 5 N m 51 3 lb ft 38 2 N m 28 2 lb ft 62 5 N m 46 1 lb ft M12 85 N m 62 7 lb ft 46 7 N m 34 4 lb ft 76 5 N m 56 4 lb ft 121 N m 89 2 lb f...

Page 22: ...nut Lock nut Hardened nut M27 1073 N m 791 4 lb ft 590 1 N m 435 2 lb ft 967 5 N m 713 6 lb ft 1486 N m 1096 lb ft 817 3 N m 602 8 lb ft 1337 N m 986 1 lb ft M30 1461 N m 1077 6 lb ft 803 5 N m 592 6 lb ft 1315 N m 969 9 lb ft 2020 N m 1489 9 lb ft 1111 N m 819 4 lb ft 1818 N m 1340 9 lb ft ZEIL06CS0136F0A 2 47956065 17 05 2016 13 ...

Page 23: ...INTRODUCTION ZEIL06CS0135F0A 3 47956065 17 05 2016 14 ...

Page 24: ...tion Application of grease or other lubricants to hydraulic connectors should be avoided If clean hydraulic oil is already on the connection it is not required to remove the oil Generally application of grease May cause a significant change in the torque required to properly tighten the connection May reduce the connection s resistance to vibration Excessive grease may displace an elastomer seal d...

Page 25: ... 7 220 162 3 132 97 4 M48 x 2 440 324 5 264 194 7 273 201 4 164 121 M60 x 2 525 387 2 315 232 3 330 243 4 198 146 S Series connectors are used with O Ring Face Seals ORFS L Series connectors are used with 37 flare Torque values for metric O Ring Boss ORB port plugs Ferrous Non ferrous Metric thread Internal hex N m lb ft 10 External hex N m lb ft 10 N m lb ft 10 M8 x 1 8 5 6 3 10 5 7 7 6 3 4 6 M10...

Page 26: ... Face Seals ORFS L Series connectors are used with 37 flare Torque values for metric port connections Metric face seal ports and stud ends Metric tube Outside Diameter OD mm in Ferrous Non Ferrous Metric thread S Series L Series S Series N m lb ft 10 L Series N m lb ft 10 S Series N m lb ft 10 L Series N m lb ft 10 M10 x 1 4 0 157 21 15 5 12 5 9 2 M12 x 1 5 4 0 157 6 0 236 47 34 7 32 23 6 28 20 7 ...

Page 27: ... Series connectors are used with O Ring Face Seals ORFS L Series connectors are used with 37 flare Torque values for inch O Ring Boss ORB port adjustable connections S Series L Series SAE dash size UN UNF thread size Inch tube OD mm in Ferrous N m lb ft 10 Non Ferrous N m lb ft 10 Ferrous N m lb ft 10 Non Ferrous N m lb ft 10 2 5 16 24 3 18 0 125 8 5 6 3 5 3 7 3 3 8 24 4 76 0 187 10 5 7 7 9 3 6 9 ...

Page 28: ...4 25 1 M8 x 1 25 34 25 1 19 3 4 M10 x 1 5 74 54 6 M10 x 1 5 74 54 6 25 1 M10 x 1 5 74 54 6 M12 x 1 75 137 101 M12 x 1 75 137 101 32 1 1 4 M10 x 1 5 74 54 6 M14 x 1 5 189 139 4 38 1 1 2 M12 x 1 75 137 101 M16 x 2 310 228 6 51 2 M12 x 1 75 137 101 M20 x 2 5 575 424 1 64 2 1 2 M12 x 1 75 137 101 M24 x 3 575 424 1 76 3 M16 x 2 310 228 6 M30 x 3 5 680 501 5 89 3 1 2 M16 x 2 310 228 6 102 4 M16 x 2 310 ...

Page 29: ...10 228 6 127 5 5 8 11 310 228 6 Tapered thread connection tightening British Standard Pipe Taper BSPT thread size inch National Pipe Thread Fuel NPTF thread size inch Turns from finger tight 1 8 28 1 8 27 2 3 1 4 19 1 4 18 2 3 3 8 19 3 8 18 2 3 1 2 14 1 2 14 2 3 3 4 14 3 4 14 2 3 1 11 1 11 1 2 1 5 2 5 1 1 4 11 1 1 4 11 1 2 1 5 2 5 1 1 2 11 1 1 2 11 1 2 1 5 2 5 2 11 2 11 1 2 1 5 2 5 Torque values f...

Page 30: ...e connection instead of O Ring Face Seals ORFS sizes 16 and up Torque values for 37 flare connections Joint Industry Council JIC SAE dash size UN UNF thread size Metric tube OD mm Inch tube OD mm Swivel nut torque N m lb ft 10 2 5 16 24 3 18 8 25 6 1 3 3 8 24 4 76 11 5 8 5 4 7 16 20 6 6 35 15 5 11 4 5 1 2 20 8 7 94 20 14 8 6 9 16 18 10 9 52 25 18 4 8 3 4 16 12 12 7 52 38 4 10 7 8 14 16 15 88 81 59...

Page 31: ...of the bearing surfaces the adequacy of lubrication and the frequency and degree of articulation between pins and bushings The latter is determined by the quantity of sprockets in the drive their speeds the number of teeth and the length of the chain in pitches ZEIL10GH0015A0A 2 Measurement of Chain For Wear Elongation Relatively accurate wear measurements can be made by using the above illustrati...

Page 32: ...6 in 1143 mm 45 0 in 1177 mm 46 3 in 1524 mm 60 0 in 1568 mm 61 7 in 70P 889 mm 35 0 in 914 mm 36 0 in 1111 mm 43 7 in 1144 mm 45 0 in 1333 mm 52 5 in 1371 mm 54 0 in 1778 mm 70 0 in 1828 mm 72 0 in 80P 1016 mm 40 0 in 1047 mm 41 2 in 1270 mm 50 0 in 1308 mm 51 5 in 1524 mm 60 0 in 1568 mm 61 7 in 2032 mm 80 0 in 2095 mm 82 5 in 90P 1143 mm 45 0 in 1177 mm 46 3 in 1428 mm 56 2 in 1473 mm 58 0 in 1...

Page 33: ...nd press down using a flat punch or seal installation tool Do not tap the seal with a hammer or mallet 6 While you insert the seal check that the seal is perpendicular to the seat When the seal settles make sure that the seal makes contact with the thrust element if required 7 To prevent damage to the seal lip on the shaft position a protective guard during installation operations O ring seals Lub...

Page 34: ...battery ground cable from the machine battery The electronic monitoring system and charging system will be damaged if this is not done 5 Remove the battery ground cable Reconnect the cable when you complete welding WARNING Battery acid causes burns Batteries contain sulfuric acid Avoid contact with skin eyes or clothing Antidote external Flush with water Antidote eyes flush with water for 15 minut...

Page 35: ... 0 0 28 Bu 1 Bu 35 23 litre 1 litre 1 057 US quart 1 US quart 0 9464 litre 1 cm cc 0 061 in 1 in 16 38 cm cc 1 m 35 31 ft 1 ft 0 028 m 1 ml 0 033 US fl oz 1 US fl oz 29 57 ml Mass 1 kg 2 204 lb 1 lb 0 4536 kg Torque 1 N m 0 7376 lb ft 1 lb ft 1 3558 N m Power 1 kW 1 358 Hp 1 Hp 0 746 kW Pressure 1 bar 100 kPa 1 bar 14 505 psi 1 psi 0 06894 bar Temperature 1 C 1 8 x C 32 F 1 F 0 56 x F 32 C Flow 1 ...

Page 36: ... the destination and specification additional data is given e g weight year of manufacture etc The Product Identification Number PIN of the combine and the engine can be found on the following locations Base unit On a plate 1 positioned on the frame rail below the right hand side of the operator s platform 93103469 1 Engine Cursor 9 On a plate at the top left side of engine 1Z0R200909ZEIL0 2 Curso...

Page 37: ...INTRODUCTION On a plate 1 on the breather cover 93094775 4 On a plate on the engine block 86063483 5 47956065 17 05 2016 28 ...

Page 38: ...SERVICE MANUAL Engine CR10 90 TIER 4B 1947 CR8 90 TIER4A 1946 CR9 90 TIER 4A 1947 CX8 80 TIER 4B 1957 CX8 90 TIER 4A 1962 47956065 17 05 2016 10 ...

Page 39: ...0 216 Fuel tanks 10 2 10 254 Intake and exhaust manifolds and muffler 10 3 10 500 Selective Catalytic Reduction SCR exhaust treatment 10 4 10 400 Engine cooling system 10 5 10 418 Rotary screen 10 6 10 450 Engine air compressor 10 7 47956065 17 05 2016 10 ...

Page 40: ...Engine 10 Engine and crankcase 001 CR10 90 TIER 4B 1947 CR8 90 TIER4A 1946 CR9 90 TIER 4A 1947 CX8 80 TIER 4B 1957 CX8 90 TIER 4A 1962 47956065 17 05 2016 10 1 10 001 1 ...

Page 41: ...gine 10 Engine and crankcase 001 SERVICE Engine Remove 3 Remove 12 Remove 28 Install 44 Install 52 Install 67 DIAGNOSTIC Engine Troubleshooting 82 See content for specific models 47956065 17 05 2016 10 1 10 001 2 ...

Page 42: ...Main gearbox and drive Remove 14 100 Place a suitable container 1 below the coolant drain hose 2 NOTE Depending on model the cooling system has a coolant capacity between 50 60 l 13 2 15 9 US gal Be sure to use clean containers with adequate capacity when draining the cooling system 10013105_780 1 2 Refer to Expansion tank Remove 10 400 for the coolant fluid drain and removal of the engine coolant...

Page 43: ... stair assembly Disconnect the shock absorber 1 from the engine cover 2 ZEIL09CR0246A0B 4 6 Remove the two retaining rings 1 washers 2 and hinge pins 3 from the engine cover Remove the engine cover from the combine ZEIL09CR0247A0B 5 7 Refer to Exhaust muffler Remove 10 254 for re moval of the exhaust pipe 8 Loosen the hardware 1 and remove the support 2 9 Loosen the clamps 3 from the air inlet pip...

Page 44: ...oved disconnected loosen the coupler 6 from the air compressor ZEIL09CR0250A0B 8 12 Loosen the coupler 1 and disconnect the fuel line 2 from the ECU cooler Loosen the coupler 4 and disconnect the fuel hose towards the injection pump from the fuel line 5 Loosen and remove the clamp 3 13 Loosen and disconnect the compressed air tube 7 at the connector 6 Loosen and remove the clamp 8 ZEIL09CR0251A0B ...

Page 45: ...itioning lines or hoses during compressor removal as serious in jury could result 19 Remove the mounting bolts and nuts 2 from the air conditioning compressor 3 Remove the compressor from the engine and tie the assembly out of the way 10013117 12 20 From inside the grain tank loosen the mounting nuts on the carriage bolts 1 and turn the rotary screen drive pulley adjusting bolt 2 counter clockwise...

Page 46: ... rotary screen door and discon nect the rotary screen brush electrical connector 1 10013132 16 24 Feed the connector and wire loom 1 and grommet 2 through the hole in the radiator frame Secure the wire loom and connector to the engine to prevent damage during removal NOTE Removal of the rubber grommet in the radiator frame hole may be necessary to remove the radiator screen brush electrical connec...

Page 47: ... engine wire har ness 2 from the gearbox wire harness 3 Secure each harness to prevent damage during en gine removal 10013126 19 27 Loosen the hose clamp 1 and disconnect the rear heater hose 2 from the engine 10013127 20 28 Loosen the hose clamp 1 and disconnect the front heater hose 2 from the engine 10013128 21 47956065 17 05 2016 10 1 10 001 8 ...

Page 48: ...bracket 2 10013129 22 30 Remove the banjo bolt 1 from the engine oil pan 2 Disconnect the oil hoses 3 and plug the hole in the oil pan 2 10010863 23 31 Loosen and remove the nut 1 Disconnect the main starter cable 2 from the starter solenoid 3 10013130 24 47956065 17 05 2016 10 1 10 001 9 ...

Page 49: ...33 Connect the lift chain to a suitable lifting device Raise the lifting device enough to support the engine during removal of the engine mounting bolts 10013136 26 34 Loosen the two front engine mounting bolts 1 and nuts 2 on each side of the engine Do not remove the mounting bolts at this time 10013137 27 47956065 17 05 2016 10 1 10 001 10 ...

Page 50: ...engine Do not remove the mounting bolts at this time With the engine securely supported by the lifting de vice remove all of the engine mounting bolts loosened in the previous steps Carefully lift the engine from the frame and remove from the combine 10013138 28 47956065 17 05 2016 10 1 10 001 11 ...

Page 51: ...This as a preview PDF file from best manuals com Download full PDF manual at best manuals com ...

Reviews: