


NeurOptics® PLR®-3000 Pupillometer System—Instructions for Use © 2018 NeurOptics, Inc.
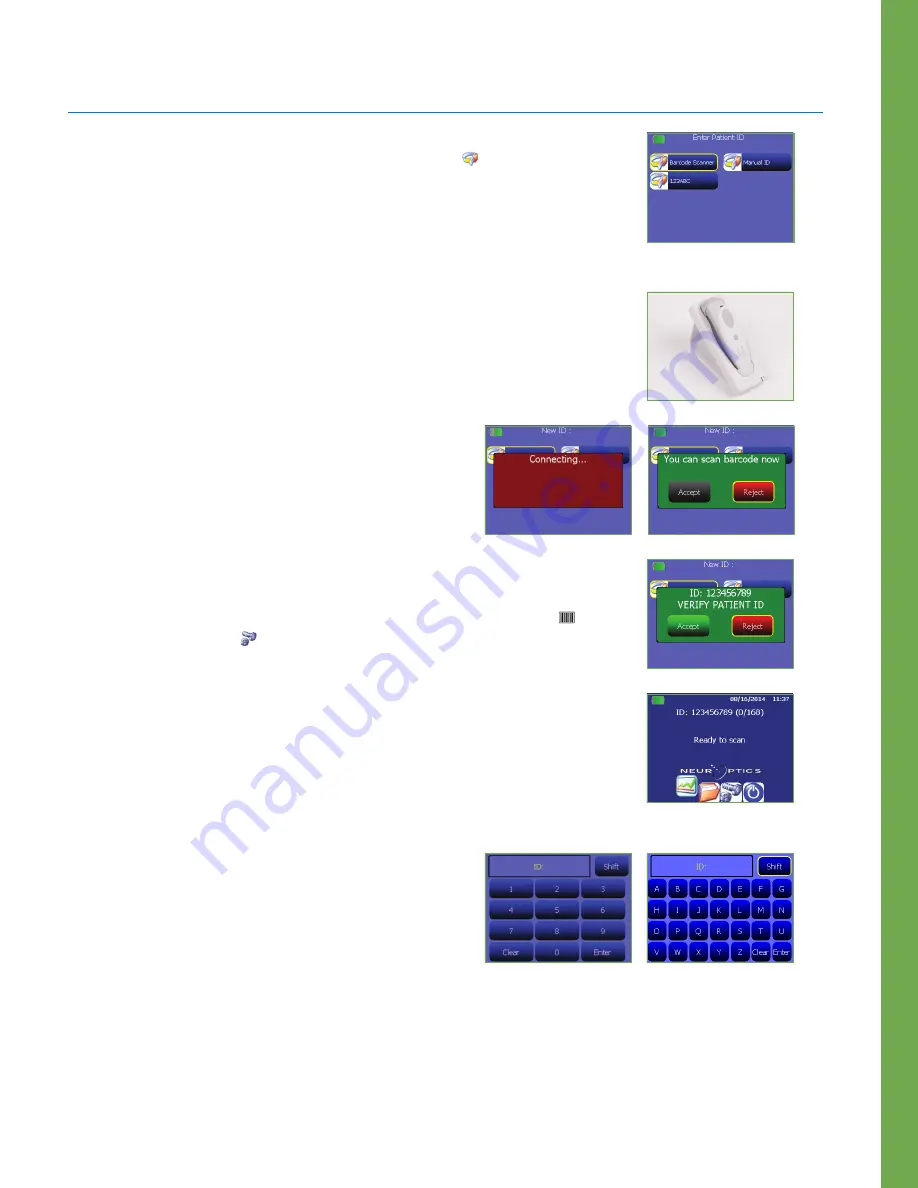
Enter a new Patient ID
Patient ID is reported in the main screen (Ex. 3) and it enables recall of patient data.
To assign a new Patient ID, from the main screen select icon and then select either
Barcode Scanner
or
Manual ID
to indicate the patient ID entry method to be used (Ex. 7).
In case other ID numbers are included in the PLR®-3000 database stored in memory,
these will be listed in the same window (e.g. ID=123ABC, Ex. 7) and they can be
immediately re-entered.
Pairing the PLR-3000 to the NeurOptics Antimicrobial Barcode Scanner
Connect the NeurOptics Antimicrobial Barcode Scanner and Charging Cradle to the
power supply and plug into a power outlet (Ex. 8). Turn on the Barcode Scanner until
an audible beep is heard and a blue light on the device flashes. Position the
Barcode Scanner
next to the PLR-3000.
On the PLR-3000, select Barcode Scanner. The PLR-3000 will
display
“Connecting...”
on the touchscreen (Ex. 9). Once
successfully paired, the touchscreen will prompt when the
device is ready to scan the patient ID barcode (Ex. 10).
The patient ID will now appear on the PLR-3000 touchscreen. Confirm the patient
information is correct and select
Accept
(Ex. 11). Use
Customize ID
function
in the Settings menu (icon from the main screen) to customize the barcode
reading (for example if only a part of the barcode has to be reported).
The PLR-3000 will display the patient ID number and read
“Ready to scan”
(Ex. 12).
Manual Entry of the Patient ID
Press
Manual ID Entry
. Using the touchscreen, press the
Patient ID
.
Select
Shift
to toggle from alpha to numeric as required. When
the patient ID number has been manually entered, check for
accuracy and press
Enter
(Ex. 13 & 14).
Ex. 7
Ex. 13
Ex. 12
Ex. 9
Ex. 8
Ex. 10
Ex. 11
Ex. 14
3