background image

www.networktv.tv 


NTVJX1700 User Guide 1-0 

21 


6. IP Camera parameter setup 

6.1 Homepage introduction 

Menu’s 

All of the pages contain 2 menu bars, navi-

gation and camera control on the left hand 

side and the settings page details on the 

right.  


Live 

Click the “Live” tab and it will provide a real 

time video image to help with camera posi-

tioning and parameter setup 


A. Video viewing window 

Video viewing window must be same as video reso-

lution, the bigger the resolution is, the bigger the 

playing area is. Double click viewing window, will 

show full-screen, double click again, will return to 

the initialized size. 


The Status Bar in the viewing window shown as be-

low. 


1) Video playback pause button: control  

real-time video pause, stop the last picture, click to 

restart the video again. 

2) Audio control buttons: can set mute mode. 

3) Full screen switch button. 
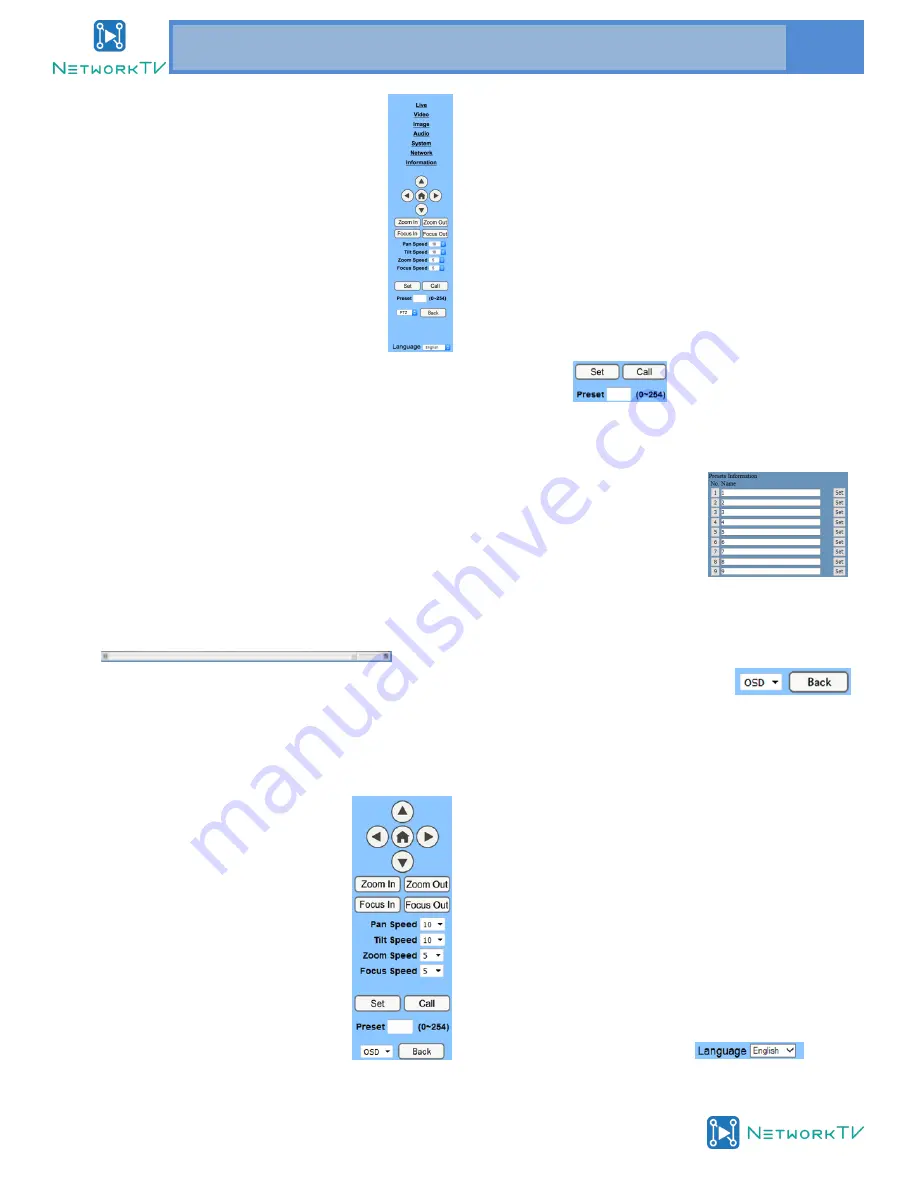
 

B. PTZ Setup 

1) PTZ direction control box: Up, down, 

left, right, home button as shown right. 

2) Rate: Vertical speed can be chosen 

as 1 ~ 24, horizontal direction at the 

rate of 1 ~ 20. 


3) Select corresponding speed and click direction  

button to change PTZ speed up or speed down. 

4) Zoom In/Zoom out: for zooming in or  

zooming out, Focus In/ Focus Out: Focusing on dis-

tant objects or Focusing on close objects. 

5) Set/Call: When you want to set a specific position 

and zoom for the camera, you can set up a preset for 

that position—see below: 


Method 1: Type a number into the Preset box. 


Method 2: Type name into the Preset information. 


Then click the "Set" button. 

When you want the camera to 

return to that preset position, 

click the relevant "Call" button 

or click the relevant preset number ("No."). The cam-

era will then turn back to that preset position. 


6) PTZ Menu: If you select OSD from 

the dropdown, this setting allows 

the user to see the On Screen Display (OSD) menu in 

the video viewing window. Use the PTZ direction con-

trol buttons (up/down arrows to select the menu, 

left/right arrows to modify the submenu and the 

home button as enter). After the menu has been 

modified, select PTZ from the dropdown if you are in 

the main menu, it will save the setting and exit auto-

matically. Otherwise, return to the previous menu by 

clicking the Back button (effective only in the sub-

menu).  

PTZ :  system in PTZ mode. 


C. Language selection 

Chinese/English/Russian 

Summary of Contents for NTVJX1700

Page 1: ...N E T W O R K T V NTVJX1700 User Guide USB IP telephone 44 0 333 335 5019 email info networktv tv web www networktv tv Release 1 0...

Page 2: ...0 TABLE OF CONTENTS Preface 3 Notes 4 What s in the Box 4 Quick Start 5 Features 6 Product Specification 7 Main Unit 9 Dimensions 10 IR Remote Controller Explanation 11 Menu Setting 13 Network Functi...

Page 3: ...d engineer Never operate under unspecified temperature humidity and power supply Please use a soft dry cloth to clean the camera If the camera is very dirty clean it with diluted neutral detergent do...

Page 4: ...ra head when carrying the camera Don t turn camera head by hand Doing so may result in mechanical damage Don t apply corrosive liquid gas or solid environment to avoid damaging the cover which is made...

Page 5: ...ww networktv tv NTVJX1700 User Guide 1 0 5 Step1 Please check connections are correct before starting Step2 Power connected to the Camera or use PoE via the RJ45 if your network supports it Quick Star...

Page 6: ...pick up a full range of sounds up to 12 metres The unique noise suppression algorithm provides an excellent clear audio signal Low light The new CMOS image sensor with ultra high noise ratio can effec...

Page 7: ...tudent mode optional IPC Features Video compression H 265 H 264 MJEPG Video Stream Main Stream Sub Stream Stream Resolution 3840x2160 1920x1080 1280x720 1024x576 960x540 640x480 640x360 Product Specif...

Page 8: ...ication cont Generic Specification Input Voltage DC 12V PoE 802 3af optional Current Consumption 0 5A Max Operating Temperature 10 C 40 C 14 F 104 F Storage Temperature 40 C 60 C 40 F 140 F Power Cons...

Page 9: ...www networktv tv NTVJX1700 User Guide 1 0 9 1 Network Interface 2 USB2 0 out 3 Power Interface Main Unit...

Page 10: ...www networktv tv 10 NTVJX1700 User Guide 1 0 Dimensions...

Page 11: ...ssing the Pan Tilt back to the middle position 6 MENU MENU enter or exit OSD MENU 7 Zoom Buttons Slow Zoom Zoom In or Zoom Out slowly Fast Zoom Zoom In or Zoom Out fast 8 Pan Tilt L R set Press with 1...

Page 12: ...s Press arrow buttons to perform panning and tilting Press HOME button to face the cam era back to front 15 Back buttons Press the OSD menu return to the superior 9 Quickly set up inversion 16 BLC Bac...

Page 13: ...RE menu appears as shown in the following figure Mode Exposure mode Optional items Auto Manual SAE AAE Bright ExpCompMode Exposure compensation mode Op tional items On Off Effective only in Automode E...

Page 14: ...00 1 6000 1 10000 Effective only in Manual SAE mode 3 COLOUR Move the cursor to the Colour item in the main menu and press home button COLOUR menu appears as shown in the following figure WB Mode Whit...

Page 15: ...s adjustment Optional items 0 14 Contrast Contrast adjustment Optional items 0 14 Sharpness Sharpness adjustment Optional items Auto 0 15 Flip H Image flipped horizontally Optional items On Off Flip V...

Page 16: ...sor to the Setup item in the main menu and press home button SETUP menu ap pears as shown in the following figure Language menu language Optional items EN Chinese Protocol Optional items VISCA PELCO D...

Page 17: ...menu and press home button RE STORE DEFAULT menu appears as shown in the following figure Restore Confirm restore factory settings Optional items Yes No Note Press HOME button to confirm All parameter...

Page 18: ...f the 2 ways shown in pictures 1 1 and 1 2 below Picture 1 1 connect by network cable Picture 1 2 Connect by router switch 4 IP camera controlled over LAN 4 1 Set up IP address The camera default IP a...

Page 19: ...this is the first time this camera has been accessed via a network you will need to install media player software such as VLC Please go to the Videolan web site http www videolan org vlc and download...

Page 20: ...for this the access url should be http youdomain 3322 org 554 NOTE If the camera s port default is 80 then it is not nec essary to input the port number the host name can access the camera directly 5...

Page 21: ...responding speed and click direction button to change PTZ speed up or speed down 4 Zoom In Zoom out for zooming in or zooming out Focus In Focus Out Focusing on dis tant objects or Focusing on close o...

Page 22: ...must combine with the available network bandwidth when the network bandwidth is too narrow and the allocated bit flow is too big it will cause the video signal to be compro mised and not transmitted...

Page 23: ...ck Default it will revert to original camera fefault set tings 6 4 Audio Setup 1 Audio Type Audio type AAC 2 Sample rate Sample rate 44 1K and 48K 3 Bit rate Bit rate 96K 128K 256K 4 Input Type Line i...

Page 24: ...communication protocol in clude Visca address Pelco D address Pelco P address 4 RTMP Setting Setting the camera stream can set up two stream in the two stream selection control code stream of On Off V...

Page 25: ...e to powerful electromagnetic radiation such as TV or radio transmitters etc Troubleshooting Image No image 1 Check whether the power cord is connected voltage is OK POWER lamp is light 2 Check whethe...

Page 26: ...hecklist below if you are unable to access IP camera web pages via a browser 1 Access the network with a PC and test whether you can access the camera via a Ping test You may have a firewall issue or...

Reviews: