background image

www.networktv.tv 


NTV75H User Guide 1-0 


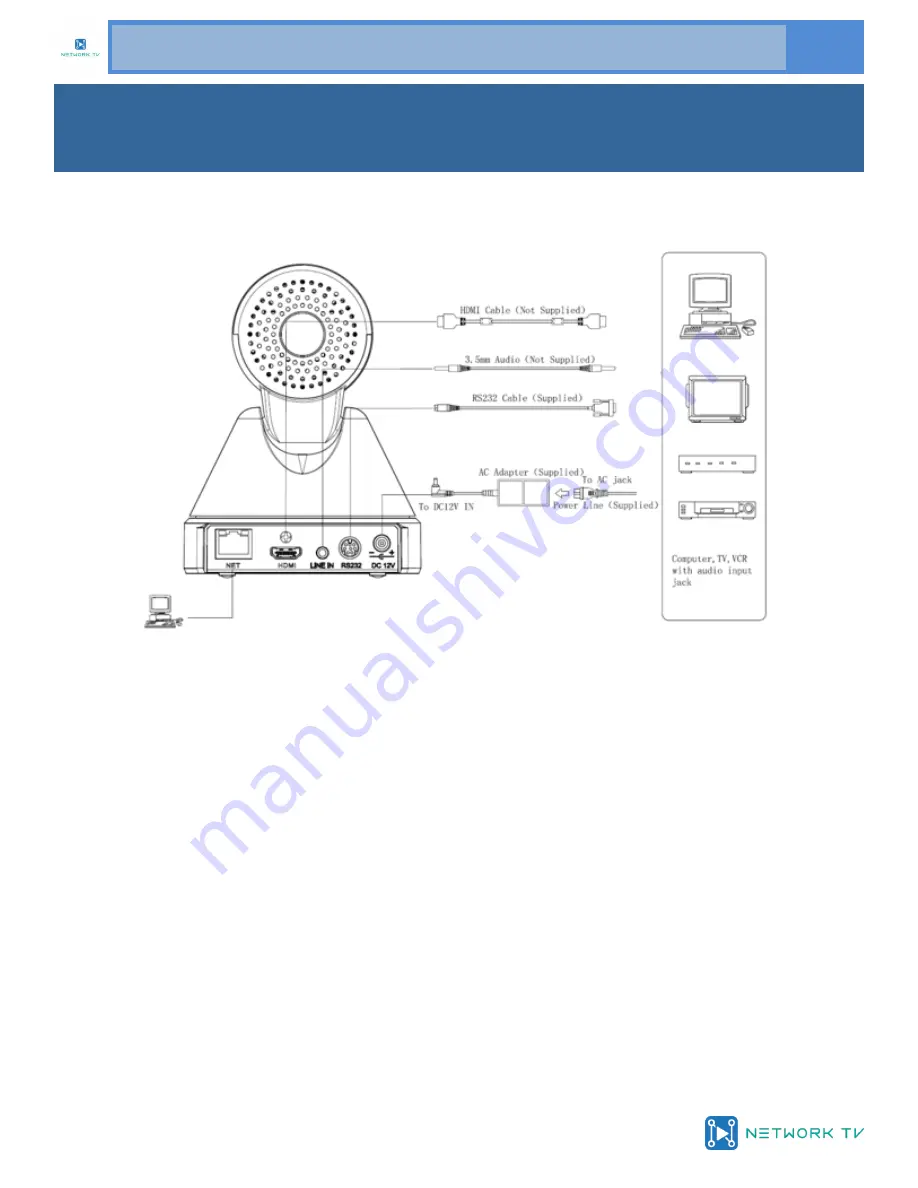
Step1: Please check connections are correct before starting 


Step2: Power connected to the Camera, the front panel power lamp is lit. 
 
Step3: Pan-Tilt will rotate to the maximum position of top right after the camera is started, then it will return 
to the centre, the process of initialisation is then complete. (Note: If the position preset 0 has been stored, 
the position preset 0 will be called up after initialisation). 

Quick Start 

Summary of Contents for NTV75H

Page 1: ...N E T W O R K T V NTV75H User Guide HDMI IP Phone 44 0 1425 650697 E Mail info networktv tv Web www networktv tv Release 1 0...

Page 2: ...4 What s in the Box 4 Quick Start 5 Features 6 Product Specification 7 IR Remote Controller Explanation 9 RS 232 Interface 11 VISCA Network Configuration 12 Serial Communication Control 13 Command Lis...

Page 3: ...ngineer Never operate under unspecified temperature humidity and power supply Please use a soft dry cloth to clean the camera If the camera is very dirty clean it with diluted neutral detergent do not...

Page 4: ...en carrying the camera Don t turn camera head by hand Doing so may result in mechanical damage Don t apply corrosive liquid gas or solid environment to avoid damaging the cover which is made of plasti...

Page 5: ...mera the front panel power lamp is lit Step3 Pan Tilt will rotate to the maximum position of top right after the camera is started then it will return to the centre the process of initialisation is th...

Page 6: ...lens supports 5x optical zoom and 16x digital zoom AAC Audio Encoding Support AAC audio encoding better sound quality and smaller bandwidth HD Interface Supports HDMI output effective transmission dis...

Page 7: ...mpensation Support Digital Noise Reduction 2D 3D Digital Noise Reduction Video S N 55dB Horizontal Angle of View 83 7 20 Vertical Angle of View 52 4 11 7 Horizontal Rotation Range 170 Vertical Rotatio...

Page 8: ...ional Current Consumption 1 0A Max Operating Temperature 10 C 40 C 14 F 104 F Storage Temperature 40 C 60 C 40 F 140 F Power Consumption 12W Max MTBF 30000h Size 128 5x118x156 2mm Net Weight 0 9 Kg Fi...

Page 9: ...ing the Pan Tilt back to the middle position 6 MENU MENU enter or exit OSD MENU 7 Zoom Buttons Slow Zoom Zoom In or Zoom Out slowly Fast Zoom Zoom In or Zoom Out fast 8 Pan Tilt L R set Press with 1 b...

Page 10: ...ect will become dark In this case press the backlight ON OFF button To cancel this func tion press the backlight ON OFF button 17 Pan Tilt reset Preset Pan Tilt self test 18 Image freezing function Ma...

Page 11: ...www networktv tv NTV75H User Guide 1 0 11 RS 232 Interface...

Page 12: ...www networktv tv 12 NTV75H User Guide 1 0 VISCA Network Configuration...

Page 13: ...e If the position preset 0 has been stored the position preset 0 will be called up after initialization Then the users can control the camera with com mands in the command list PTZ over TCP UDP Realiz...

Page 14: ...E menu appears as shown in the following figure Mode Exposure mode Optional items Auto Manual SAE AAE Bright ExpCompMode Exposure compensation mode Op tional items On Off Effective only in Automode Ex...

Page 15: ...0 1 6000 1 10000 Effective only in Manual SAE mode 3 COLOUR Move the cursor to the Colour item in the main menu and press home button COLOUR menu appears as shown in the following figure WB Mode White...

Page 16: ...ly Optional items On Off Flip V Image Flip Vertical Optional items On Off B W Mode Image color Optional items On Off Gamma Optional items Default 0 45 0 5 0 56 0 63 Style Optional items Norm Clarity B...

Page 17: ...ic bad points Optional items Off 1 5 7 SETUP Move the cursor to the Setup item in the main menu and press home button SETUP menu ap pears as shown in the following figure Language menu language Option...

Page 18: ...ional items On Off When set to On useless in 88 30 01 FF Command Net Mode Set the serial port control networking Optional items Serial Paral Baudrate Serial port baud rate Optional items 2400 4800 960...

Page 19: ...n in pictures 1 1 and 1 2 below Picture 1 1 connect by network cable Picture 1 2 Connect by router switch 4 IP camera controlled over LAN 4 1 Set up IP address The camera default IP address is 192 168...

Page 20: ...is is the first time this camera has been accessed via a network you will need to install media player software such as VLC Please go to the Videolan web site http www videolan org vlc and download an...

Page 21: ...r this the access url should be http youdomain 3322 org 554 NOTE If the camera s port default is 80 then it is not nec essary to input the port number the host name can access the camera directly 5 3...

Page 22: ...esponding speed and click direction button to change PTZ speed up or speed down 4 Zoom In Zoom out for zooming in or zooming out Focus In Focus Out Focusing on dis tant objects or Focusing on close ob...

Page 23: ...ust combine with the available network bandwidth when the network bandwidth is too narrow and the allocated bit flow is too big it will cause the video signal to be compro mised and not transmitted no...

Page 24: ...Default it will revert to original camera fefault set tings 6 4 Audio Setup 1 Audio Type Audio type AAC 2 Sample rate Sample rate 44 1K and 48K 3 Bit rate Bit rate 96K 128K 256K 4 Input Type Line in...

Page 25: ...communication protocol in clude Visca address Pelco D address Pelco P address 4 RTMP Setting Setting the camera stream can set up two stream in the two stream selection control code stream of On Off...

Page 26: ...to powerful electromagnetic radiation such as TV or radio transmitters etc Troubleshooting Image No image 1 Check whether the power cord is connected voltage is OK POWER lamp is light 2 Check whether...

Page 27: ...ecklist below if you are unable to access IP camera web pages via a browser 1 Access the network with a PC and test whether you can access the camera via a Ping test You may have a firewall issue or a...

Reviews: