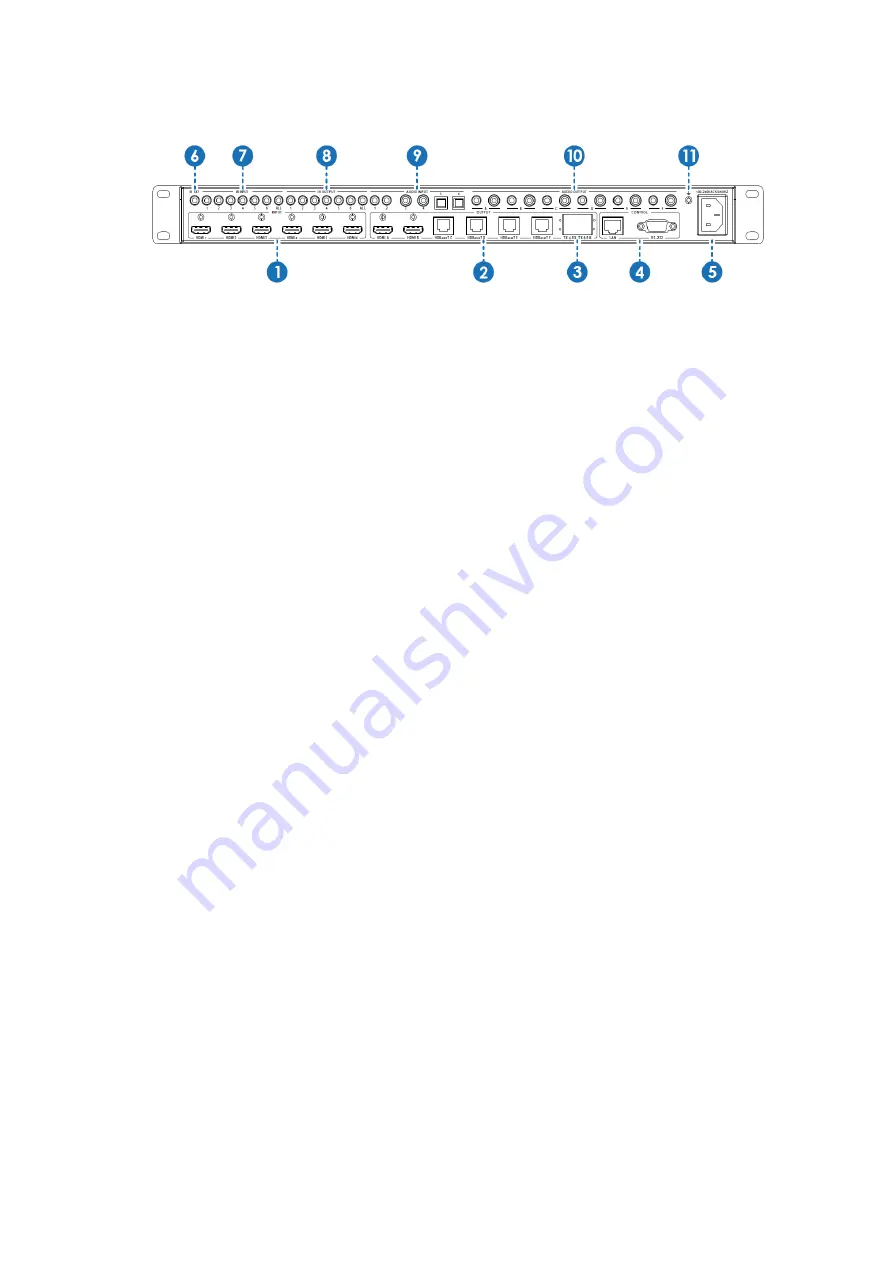
Network Devices ND-66-B70 User Manual Download Page 8


10 

5.2


Rear Panel 


1.


HDMI In:

 Connect to HDMI source devices such as Blu-ray DVD or PS4. 

2.


HDMI and 4 HDBaseT Out: 

2 HDMI out connect to HDMI display devices and 

4 HDBaseT connect to the HDBaseT receivers. 

3.


This is a two-way transmission port. The label C/D/E/F is corresponding to 

HDBaseT C/D/E/F port. When the port connects another device, you can control 

the device through PC from RS-232 port on the receiving end. When the port 

connects PC, you can control far-end device through PC when the device 

connects the RS-232 port on the receiving end.


4.


LAN and RS-232 Control Port:


LAN port is for the TCP/IP control; connect to an active Ethernet link with an 
RJ45 terminated cable. 
RS-232 port connects to a PC or control system with DB9 cable for the 
transmission of RS-232 commands. 
The two ports also can be used for upgrading the matrix firmware. 

5.


AC Power Input: 

Connect to AC power supply.


6.


IR EXT: 

If the unit is installed in a closed area out of infrared line of sight, IR EXT 

port at the rear of unit can extend the matrix control IR by an external IR receiver 
cable.


7.


IR Input: 

Receiving the remote control signal andsending it to Receiver side.


8.


IR Output: 

Sending the remote control signal from Receiver side.


9.


Audio Input: 

Including two 3.5mm analog audio, two coaxial audio and two 

optical audio inputs.


10.


Audio Output: 

Six channels audio output ports, each channel has one 3.5mm 

analog and one mirrored coaxial audio output.


11.


GND Shielding: 

Connect to environment GND for better GND Shielding.


Summary of Contents for ND-66-B70

Page 1: ...3 ND 66 B70 6 6 HDMI 18Gbps over HDBaseT Matrix with Audio Matrixing VER 2 1...

Page 2: ...mmended This product contains sensitive electrical components that may be damaged by electrical spikes surges electric shock lightning strikes etc Use of surge protection systems is highly recommended...

Page 3: ...l button IR RS 232 Telnet and Web GUI 2 Features HDMI 2 0b 18Gbps HDCP 2 2 and DVI compliant Routes 6 HDMI sources to 6 displays including4 HDBaseT outputs and2 independent or mirrored HDMI outputs Su...

Page 4: ...r Depth 10 bit 12 bit HDMI Audio Formats Pass through LPCM 2 5 1 7 1CH Dolby Digital DTS 5 1 Dolby Digital Dolby TrueHD DTS HD Master Audio Dolby Atmos DTS X Audio Formats Optical Coaxial In LPCM 2 5...

Page 5: ...emperature 32 104 F 0 40 C Storage temperature 4 140 F 20 60 C Relative Humidity 20 90 RH no condensation 5 Operation Controls and Functions 5 1 Front Panel 1 OLED Display Displays the information of...

Page 6: ...on finally If success the screen will go back to initial OLED display The EDID table 1 720p Stereo Audio 2 0 2 1080p Stereo Audio 2 0 3 1080p Dolby DTS 5 1 4 1080p HD Audio 7 1 5 1080i Stereo Audio 2...

Page 7: ...own buttons to select which group you want to Recall all save settings from it Pressing the Right button to confirm this operation finally If success the screen will go back to Recall Preset page you...

Page 8: ...with an RJ45 terminated cable RS 232 port connects to a PC or control system with DB9 cable for the transmission of RS 232 commands The two ports also can be used for upgrading the matrix firmware 5 A...

Page 9: ...from matrix IR In 7 RS 232 Connect to PC or third party RS 232 controller to control the matrix or output from matrix s RX 232 C D E F port 8 SERVICE This port is used to upgrade the firmware of recei...

Page 10: ...ogic of the IR matrix follows the video map of the matrix at the same time For example if video HDMI IN1 is selected to HDBaseT Out C the matrix s IR INPUT1 signal can be output from Receiver s IR out...

Page 11: ...including 6 HDMI embedding audio to the HDBaseT and HDMI outputs 6 direct audio breakouts A F In addition Volume Mute Delay for Lip Sync correction are available on all direct audio outputs PCM 2 0 a...

Page 12: ...IP address 192 168 1 100 as default IP b The matrix and the PC on the same network IP segment with network router and the matrix work on the DHCP status You need search IP and click the connect button...

Page 13: ...front OLED panel Menu View IP page Then you should set the IP address of your PC or laptop or mobile device is within the same IP address segment with the matrix After above you can enter the matrix...

Page 14: ...1 6...

Page 15: ...1 7...

Page 16: ...1 8 7 Connection Diagram...

Reviews: