


9
Setup Menu page. You can press the "Up" or "Down" into the PTP Set
page. and press the "Right" to confirm this operation.
If success the screen will go back to PTP Set page, you can press "Left"
button to go back the initial OLED display.
c.
Save Preset
: On the initial OLED display you can press
“
Menu
”
button to
enter Setup Menu page. You can press the "Up" or "Down" buttons into
the Save Preset page, and press the "Right" button into the Save Preset.
There are five groups(Save to #1 or #5),you can press "Up" or "Down"
buttons to select which group you want to save all current settings on it.
Pressing the "Right" button to confirm this operation finally, If successful
the screen will go back to Save Preset page, you can press "Left" button to
go back the initial OLED display.
d.
Recall Preset
:
On the initial OLED display you can press “Menu” button to
enter Setup Menu page. You can press the "Up" or "Down" buttons into
the Recall Preset page. and press the "Right" button into the ReCall Preset.
There are five groups (ReCall #1 or #5), you can press "Up" or "Down"
buttons to select which group you want to Recall all save settings from it.
Pressing the "Right" button to confirm this operation finally. If success the
screen will go back to Recall Preset page, you can press "Left" button to
go back the initial OLED display.
e.
View IP:
On the initial OLED display you can press “Menu” button to enter
Setup Menu page. You can press the "Up" or "Down" buttons into the
View IP page. Pressing the "Right" button to confirm this operation finally.
If success the screen will show the matrix IP address. You can press "Left"
button to go back the initial OLED display.
f.
Selecting Input/output:
On the initial OLED display you can press the
“
Left
”
and
“
R
ight”
buttons to select the output then press the
“
Up
”
and
“
Down
”
buttons to select the input port, then press the
“
Menu
”
button to
confirm this operation.
g.
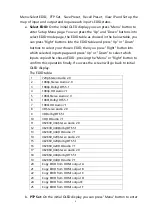
EDID Status:
On the initial OLED display you can press the
“
Up
”
and
“
Down
”
button to check each input
’
s EDID setting, pressing the
“
Menu
”
button go back to the initial OLED display.
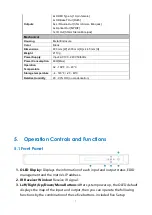
4. Power Button:
This button allows users to power on or standby the matrix.
5.Bi-Colors LED:
The LED indicates the matrix status, Red color indicates the matrix
in standby mode and Green color indicates the matrix under normal working.
Summary of Contents for ND-66-B70
Page 1: ...3 ND 66 B70 6 6 HDMI 18Gbps over HDBaseT Matrix with Audio Matrixing VER 2 1...
Page 14: ...1 6...
Page 15: ...1 7...
Page 16: ...1 8 7 Connection Diagram...


